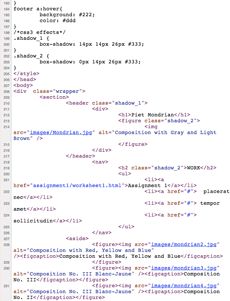
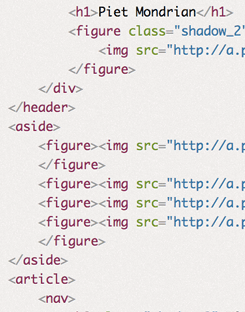
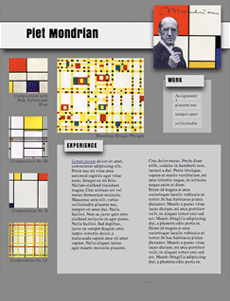
The biggest hurdle when first coming to web design from other design fields is how to relate the process of design to coding. Hand coding is completely different from the design interfaces that you are used to. The intention of this article is to explain how to think about code so that you can design with it.
The design process in Illustrator, InDesign and some aspects of Photoshop allows for the creation and positioning of objects anywhere on the page, and in any order.
Anyone familiar enough with how these programs work will know that behind the scenes, there is a long list of instructions that make up the document.
Code looks like this linear sequence of instructions without the interface. Unless you are familiar with coding, it is hard to tell how code relates to the objects on the page. This makes it difficult to apply your design experience.
What one has to understand is that each of these lines of code is a potential design object, and can be given form.
Preparing the Content: HTML
There are two parts to this process. The first is marking up the content. HTML stands for hypertext markup language. This entails tags, or instructions, for the browser to interpret. These tags are placed at the beginning and the end of each discrete part of the content, like a <h1>for headline, <div> for division, <p>paragraph and <li> for list item. Just to make it confusing, there is also a <header>tag for headers.
For example, a header represents the area of a page, and is designated by using the header tag: <header> Header content </header>A headline has six levels, for the main one, represented by <h1> to the least important, <h6>. The paragraph: <p>paragraph content</p> and the code for a list contains both the ordered list tags and the list item tag, and looks like: <ol><li>list item</li></ol>.
Some tags are replaced by the content they represent. These are self-closing tags. They do not require an end tag. The image tag is replaced by the image itself: <img src="address of picture" alt="description of picture for screen readers, etc."> and the line break tag <br> is replaced by the line break itself. Read about the other HTML tags.
As you can imagine, the first step in the web design process, after all of the design development has taken place, is to mark up all of the content. Once the content has been marked up, it is possible to start giving the content form.
Turning the code into design elements
The opening and closing tags and the content sandwiched between creates an element or object.
All of the content must be marked up in this way and turned into objects before the design process can begin. What looks like lines of code to the uninitiated ends up being many objects, one after the other.
Without intervention, content itself merely follows the default document flow, like a word processor. It starts at the top left hand corner, moves to the right till it runs out of room and then returns to the next line, like this.
Specifying the content in paragraphs forms block level elements that simulates what happens when the return key is hit on an old fashioned typewriter or word processor. It initiates a new paragraph to start below the existing paragraph. All paragraphs stack vertically down the page.
We have just described two ways that content can flow on a page: The horizontal or inline direction is a lot like characters in a line of text. The vertical or block direction has each object come one below the other, like paragraphs.
In coding, this is done by inserting the tag for a paragraph <p> in front of the paragraph and a closing tag </p> at the end of the paragraph. Each paragraph acts just like the paragraphs in a word processor, proceeding vertically down the screen, one below the other.
In Illustrator or InDesign this paragraph could be in its own box and moved anywhere on the screen just by clicking and dragging, independent from all of the other elements or objects. This is also possible by styling the code, which becomes possible to do once you have marked up a document in to discrete elements.
CSS: Giving Form to the Content
CSS stand for cascading style sheets. Giving form to the elements in an HTML document is done by writing rules that specify a quality of the object.

In Indesign, a box is drawn by first selecting the Text Creation Tool and then clicking and dragging the mouse. It can be filled with a paragraph of text.
If it were moved to the lower right hand of the document, that would be reflected in the status boxes of the tool bar, which would provide the distance from the top left corner on the x, or horizontal axis, and the y, or vertical axis. It would also provide the width (W) and height (H) of the box.
Used the mouse to create the box, it might say X: 25p0, Y: 41p8, W: 16p8 and H: 8p4. If it doesn’t, you could tweak the dimensions of the box by changing the numbers in the toolbar.
Clicking and moving the mouse to create code is not an option if you are writing code. There are programs that will change a click-and-drag into objects that you can then move around, but we are learning how to actually do this without the help of such programs.
The same effect is done by writing a rule that specifies that the paragraph is to be absolutely positioned, allowing it to be moved so many pixels along the x and y axis irrespective of whatever else is in the document, and that it should be so many pixels wide and high.
The language used to specify the rule uses properties and values that are similar to the way we speak. We can write the code for that paragraph into the <p> using the style attribute style="position: absolute; left; 300px; top: 500px; width: 200px; height: 100px;". This specifies the paragraph just as Indesign specifies the box using numbers.
I could stroke the box with a 1 point line and add some Inset Spacing in InDesign to keep the content from butting up against the border of the box. Using the Text Frame Options Dialog Box available under the Object Menu in InDesign provides the ability to add Inset Spacing to the top, right, bottom and left.
The same border and inset spacing can be applied to the paragraph by adding the following properties to the rule: border: 1px solid black; padding: 6px;.
It is possible to select words within the paragraph. In Indesign, you select a word and give the command to make it bold. In HTML, you surround the word with inline code <em> like this: <em>word</em>.
You then define a rule that makes the inline selected content bold with the property font-weight: 700; where the weight of a character is determined from 100 to 900 in jumps of 100. It could also be specified by the keywords bold or normal. In the style sheet, the rule would look like: strong {font-weight: 700;}. It should be noted that this does not create font weights, but only specifies fonts that are available to be used.
Though it is possible to write the rules in the element tags themselves, <strong style="font-weight: 700"> that is not a good idea. CSS is designed to apply the rules at a distance. That way, all of the rules that inform how the web page is to look can then be collected in one place, an external style sheet, and all the pages of a web site can reference that external style sheet, and be styled by just one set of rules.
This is done by providing a selector in front of each rule that seeks out the element it is to style. In the example above, the name of the tag itself came before the rule. That way the rule would be applied to all <em> elements wherever they are used in the website.
Putting it All Together

The content is marked up by the hypertext markup language as discrete blocks that can be manipulated by cascading style sheet language.
These blocks can be treated as separate elements or objects, removed from the document flow, the way Illustrator or InDesign treats objects. This is not the way it is usually done, however.
That is because the web requires flexibility. Chances are that a page has to adapt to various formats, from tall and skinny to fat and wide.
To maintain that flexibility, the design elements on the page need to be organized more like a word processor rather than a page layout system used for preparing documents for print.
Think of a child stacking blocks. Now turn those blocks upside down, as if they were staking them onto the ceiling.
Instead of being fixed in their position as they are for print design, they need to be flexible and able to change hale and location, and even what they look like, depending on the context.
The word processor model allows the blocks to reflow depending on the size of the window. The window is called the viewport.
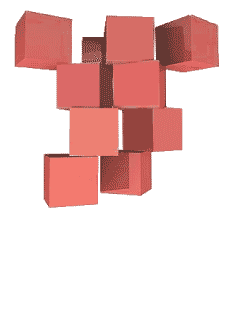
All of the elements originate from the top left hand corder of the page and moves down. They form a chain of boxes that act much like a word processor.
When one word is deleted, the rest of the sentence fills the gap. So it is with the elements in the document flow. This is what is means to be chained together from the top of the document.
Since block elements move downward by default, the challenge is how to move objects horizontally. This is like having two paragraphs next to one another. This can be done by floating one of paragraphs.
There is a lot to learn.
So Where is the Design in designing a Web Page?
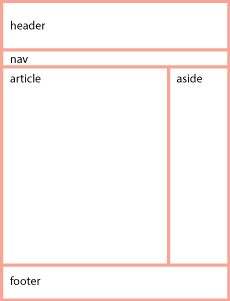
The design of the layout happens before the coding begins. There is little design in the actual creation of the web page. All of the design happens before, just as it does with InDesign.
To be fair, the coding can be likened to preparing an image for print, in which the creative design has already been executed, and now the image is prepared so that it prints correctly.
The process is as follows.
Using paper and pencil to create thumbnails, develop the equivalent of stick figures in a wireframe, and then use photoshop to render it so you have something to aim for when you code. Only then do you start to code.
Coding is more like solving puzzles than designing. Unlike print, the interactivity of web pages requires a continual back and forth between designing the way it looks and coding the design.
We spend two weeks on learning how to mark up documents, two weeks on CSS, and the rest of the semester learning how to use them in a way that is professional and standards compliant.
