Installing the Operating System
- Purchase/obtain a micro SD that is at least 8GB.
- Insert your SD card into a computer (not your raspberry pi).
- Reformat SD card with SD official software available here.
- If you just reformat the card on your computer you might have trouble trouble with your Pi recognizing the SD card.
- Download Noobs from here.
- I tend to download the ‘Offline and network install’ version because it is good to keep on your computer if you need to reinstall at a later date and for whatever reason (maybe you forgot your LAN cable or are not able to connect your Pi to wifi.
- This version does take a long time to download if you are downloading the zip – 20 minutes or so. The torrent is quicker but requires special software like uTorrent.
- Unzip the Noobs file
- Drag the files from the folder named “NOOBS_v2_4_5” (or something similar) into your micro SD.
- Note, your pi will not work if you drag the NOOBS_v2_4_5 folder.

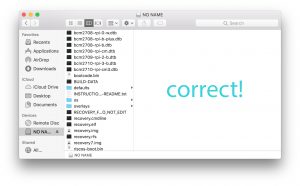
 Here is what your SD card should not and should look like, respectively.
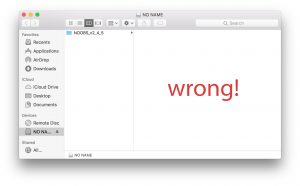

- Safely eject your USB from your computer
- Insert your SD card into your Pi. Attach a screen, mouse, keyboard, and finally power.
- Check Raspbian and then click install.
- The install will take roughly 25 minutes.
- If you are NOT using a UK English keyboard, use this time to change the keyboard setting on the Pi. At the botton click the arrow next to English (UK) and change it to English (US). This should change Keyboard (9): from ‘uk’ to ‘us’. If you forget to do this, you can do it later in raspi-config
- A window will pop up letting you know that the OS was installed successfully.
- Click ‘Ok’ and the Pi will reboot to the GUI.
Initial OS Configuration:
- In the tool bar click the raspberry icon > Preferences > Raspberry Pi Configguartion
- Under the ‘system’ tab, the third item down should be “boot”. Change the radio button from ‘to desktop’ to ‘CLI’
- Click ‘Ok’
- Click raspberry icon > shutdown > reboot
- The Pi should automatically log in. If it does not, use the following information to log in:
- username: pi
- password: raspberry
- type “sudo raspi-config” and press enter
- if the pi did not automatically log in, use your up/down arrows and left/right (for ok/cancel/select/back) to select boot options>Desktop / CLI> Console Autologin
- Select Localisation Options>Change Timezone to change your Pi to the correct time zone.
- Under Localisation Options you can also change the keyboard if you did not do it on install
- Select finish and reboot the Pi
- Change the font on the raspberry pi to fit your screen better. Tutorial Here.
- in the console type “sudo dpkg-reconfigure console-setup” and press enter
- Using the up/down arrow keys select “UTF-8”. Using the right arrow key select “OK” and press ENTER.
- Using the up/down arrow keys select “Guess optimal character set”. Using the right arrow key select “OK” and press ENTER.
- Using the up/down arrow keys select “Terminus”. Using the right arrow key select “OK” and press ENTER.
- if you select “Do not change the boot/kernel font” it will not offer you the option to change the font size.
- Using the up/down arrow keys select a size. Using the right arrow key select “OK” and press ENTER.
- 16×32 is a font size that will be twice the size of the default.
- There will be short delay before you are returned to the command prompt with the new font size.
- There is NO need to “sudo reboot” to see the new font size.
- Connect the Pi to wifi. (based on this tutorial)
- type “sudo nano /etc/network/interfaces” and press enter
- Change this:
allow-hotplug wlan0
iface wlan0 inet manual
wpa-conf /etc/wpa_supplicant/wpa_supplicant.conf
to this:
auto wlan0 allow-hotplug wlan0 iface wlan0 inet dhcp wpa-conf /etc/wpa_supplicant/wpa_supplicant.conf - press control>x to exit then “y” and enter to save
- type “sudo /etc/wpa_supplicant/wpa_supplicant.conf” and press enter
- Add this to the end of the file:
network={ ssid="my network name" psk="my network password" proto=RSN key_mgmt=WPA-PSK pairwise=CCMP auth_alg=OPEN } - press control>x to exit then “y” and enter to save
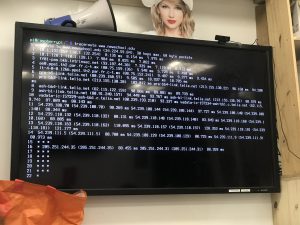
- to check to make sure that the setup worked type one of the following and then press enter:
- traceroute 93.93.128.176
- traceroute www.raspberrypi.org
- If you get a result similar to this you know you are connected.
Installing the Phone Module Software:
- type “sudo apt-get update” and press enter. This will take a couple minutes.
- type “sudo apt-get upgrade” and press enter. When prompted press “y” and then enter. This will take 5-10 minutes.
type “sudo rpi-update”. When prompted press “y” and then enter. This will take a few minutes.this causes an error and i don’t know why and i don’t know how to fix it. do not do this. this link might hold a solution. here basically says do not do this unless you have a specific reason to. so do not do rpi-update!- “apt-get update” updates the rpi firmware to the latest stable version
- restart the Pi by typing “sudo reboot” and pressing enter.
- This tutorial uses the Itead Raspberry Pi GSM Board (SIM800) and follows this tutorial by ModMyPi. There is an alternative here but it has not been tested (as of 26/02/2018).
- This breakout board communicates to the Pi over serial, but the serial ports of the Pi are already in use, so we will need to free up the serial ports.
- type “sudo nano /boot/config.txt” and press enter
- add the following lines to the bottom
-
dtoverlay=pi3-miniuart-bt
enable_uart=1
force_turbo=1
-
- press control>x then press “y” and enter to save.
- add the following lines to the bottom
- type “sudo nano /boot/cmdline.txt” and press enter
- Remove all references of “console=”
- for example in the line reads:
dwc_otg.lpm_enable=0 console=serial0,115200 console=tty1 root=/dev/mmcblk0p2 rootfstype=ext4 elevator=deadline fsck.repair=yes rootwait
Change it to:
dwc_otg.lpm_enable=0 root=/dev/mmcblk0p2 rootfstype=ext4 elevator=deadline fsck.repair=yes rootwait
- Note: this needs to be entirely on one line and the first line of the file. it will error if not.
- press control>x then press “y” and enter to save.
- if you have trouble booting after this stage you probably typed something wrong. You can edit these files by putting your SD card into a computer and finding the respective file in the “boot” drive (as opposed to the “recovery” drive).
- type “sudo nano /boot/config.txt” and press enter
- install minicom by typing “sudo apt-get install minicom” then pressing enter. when promoted if you want to continue type “y” for yes then press enter.
- to enter minicom type:
“minicom -b 9600 -o -D /dev/ttyAMA0” and press enter - test your connection by typing “AT” and pressing enter
- you should receive back an “OK” response.
- If you do not get any response, make sure your SIM card is unlocked (put it into another phone to remove the passcode). Also make sure the power is turned on. The two LEDs near the power key should be lit up. The left should slowly blink to indicate it is connected to the network and the right should be solid.
- test sending a text by typing:
-
AT+CMGF=1
+ enter
- response = OK
-
AT+CMGS="[the number here in quotes]
+ enter
- a right angle bracket will appear type your text message here. any “enters” done here will count as a return in the text. to send the text message press control>z.
- you will receive an OK response.
-
- to exit minicom:
- hit enter. then cntl-A then q then enter to exit minicom.
- to enter minicom type:
Installing the Phone Code:
- check if git is installed by typing “git –version” if it is install it will return which version is install- for example : “git version 2.11.0”
- if git is not installed install it with “sudo apt-get install git”
- clone the myPhone github repository by typing “git clone https://github.com/krismadden/myphone_working.git”
- type “ls” to make sure it installed. you should now see “myphone_working” listed in your folders.
- navigate into the folder by typing “cd myphone_working”
- type “ls” to look at all the files in the folder.
- open the text message python script by typing “python text2.py”