
Final Project: Thermo-chromic Weaving
Inspiration
My thesis collection is all about the –

When designing my collection these were the main factors that I took into consideration. In all aspects of my collection from the silhouettes down to the closures and finishes I played with the colour, size and pattern.

One of key elements of my collection is the woven material and the fringing.


With the skills I have learnt over the weeks I wanted to play with weaving my own fabric from yarns made using themochromic dye so that the colours and pattern would change with the reaction of heat, I am hoping this further exploration will bring a new dimension to my current collection.
Below is a link to other projects that have used themochromic paint and nitinol in relation to fashion
http://wearable.mlog.taik.fi/author/mattiniinimaki/
Part 1 – Dyeing
In this post I am going to show you how to dye wool with thermo-chromic pigment without using hot water.
Materials Needed
- White Wool
- Thermo-chromic pigment: blue, orange, black
- Measuring cylinder
- Cold Water
- Teaspoon
- Mixing Container
- Drying Container
- Kitchen Paper
- Hairdryer
- Blue Ink
- Red Acrylic Paint
- White Acrylic Paint


Before I found the correct method of dyeing the wool I tried several methods. Each time I used the same measurements just adding little alterations each time. So for example I always used a teaspoon of each thermo-chromic pigment and 140ml of water. In my first trial I only used the pigments and cold water, traditionally you should use hot water and this helps the dye pigment to stick to the wool, however I didn’t want to use hot water as it could affect the thermo-chromic pigment’s properties. I also tried microwaving the the yarn to get the dye to take to the fabric. After multiple explorations I managed to find the perfect solution.
The Correct Dyeing Method
Step 1
In 3 separate mixing containers measure out a teaspoon of each thermo-chromic pigment.


Step 2
Add your colorant to the thermo-chromic pigment.
I added a teaspoon of blue ink to the black thermo-chromic pigment.

I added a teaspoon of red acrylic to the blue thermo-chromic pigment.


I added a teaspoon of white acrylic to the orange thermo-chromic pigment.

Step 3
Now add 140ml of cold water to each pigment and colorant and mix eve thing together.

Step 4
Once everything is mixed together you can add your wool to you dye mixture. Make sure all the wool is mixed into the mixture so that the dye can take evenly. I then left the wool in the mixture to soak up for 1day and a half.


Step 5
After I left the mixture soaking, I took the wool out of the mixture and didn’t squeeze out the excess instead I transferred into another container lined with kitchen paper to soak any excess up. I then left it to dry for another day and a half.


Step 6
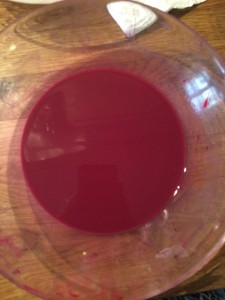
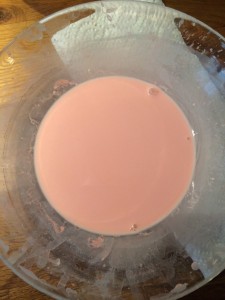
Once dry test out the wool by heating a patch of it with a hair dryer/iron.


Part 2 – Creating a Loom
In this part of the post I will show you how to easily and cheaply make you own loom.
Materials Needed
- Foam Board
- Push pins
- Ruler
- Pencil
Step 1
Take your foam board, ruler and pencil and measure out your frame. I created a rectangular frame with the measurement, 11cm across the width and 15 cm in height. For the 11cm width line I marked a point at every 1 cm on both the top and bottom lines.


Step 2
Where I marked the 1 cm dots I pushed the pins through the foam board. The pins will act as your loom frame.
Tip – if you have problems with the push pins coming out you can always tape them down.


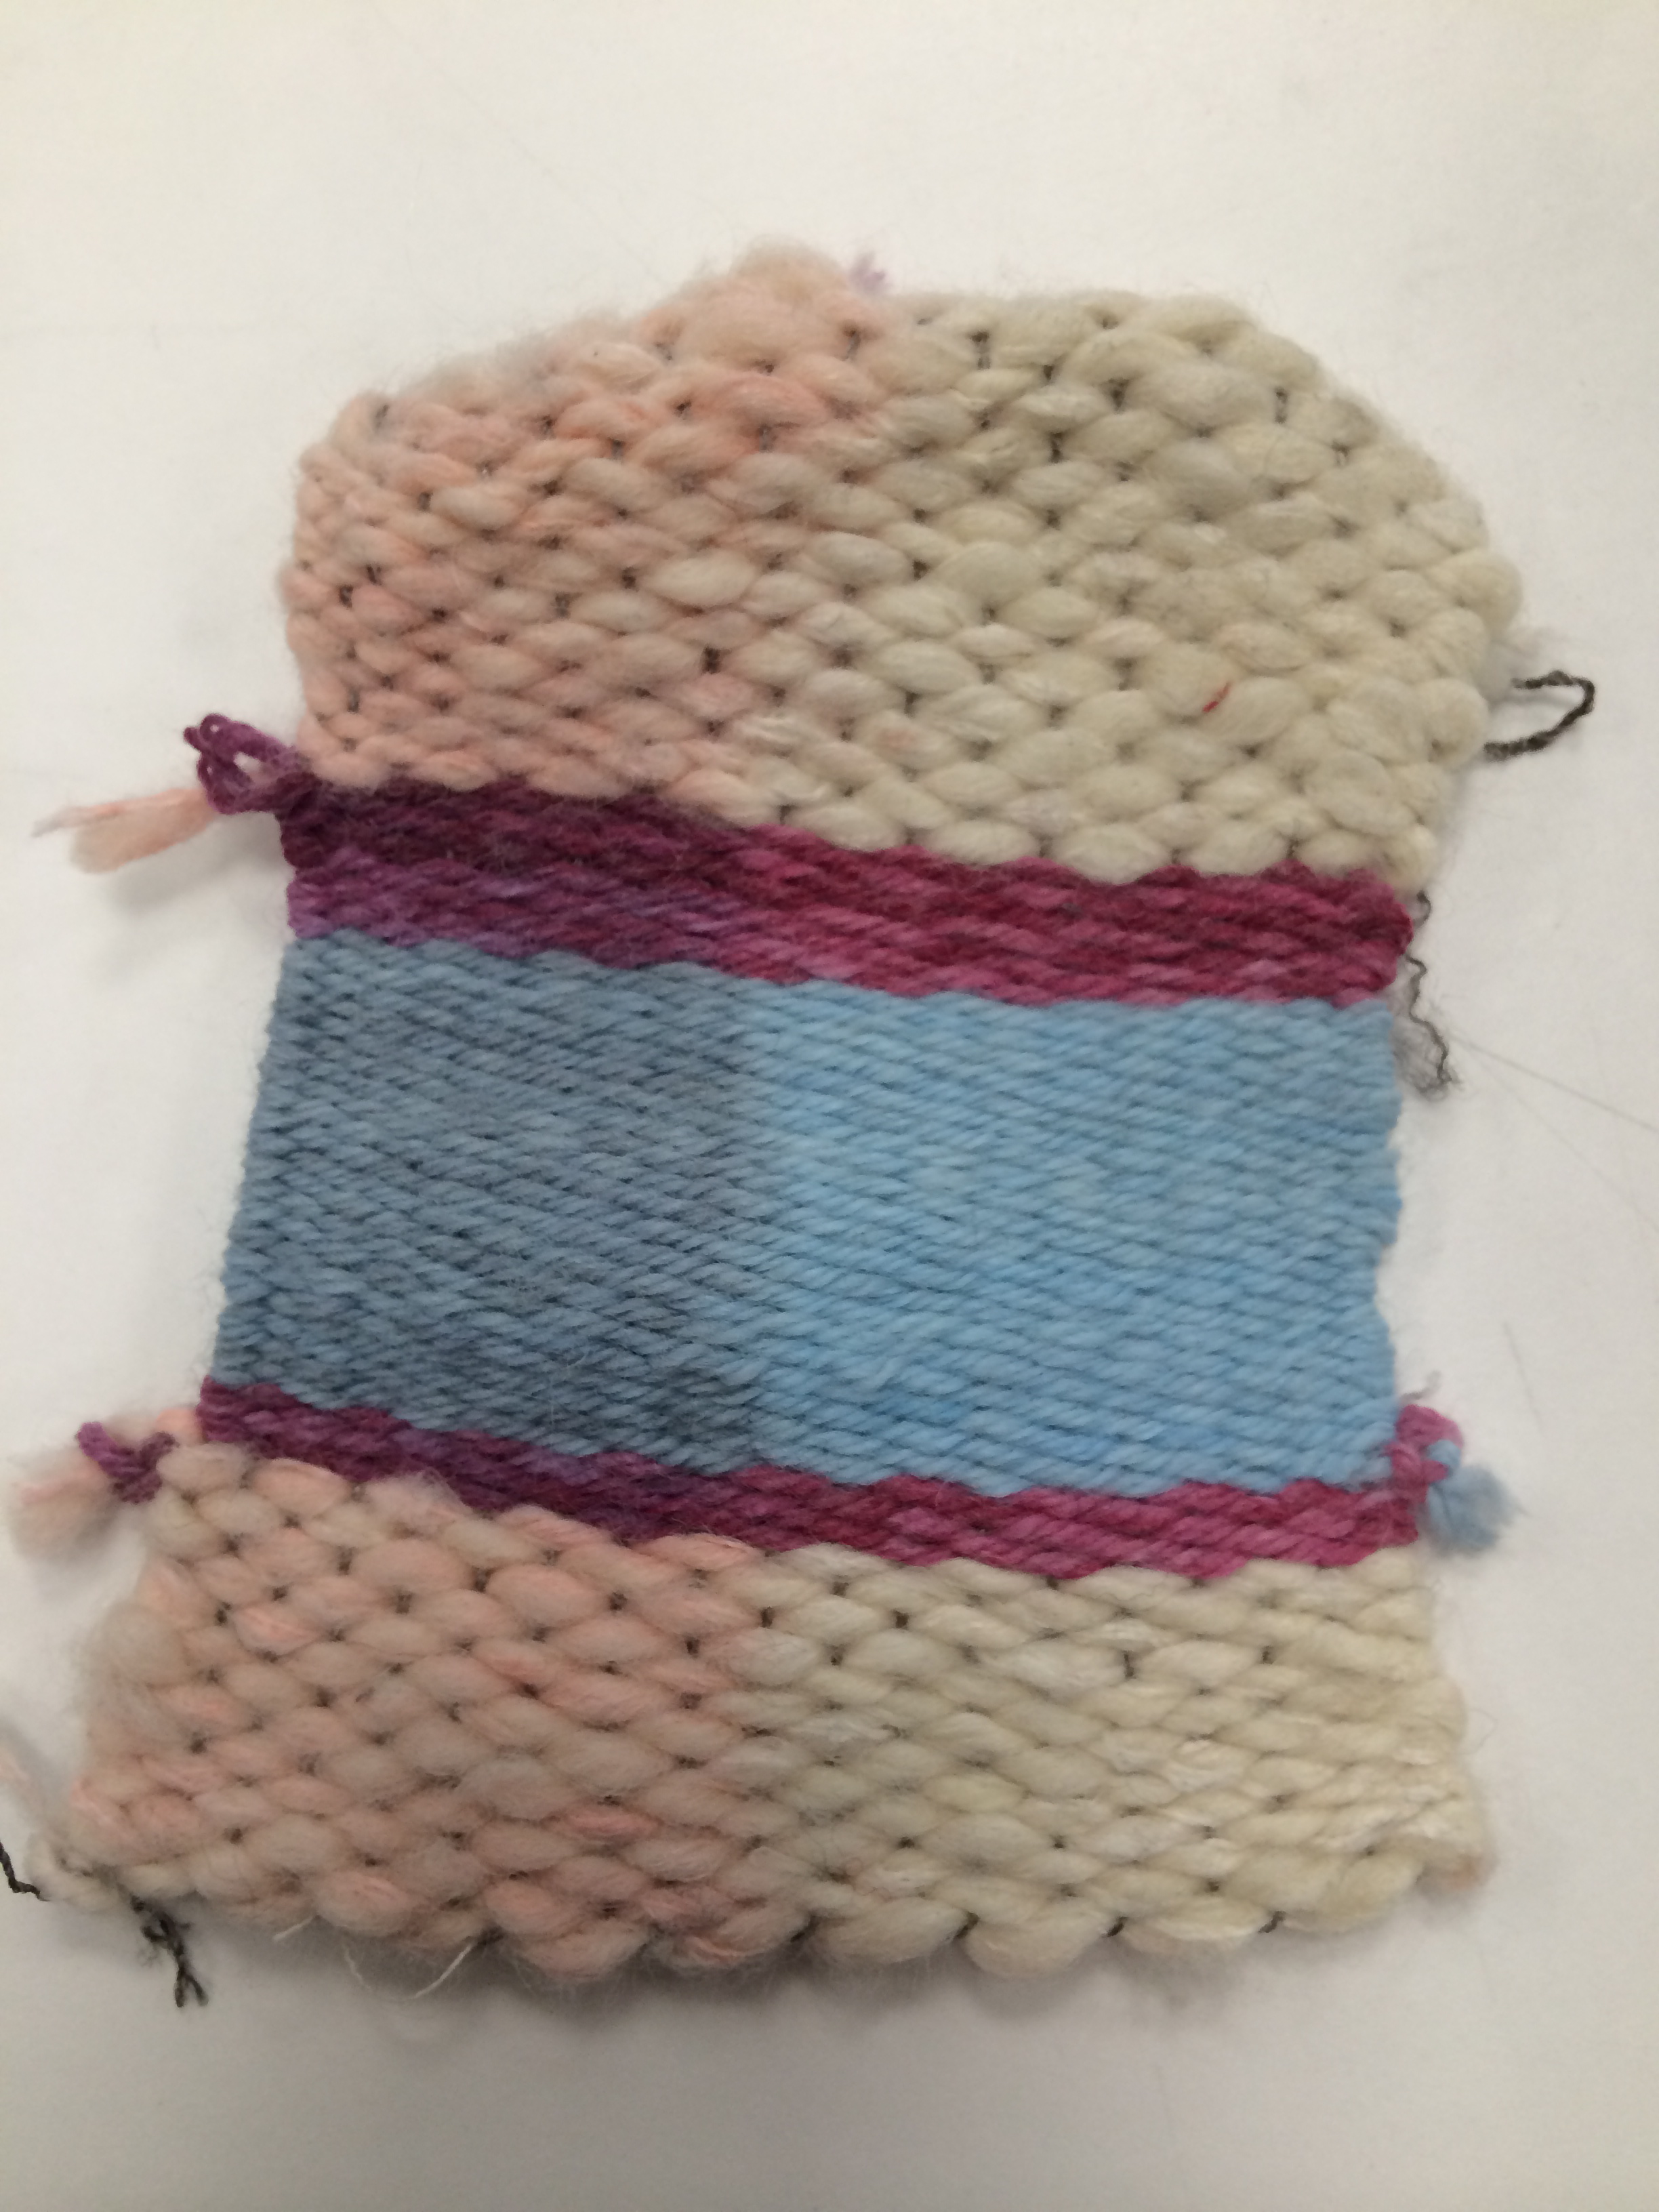
Part 3 Weaving
In this part I will show you how to string up your loom and start weaving.
Materials Needed
- Loom
- Conductive Thread
- Thermo-chromic dyed wool
- Scissors
Step 1
Take your conductive thread and knot around the first push pin on the bottom line, make sure you leave a little extra at the end because you will need this to knot the thermo-chromic wool to the conductive thread.

Step 2
Take the knotted conductive thread and string it up to the corresponding pin on the top width line and loop it around. Then string it down to the next push pin on the bottom width line. Continue this process around all the push pins. When you get to the last push pin knot the conductive thread around the push pin, and again leave a little excess at the end to knot the thermo-chromic wool together.


Step 3
You are now ready to start weaving. To begin you need to attach your thermo-chromic wool to the conductive thread, so you should knot the two together at the first push pin (where you knotted the thread to the push pin).

Step 4
Now you are ready to start weaving. Begin by cutting a length of the wool so you don’t have to weave the whole ball of wool, I cut about 50cm length. You want to take the end of the wool and thread it under the first conductive thread line, then you want to thread it over the second conductive thread line, then under the third and over the fourth. Continue this process till you get to the end. Once you reach the end you continue the same process but backwards, at the end each line you should be looping round the conductive thread. For example if you reach the end and your thermo-chromic wool is under the conductive thread then you need to loop it over that same conductive thread and start the process of under and over again.


Step 5
Changing the colour of the thread. To change you thread you should preferably wait till you get to the end of line and take the colour thread you want and knot the two together and cut the excess off of the wool you are not continuing with. Then continue the process of under and over with the new wool. You can change the colour wool as many times as you want to create different patterns.


Step 6
To end the weaving once you get to the top of the frame you knot the wool to the conductive thread at the las push pin (where you knotted the conductive thread to the push pin). Snip away the excess. then you can un-loop the push pins and your weave is done.


I then tested it out by ironing half the weave sample.
Part 4: Testing
Materials Needed
- Power Supply with crocodile clips
- Weave Sample with conductive thread and thermo-chromic wool
Step 1
Connect one crocodile clip to the beginning of the conductive thread, where you knotted it to the push pin and the other crocodile clip to the end of the conductive thread (again where you knotted it to the push pin). Then plug the power supply into the wall make sure that you start on 3vs and increase the power if you see no colour change.
Important Note – My sample required more voltage then the 12v power supply so I had to move one of the crocodile clips half way through the sample and it worked on 12v.

Part 5 Experimentation
In this part I show you all the different explorations of fabric I dyed and manipulated with the left over thermo-chromic dye solution.
Materials Needed
- Left Over Thermo-chromic dye solution
- White Cotton Thread
- White Wool for Felting
- Container fo Drying
- White Wool Yarn


Step 1
Place all the new materials into the dye solutions, mixing them all around to make sure they are all covered in dye. Again let them soak in the mixture for 1day and half.


Step 2
Once they have been soaking in the mixture for a day and a half take them out and let them dry in another container for 1day and half again.


Step 3
After the experimentation materials had all dried I first decided to try needle felting with the wool.
Part 6; Felting
In this part of the post I will show you how to needle felt two different materials together.
Materials Needed
- Needle Felt
- Needle Felt Brush
- Wool or Cotton based Fabric
- Wool for Felting (dyed in thermo-chromic solution)
- Wool Yarn (dyed in thermo-chromic solution)

Step 1
Place your chosen fabric onto of the needle felt brush, make sure the right side on the fabric is face down onto the brush!

Step 2
Place the yarn that you are going to felt onto of the fabric.

Step 3
Take the needle felter and punch through the yarn and fabric, till the fabric was fused together.


Step 4
Now you know how to needle felt you can add different colour yarns or different material like the pure wool pictured below.


Step 5
Once the wool and the yarns are fused together with the base fabric you can pull the base fabric off the brush and reveal the fluffy side.

Here are some tests I made. I tried both a black fabric and a light grey fabric to see which one would show better. Unfortunately I found that after needle punching the yarn and wool the fibres that come through the fabric loose the thermo-chromic pigment and therefore there is not reaction to the heat. To rectify this I plan to try needle punch white wool through a fabric and then painting the fabric that are felted through the fabric with the thermo-chromic paint.


Part 7:Knitting
In this part I will show you how you can use your thermo-chromic yarn to knit. You could knit a tea cosy, scarf etc that would then change colour due to heat.
Materials Needed
- Leftover thermo-chromic yarn
- Knitting needles (any size)
- Scissors

Step 1
Cast on as many stitches onto your knitting needle.
For those of you who don’t know how to knit here is a link to a casting on video for beginners: https://www.youtube.com/watch?v=9vMQ0IpvpSo
Step 2
Now you have cast your stitches on you can know begin to knit.
For those of you who don’t know how to knit here is a link to knitting stitches for beginners: https://www.youtube.com/watch?v=ivmvGxqcEZs&list=PL41553DF793BB50E3
Step 3
Changing the colour yarn. This is simple to do, much like changing the colour of the yarn when you weave. You simply knot the two threads together, as near to the knit stitch as possible so the colour changes at the end of each line.


Step 4
Once you have completed knitting you need to cast off.
For those of you who don’t know how to knit here is a link to casting off for beginners:https://www.youtube.com/watch?v=aNR9g_0J3Wg&list=PL41553DF793BB50E3
Here is my final knit outcome!

Part 8; Hand Embroidery
In this part I will show you how to hand embroider an overlock stitch that you can use on your garments to add a subtle depth when the threads change colour due to heat reaction.
Materials Needed
- Dyed Thermo-chromic Thread
- Conductive Thread
- Needle
- Any Fabric
- Masking Tape

Step 1
Take your masking tape and tape a strip to the fabric on the correct side, this will act as a guide for your running stitch.

Step 2
Now you have your guide ready. Thread your needle with the conductive thread, knot the end and begin your running stitch. I made each stitch length around 1cm and left a 1cm gap between each stitch. I made three parallel lines of the running stitch leaving a 0.5cm gap between each line. It is important to try to start all the stitches on each line at the same point and end at the same point. Once you have done three lines knot your thread on the fabric back and snip off the excess.


Step 3
Now you have your three lines of conductive thread, You need to go over theses stitches with your thermo-chromic thread. I doubled the thread in the needle to make my thread thicker and I used thin cotton thread. You should use a backstitch for this part and you want to cover the conductive thread and remove the gaps between each stitch. The back stitch is similar to the running stitch except after each forward stitch you stitch backwards once .


Front View=
Back View = 
Step 4
Change the colour of your thread, again I doubled the thread to make each stitch thicker. Start from the back side of the fabric and push the needle through the first stitch.

Then tuck the needle under the width of the middle and last stitch.


Now loop the needle over to the next stitch and thread the needle under the first, middle and last width of the stitch.

Continue the looping and threading under the stitches till you get to the end of the three lines. At the last stitch push your needle through the last stitch and knot in the back.
Here is my example of a hand sewn overlock stitch.

I hope all my experimentations with dyeing, sewing, felting, weaving and knitting have been a help! To further enhance this project I want to work more on the conductive side, being able to better heat the materials and potentially work with circuits and Arduino to regulate the heat.