
Project Proposal
Section 1: Project Information | “What are you doing?”
Include the following:
- Project Title
“My Many Faces”
- Your name and contact information
Name: Hitomi ‘Kelsey’ Ko
Contact info:
Email: koh029@newschool.edu
phone number: +1 424 321 9393
- Project Log-line: no more than 3 sentences that capture the essence of the project.
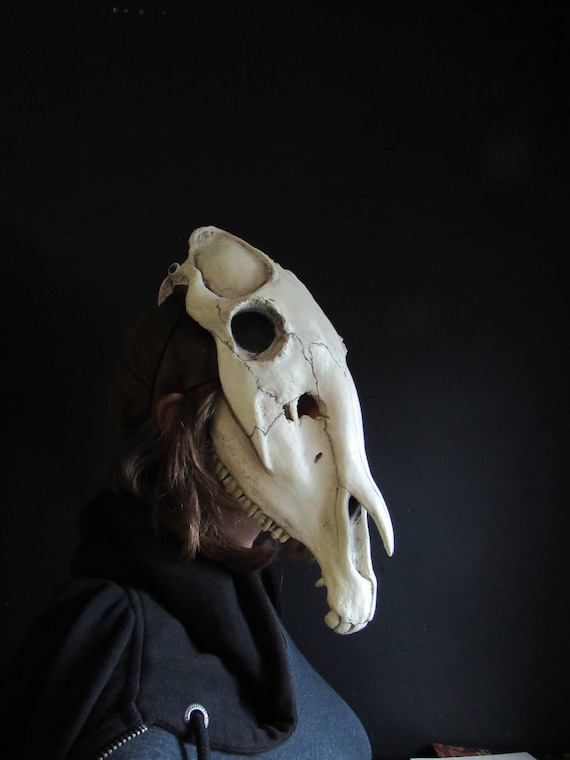
“My Many Faces” is a collection of fantasy and monster-like resin masks that are inspired by my original characters. They are mystified versions of anthropomorphic animals, meant to look both fantastical and/or horrifying. Like any other fashion accessory, anybody who enjoys self expression through costume-play may wear these masks as a physical avatar. Through this, I plan to spread awareness of my original characters and personal creative work.
Section 2: Objectives | “Why are you doing it?”
(8-10 sentences)
Argue the reasons for doing this project and state your objectives clearly. Consider the following questions, and keep it concise.
What exactly will you be doing?
I will be creating four masks with designs based on my original characters.
Who is your target audience? Why should they care about it?
My target audience will be anybody who’s interested in sci-fi concepts, character art/development, and fantasy/anthropomorphism. My project will be worth noting because it shows the depth of thought i put into world-building around my characters, and while there are many notable works out there I love that are built around anthropomorphism (Zootopia, Beastars, BNA, etc.), my project aims to develop the existing species in significantly greater detail.
Where will it be viewed or experienced? Or, where is the intended venue for the work?
The venue will be on my face.
What distinguishes your project from everything else that’s already out there? What are some of the other current contributions to this field? How do they relate to your project?
Like many past artists, this work is inspired by nature, but the project’s designs utilize nature for both aesthetic and survival/combative purposes. Similar to Antoni Gaudi’s Casa Mila, aka “La Pedrera”, in which the architect has modeled its structure after nature in a manner that is ergonomic for both light and airflow, my project aims to put a playful twist on real life protective gear, as well as bring fictional garments from games such as World of Warcraft or Trove to life.
Why are you doing this project? What goals are you aiming to achieve with it- personal, business, artistic, or otherwise?
I have always been interested in costume design as well as character design, and I think making masks is one of the best ways to bring my art to life. I am hoping to learn this skill as it can not only help me create masks but also other works such as figurines or sculptures. At the moment, however, I have not planned enough to turn these designs fully functional as protective/combative gear, but I would at least like to create a prototype on which I can add new ideas later.
Section 3: Methodology | “How are you going to do it?”
Describe the overall approach to the project in two to three sentences. Include what tools or media will be used and a strategy for how you will adapt to change as the project progresses.
The step by step process will ensue as follows: I will sculpt my mask design in clay over a mannequin head, coating it in silicone to create a reusable mold, casting the design with resin, and then painting over it. I will be looking at various youtube tutorials to cross-reference so i can find better tools as the supplies may have different models for different functions.
What are the deliverables? When are they due?
4 masks, due March 9.
How will it be done? What are your tasks, and in what order? How long will each task take?
- Find and gather equipment (1 week)
Using this video as a reference: Cat Skull Mask – Sculpting + Mold Making + Painting Tutorial by Lightning Cosplay (url: https://www.youtube.com/watch?v=oTgY4JRD2rI)
- Translate all items into cantonese and print pictures for references (shopping)
| Documentation tools | Chemicals | Crafting tools |
| Procreate for designing/ sketches Camera + SD cards Premiere pro | Clay (oil based to ensure constant moisture) Epoxy-resin Fiberglass cloth Silicon Thi-vex (aka Silicone thixotropic agent; a viscosity stabilizer) Smooth-cast 65D resin (cures white) Epoxy glue Various paints | Styrofoam mannequin head Clay sculpting tools (scalpels, brushes, etc) Gas mask Sandpaper or dremel Popsicle sticks Hammer Heat gun Exacto knife |
- Find a studio or suitable workspace (5 days)
- Set up workspace (30 minutes)
- Sculpt clay masks onto mannequin head (3-5 hours per mask, approx 12-20 hours total)
- Coat the mask in silicone (5 mins, total 20 minutes)
- After the first layer, mix thi-vex into silicone to thicken the paste, paint on thickened silicone; add any clay into ‘hollow’ areas to preserve detail (20 mins, total 1h 20 mins)
- cover one half in aluminum foil, paint on epoxy-resin and allow to dry (2 hours, total 16 hours)
- Coat epoxy-resin in fibreglass cloth and leave to dry (overnight or 5 hours, total 4 days)
- Repeat on other side
- Sand down any sharp edges (5 mins, total 20 mins)
- Crack down middle in half with popsicle sticks (15 mins, total 1h)
- Peel off mold-jacket and silicone mold, roto-cast in resin, keep adding layers as it dries until thick enough (overnight, total 4 days)
- De-mold the resin mask and paint (overnight, total 4 days)
- Repeat steps 4-17 on remaining 3 other heads
Total process, not including rest/non-studio hours, other class hours or margins for error: 753.2 hours = 31.4 days = 4 weeks
Deliverables:
List out all the deliverables you expect to produce and present by the end of the project. For Example, this could be objects, a performance, video, a book, packaging–anything.
- 4 mask sketches/designs
- 4 Clay masks
- 4 silicon molds
- 4 mold jackets
- 4 resin masks (fully painted)
Schedule:
Completed projects (including documentation) are due March 7. Make a weekly timeline, listing tasks or goals to complete each week, that will help you stay on schedule.
| Week 1 (01/25-01/31) | Jan 28 Thu Finish proposal List all products, translated in local language Find workspace/studio Jan 29 Fri Online shopping begun supply/material search begun Sketches begun Jan 30 Sat – Jan 31 Sun Allow time for online shopping materials to arrive |
| Week 2 (02/01-02/07) | Feb 1 Mon Workspace tour Allow time to modify any plans if needed Touch up design sketches if necessary Feb 2 Tue – Feb 7 Sun Allow time for online shopping materials to arrive |
| Week 3 (02/08-02/14) | Feb 8 Mon Workspace set up Feb 9 Tue 0500-0645: fiction class First mask begun (test round) Sculpt clay Refine Paint on silicone + thickened paste Let dry <Lunch> Paint on one half epoxy resin + fibreglass Allow to cure overnight if not dried by 5 hoursIf dried in time paint the other half Feb 10 Wed Paint the other half Allow to cure overnight if not dried by 5 hours <Lunch> Crack open in half with popsicle sticks Check mold jacket integrity and demold silicon Start slush-casting first coat of resin Keep adding layers until enough Feb 11 Thu 0800-1040: advanced research class <Lunch> If mold needed to dry overnight, do the second half of the process >Crack open in half with popsicle sticks >Check mold jacket integrity and demold silicon >Start slush-casting first coat of resin >Keep adding layers until enough Demold mask Sand/refine any details/errors Paint over it Allow to dry 2200-0340 Core studio Feb 12 Fri – Feb 13 Sat Extra day for any paint adjustments Extra time to catch up with school work Feb 14 Sun Extra time to catch up with school work |
| Week 4 (02/15-02/21) | Feb 15 Mon Workspace set up Second mask begun Sculpt clay Refine Paint on silicone + thickened paste Let dry Start sculpting third clay mask <Lunch> If dried, paint on one half epoxy resin + fibreglass on mask 2 Allow to cure overnight if not dried by 5 hours Keep sculpting third mask Refine Paint on silicone + thickened paste Let dry Extra time to catch up with school work Feb 16 Tue 0500-0645: intro to fiction Repeat procedure with other masks paint the other half of mask 2 with epoxy resin and fiberglass Allow it to dry Any adjustments to Mask 1’s paint job if needed <Lunch > Start painting half of mask 3’s mold-jacket Allow to dry Extra time to catch up with school work If dried in time, crack open mask 2’s mold jacket in half with popsicle sticks Check mold jacket integrity and demold silicon Start slush-casting first coat of resin Keep adding layers until enough Allow to dry Paint other half of mask 3’s mold jacket, allow to dry De-mold mask 2 Paint over it Feb 17 Wed If mold needed to dry overnight, do the second half of the process today Crack open mask 2’s mold jacket in half with popsicle sticks Check mold jacket integrity and demold silicon Start slush-casting first coat of resin <Lunch> Keep adding layers until enough Allow to dry Paint other half of mask 3’s mold jacket, allow to dry De-mold mask 2 Paint over it Feb 18 Thu 0800-1040 Advanced research class Any final touches to mask 2’s paint job <Lunch > Spray coat of preservative Allow to dry Document process so far Extra time to catch up with school work 2200-0340 Core studio Feb 19 Fri – Feb 21 Sun Extra time to catch up with school work Resupplying if necessary |
| Week 5 (02/22-02/28) | Feb 22 Mon Set up workspace Crack open mask 3’s mold jacket in half with popsicle sticks Check mold jacket integrity and demold silicon Start slush-casting first coat of resin Keep adding layers until enough Allow to dry <Lunch> Extra time to catch up with school work Demold mask Start painting on decor Add preservative coat Allow to dry Feb 23 Tue 0500-0645: intro to fiction Start sculpting mask 4 Shape clay <Lunch> Refine any details if needed Paint on silicone Allow dry Paint on mold jacket half Allow dry Feb 24 Wed Paint on other half of mold jacket Allow dry <Lunch> Crack in half, check details Start slush-casting Keep adding layers until dry Paint Feb 25 Thu 0800-1040 Advanced research class Finish paint job Coat with preservative <Lunch> Look over any errors if necessary 2200-0340 Core studio Feb 26 Fri – Feb 28 Sun Spare time allowed for any errors needed to be amended |
| Week 6 (03/01-03/07) | Mar 1 Mon – Mar 6 Sat Allow extra time to adjust/correct/finalize Mar 7 Sun Review documentation process Edit footage Finalize documentary |
Section 4: Budget | “How much will it cost?”
List your costs in a detailed, line-item budget broken up by different project categories, such as travel, research, supplies, services (like printing or software subscriptions), etc. Everything you anticipate spending money on to get the job done.
*currency is local
Highlighted in yellow = requires more investigation/consultation
| Product | Venue | Price (approx) |
| PRODUCTS | ||
| Styrofoam mannequin head | shorturl.at/sxyV0 Or BLOCK B, 2/F, ON LOK FACTORY BUILDING, TEL: (852) 2334 2498 88 KOWLOON CITY ROAD, KOWLOON, HONG KONG | 41 |
| Gas mask | mask, filter | 465 |
| Nitrile gloves | Owned | 0 |
| Clay (oil based to ensure constant moisture) | Craft supplies, 173 Sai Yee St, Prince Edward Or shorturl.at/a0467 /shorturl.at/tyCG0 shorturl.at/lADTW shorturl.at/itHZ5 | 160 (40*4) |
| Clay sculpting tools (scalpels, brushes, etc) | 96 | |
| Epoxy-resin | 224 (112*2) | |
| Heat gun | shorturl.at/uwUW1 | 224 |
| Silicone | Rebound 25 Brushable Silicone Rubber http://amzn.to/1ROiihW | 256 |
| Thi-vex (aka Silicone thixotropic agent; a viscosity stabilizer) | http://amzn.to/1ROihdR | 136 |
| Fibreglass cloth | Bondo Fiberglass Cloth | 96 |
| Smooth-cast 65D resin (cures white) | shorturl.at/mGLMY | 280 |
| Epoxy glue | shorturl.at/fmuvO | 160 |
| Various paints | Owned (owned) | 0 |
| Popsicle sticks | ||
| Sandpaper/file | ||
| Hammer | ||
| Exacto knife | ||
| WORKSPACE | ||
| Studio rental | Found from personal contact | 0 |
| Transport | ||
| Bus fare ($10) * 6 times a week (Avg) | n/a | 60 |
| MTR fare ($4.5) * 6 times a week (avg) | n/a | 27 |
| TOTAL | 2225 (297USD) |
Section 5: Additional research
What might I need to learn and research further?
- Watch other videos on resin-casting masks
- What type of product should i use?
- Gas masks
- Sculpting tools
- Silicone
- Thi-vex
- Fibreglass
- Epoxy-resin
- Nitro gloves
- Smooth-cast resin
- Smooth Cast 300 part A and B
- 65D
- Resin pigments also available
- What should i know about resin?
- Resin comes in 2 parts: resin and hardener.
- Ratios should be carefully measured either by volume or by weight. Check description.
- Most resins
- What kind of studio can I rent? Can I set up my own space to keep the toxic resin fumes contained?
- Other safety measures
Section 6: Appendix
Sketches, prototypes you already have, and inspiration images
If applicable, add any additional charts, graphs, images, or reports that were cited in the proposal. Many times, reference material will go into the appendix to keep the rest of the proposal clean and easily readable.
INSPIRATIONS/MOODBOARD


