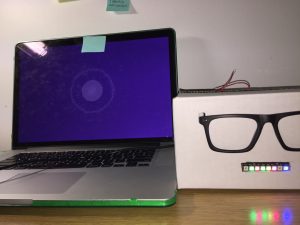
For my midterm I thought it would be a great chance to dive into serial communication and teach myself how Arduino talks to other devices. This was a challenge to have my ultrasonic sensor pickup the correct distances so I changed my method of calculating data by using an open switch. My overall project was an external device called the SPARKY that attaches to the computer. Playing music that becomes audio reactive to the various frequencies. The data was being translated through processing. In total this was a great experience for me, and for further implementations I would like processing to send data back to the Arduino.
ARDUINO CODE
/*
Motor Control with a Transistor
This example shows you how to control a motor’s using a transistor.
When a pushbutton on pin 2 is pressed, the Arduino will control a transistor
via PWM, which will slowly ramp up the motor’s speed, then slow it down.
The circuit :
* momentary switch with one end connected to 5V, the other end connected
to GND through a 10-kilohm resistor, and digital pin 2.
* TIP120 tranistor, with the Base connected to digital pin 9, the Emitter to ground,
and the Collector to one lead from a 9V DC motor
* a 9V battery, with the ground connected to the Arduino’s ground, and the power
connected to the motor
* 1N4001 diode across the motor’s leads, with the striped side conneted to the 9V
The Arduino can only provide 40mA at 5V on its pins. Most motors require
more current and/or voltage to overcome intertia and run. A transistor
can act as a digital switch, enabling the Arduino to control loads with
higher electrical requirements.
Created on 03 January 2013
by Scott Fitzgerald
http://www.arduino.cc/en/Tutorial/TransistorMotorControl
This example code is in the public domain.
*/
// give a name to digital pin 2, which has a pushbutton attached
int pushButton = 2;
// the transistor which controls the motor will be attached to digital pin 9
int motorControl = 9;
// the setup routine runs once when you press reset:
void setup() {
// make the pushbutton’s pin an input:
pinMode(pushButton, INPUT);
// make the transistor’s pin an output:
pinMode(motorControl, OUTPUT);
}
// the loop routine runs over and over again forever:
void loop() {
// read the state of the button and check if it is pressed
if(digitalRead(pushButton) == HIGH){
// ramp up the motor speed
for(int x = 0; x <= 255; x++){
analogWrite(motorControl, x);
delay(50);
}
// ramp down the motor speed
for(int x = 255; x >= 0; x–){
analogWrite(motorControl, x);
delay(50);
}
}
delay(1); // delay in between reads for stability
}
PROCESSING CODE
/**
* Simple Read
*
* Read data from the serial port and change the color of a rectangle
* when a switch connected to a Wiring or Arduino board is pressed and released.
* This example works with the Wiring / Arduino program that follows below.
*/
//The Audio Visualization code has been It has been modified. The source code belongs to blyk.
//https://github.com/blyk/Music-Visualization/blob/master/MusicViz.pde
import processing.serial.*;
Serial myPort; // Create object from Serial class
int val; // Data received from the serial port
import ddf.minim.*;
import ddf.minim.analysis.*;
Minim minim;
AudioPlayer player;
AudioMetaData meta;
BeatDetect beat;
int r = 200;
float rad = 70;
void setup()
{
size(500, 500);
//fullScreen();
// I know that the first port in the serial list on my mac
// is always my FTDI adaptor, so I open Serial.list()[0].
// On Windows machines, this generally opens COM1.
// Open whatever port is the one you’re using.
String portName = Serial.list()[3];
myPort = new Serial(this, portName, 9600);
println(Serial.list());
minim = new Minim(this);
player = minim.loadFile(“music.mp3”);
meta = player.getMetaData();
beat = new BeatDetect();
//player.loop();
//player.play();
//background(-1);
//noCursor();
}
void draw()
{
if ( myPort.available() > 0) { // If data is available,
val = myPort.read(); // read it and store it in val
}
//background(255); // Set background to white
if (val == 0) { // If the serial value is 0,
//fill(0);
player.pause();
} else { // If the serial value is not 0,
{
player.play();
float t = map(mouseX, 0, width, 0, 1);
beat.detect(player.mix);
fill(#551A8B, 30);
noStroke();
rect(0, 0, width, height);
translate(width/2, height/2);
noFill();
fill(-25, 100);
if (beat.isOnset()) rad = rad*0.9;
else rad = 100;
ellipse(0, 0, 2*rad, 2*rad);
stroke(-1, 50);
int bsize = player.bufferSize();
for (int i = 0; i < bsize – 1; i+=5)
{
float x = (r)*cos(i*2*PI/bsize);
float y = (r)*sin(i*2*PI/bsize);
float x2 = (r + player.left.get(i)*100)*cos(i*2*PI/bsize);
float y2 = (r + player.left.get(i)*100)*sin(i*2*PI/bsize);
line(x, y, x2, y2);
}
beginShape();
noFill();
stroke(-10, 200);
for (int i = 0; i < bsize; i+=30)
{
float x2 = (r + player.left.get(i)*1000)*cos(i*2*PI/bsize);
float y2 = (r + player.left.get(i)*1000)*sin(i*2*PI/bsize);
vertex(x2, y2);
pushStyle();
stroke(-10);
strokeWeight(2);
point(x2, y2);
popStyle();
}
//endShape();
//// if (flag)
//// showMeta();
}
////
}
////
//id showMeta() {
//int time = meta.length();
//textSize(50);
//textAlign(CENTER);
//text( (int)(time/1000-millis()/1000)/60 + “:”+ (time/1000-millis()/1000)%60, -7, 21);
}
////
//olean flag =false;
//id mousePressed() {
//if (dist(mouseX, mouseY, width/2, height/2)<150) flag =!flag;
AUDIO VISUALIZER | SERIAL COMMUNICATION
Installation of the Adafruit NEO PIXEL
