
Goat Box- Process Documentation
MET Research object:

Front view of Vase with Coiling Dragon
Title: Vase with Coiling Dragon
Creator/ dynasty: Qing Dynasty, China
Date: 1678-88
Geographic location: China
Medium/ material: Porcelain with peach bloom glaze (Jingdezhen ware); Western mount
Dimensions: H. 8 in. (20.3cm)
Explanation for selection of object: I really like the design of how the dragon coils around the neck of the vase and as my object also incorporates a Chinese zodiac in its design, I was interested in weaving elements influenced from this vase into my work. It was also very intriguing to see the contrasting cultural desings in this singular vase, with a Chinese porcelain vase as a bottom and a Western metal mount as the neck.
Orthographic Drawing:
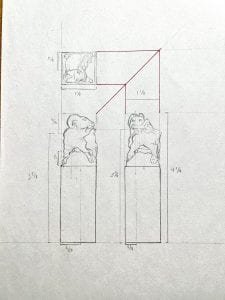
Orthographic drawing of my object
The object that I have choosen for this project is a Chinese seal/stamp that has my Chinese name engraved in it. It is made of white stone and has a sculpture of a lamb on the top of it. The reason for choosing this object is that it was gifted to me by my cousin and I have been using it a lot to sign off my artworks over the last year. I also can not write Chinese, therefore, this was a nice way of helping me appreciate my Chinese name and the language itself.
Linear Iteration:
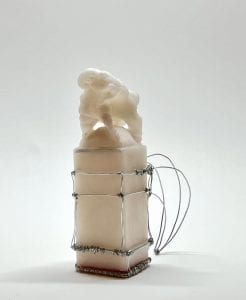
3/4 view of linear structure
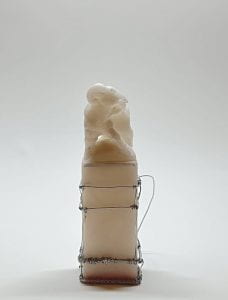
Front view of linear structure
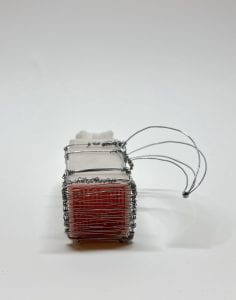
Bottom view of linear structure
For my linear structure, I created a carrier/ container for my object with two different gauges of wire. It is two parts, the bottom cuboid prism is closed off at the bottom to hold the stamp and prevent the ink of it to touch other surfaces. This is then connected at each corner to the upper section that wrapes around the stamp and has a wire horn connected to it. The horn is supposed to be a reference to the object itself, as it is a stamp with the Chinese zodiac of a goat sculpted into it. The horn is decorative but also can be used to hold/ lift the stamp up. The 22 gauge wire is used mostly for the frame of the structure whereas the thinner 28 gauge was used to connect and attach the frames and sections together.
Planar iteration:
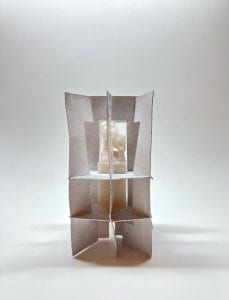
My planar iteration has 8 planes; 2 horizontal on the main body of the stamp, 2 vertical crossing perpendicularly in the middle of the stamp and 4 diagonal ones at each corner for support. I used an empty cereal box cardboard as the material for the planes and painted them with a few layers of white acrylic gesso to help them be more sturdy as the cardboard was quite flimsy and bendable.
Volumetric iteration:
Sketch for paper prototype
3/4 view of paper prototype of volumetric iteration
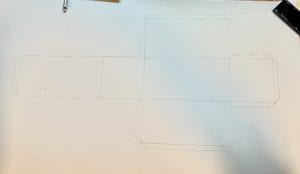
The volumetric paper model adopts roughly the same shape as the linear structure as it follows the form of the original object. The horns was difficult to make with paper as it has curved edges so I did not add it to the volumetric iteration. I ended up changing the net for my volumetric iteration when making the final design as it wanted the lid of the box to open from the front instead of the top.
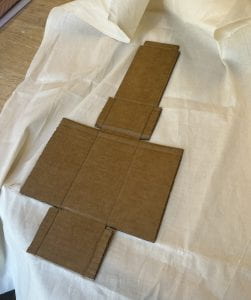
Process image of sticking the cardboard net to muslin
Final design:
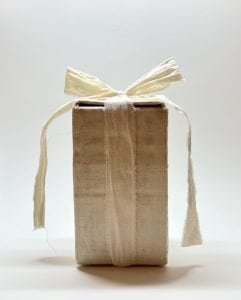
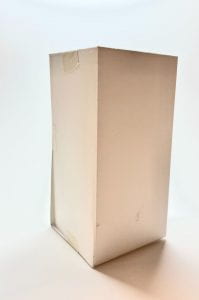
Front view of final design
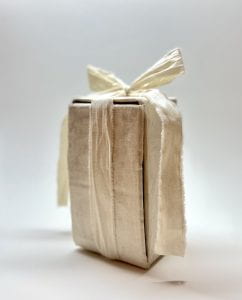
3/4 view of final design
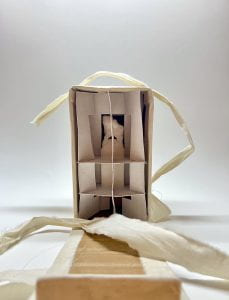
Final design opened
The materials used in my final design container are cardboard and muslin (wooven fabric). After cutting out the cardboard net for the container, I used a bone folder to help me fold the edges of the cardboard cleanly. I then applied PVA glue to it and stuck a layer of muslin onto it, once it dried I used a needle to poke holes in the extra flaps I have on the edges I wanted to connect, and using 28 gauge wire, I sewed the planes together- tied a knott and twisted it to make sure it was secure and not sticking out. Then, I went in with a second layer of much more glue and applied another layer of muslin to cover up the wires and edges of the cardboard completely. I used an extra piece of muslin as a ribbon and tied a bow at the top to ensure the lid does not open- this was a bit inspired by my MET research object where a metal dragon was used to connect the vase to the newly attached mount.
I would say the successes of the final design is that it really conforms to the original shape of the stamp being a rectangular prism, and along with the lid being at the front of the container it almost puts the object inside on display and really frames it. Although the design is quite plain, I feel like the cream colour and the texture of the muslin, as well as the whole container being one colour really matches the stamp inside- as these seals/ stamps were historically used on scrolls that had a similar texture.
After reflecting on my final design, I think that there are many things I would like to improve on. Firstly, I believe I could have been a bit more creative with the overall design of it and added some more elements to it. Like I could have experimented with different materials such as plexiglass or wood, or even tried to cut out or sew some interesting and oriental designs onto it. I think it might have also been beneficial to have used more glue so that the threads from the muslin would not have fallen loose.
Nevertheless, this was an interesting project for me to have learnt many new things. I did not know what orthographic drawings were or how to properly work with wire and materials. I have also never really worked on three dimensional projects either aside from clay sculptures.