
For the Bridge 2 assignment, our aim was to create a wearable sculpture/ body extension that can aid our partner in overcoming their fear or psychological limitation.
Partner– Francine
Interview-
After interviewing my partner during class, I was able to gain a basic understanding of some of her fears and limitations that she struggles with.

We then visited the Metropolitan Museum of Art where we tried to find objects and pieces that helped us gain inspirations. Over social media, we also communicated about our fears and limitations to gain a deeper understanding and share pieces we thought the other may like.


Concept and Idea-
The fear/ limitation that my partner struggles with is the inablility to not be easily influenced by others’ emotions and opinions. To protect or help her with this limitation, I am creating a caged helmet type object that can help her create her own ‘bubble’ where others’ negative comments and thoughts are blocked out.
Progress-
Below are my design sketch and paper mini prototype.

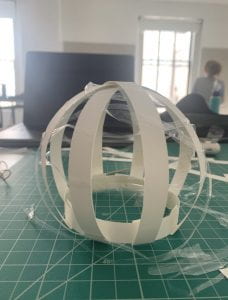
I started off my taking measurements. I measured the real-life scale of how big I wanted my piece to be when worn by my partner. Using a large piece of paper I had my partner stand against it in order for me to draw the shape out. Originally, I wanted to go really large scale to create a sense of impact but when measuring and making my prototype, I realised that making it large scaled -especially with cardboard- was going to be difficult. Thus, I scaled it down to a helmet because my partner said that thinking of this fear, the first body part she thinks of is her head as this is quite an abstract fear.

Then using the scale and measurement I made, I cut out a paper stencil for the ribs and rims of the bubble helmet. Pinned it on to a large piece of cardboard and sketched the outlines out. I proceeded to cut each piece out using a olfa knife.
With each separate piece cut out, I began to think of ways to attach them together. Rather than using glue or tape, I thought the best idea was to cut a slit in the ribs and rim to slide the two piece together like a puzzle. Below are images of how the rib pieces looks attached to the bottom rim only. I thought that being attached to just the bottom rim might look interesting- like a flower blooming.


I tried carrying my piece without the top rim but it just seemed very unstable and was unable to hold its shape. Therefore, I resorted back to the original idea of having the top rim to support my piece and make it a helmet. Once all the piece were cut out, I painted each rim and rib with multiple layers of white acrylic paint. I also noticed that after painting the cardboard with acrylic, it made the ribs and rims much more sturdy and stable when put together.


After I had assembled all the pieces together, I decided to further stablize the whole thing by applying E6000 glue on the edges/ slits where each piece was connected. Once everything was dry and firm, I began to weave yarn between each rib in a spider web pattern. I tried to make the patter look as natural as possible by also separating some of the yarm into thinner strands to weave into it too. I set everything in place with E6000 super glue.

Final Product-
Trailer– https://youtu.be/dmitap7SvOo