01 A quick introduction to HTML

This section is non-normative.

A basic HTML document looks like this:

<!DOCTYPE html>
<html>
 <head>
  <title>Sample page</title>
 </head>
 <body>
  <h1>Sample page</h1>
  <p>This is a <a href="demo.html">simple</a> sample.</p>
  <!-- this is a comment -->
 </body>
</html>

HTML documents consist of a tree of elements and text. Each element is denoted in the source by
a start tag, such as “<body>“, and
an end tag, such as “</body>“.
(Certain start tags and end tags can in certain cases be omitted and are implied by other tags.)

Tags have to be nested such that elements are all completely within each other, without
overlapping:

<p>This is <em>very <strong>wrong</em>!</strong></p>
<p>This <em>is <strong>correct</strong>.</em></p>

This specification defines a set of elements that can be used in HTML, along with rules about
the ways in which the elements can be nested.

Elements can have attributes, which control how the elements work. In the example below, there
is a hyperlink, formed using the a element and its href attribute:

<a href="demo.html">simple</a>

Attributes are placed inside the start tag, and consist
of a name and a value, separated by an “=” character.
The attribute value can remain unquoted if it doesn’t contain space characters or any of " ' ` = < or
>. Otherwise, it has to be quoted using either single or double quotes.
The value, along with the “=” character, can be omitted altogether if the
value is the empty string.

<!-- empty attributes -->
<input name=address disabled>
<input name=address disabled="">

<!-- attributes with a value -->
<input name=address maxlength=200>
<input name=address maxlength='200'>
<input name=address maxlength="200">

HTML user agents (e.g. Web browsers) then parse this markup, turning it into a DOM
(Document Object Model) tree. A DOM tree is an in-memory representation of a document.

DOM trees contain several kinds of nodes, in particular a DocumentType node,
Element nodes, Text nodes, Comment nodes, and in some cases
ProcessingInstruction nodes.

The markup snippet at the top of this section would be
turned into the following DOM tree:

The root element of this tree is the html element, which is the
element always found at the root of HTML documents. It contains two elements, head
and body, as well as a Text node between them.

There are many more Text nodes in the DOM tree than one would initially expect,
because the source contains a number of spaces (represented here by “␣”) and line breaks
(“⏎”) that all end up as Text nodes in the DOM. However, for historical
reasons not all of the spaces and line breaks in the original markup appear in the DOM. In
particular, all the whitespace before head start tag ends up being dropped silently,
and all the whitespace after the body end tag ends up placed at the end of the
body.

The head element contains a title element, which itself contains a
Text node with the text “Sample page”. Similarly, the body element
contains an h1 element, a p element, and a comment.


This DOM tree can be manipulated from scripts in the page. Scripts (typically in JavaScript)
are small programs that can be embedded using the script element or using event
handler content attributes
. For example, here is a form with a script that sets the value
of the form’s output element to say “Hello World”:

<form name="main">
 Result: <output name="result"></output>
 <script>
  document.forms.main.elements.result.value = 'Hello World';
 </script>
</form>

Each element in the DOM tree is represented by an object, and these objects have APIs so that
they can be manipulated. For instance, a link (e.g. the a element in the tree above)
can have its “href” attribute changed in several
ways:

var a = document.links[0]; // obtain the first link in the document
a.href = 'sample.html'; // change the destination URL of the link
a.protocol = 'https'; // change just the scheme part of the URL
a.setAttribute('href', 'http://example.com/'); // change the content attribute directly

Since DOM trees are used as the way to represent HTML documents when they are processed and
presented by implementations (especially interactive implementations like Web browsers), this
specification is mostly phrased in terms of DOM trees, instead of the markup described above.


HTML documents represent a media-independent description of interactive content. HTML documents
might be rendered to a screen, or through a speech synthesiser, or on a braille display. To
influence exactly how such rendering takes place, authors can use a styling language such as
CSS.

In the following example, the page has been made yellow-on-blue using CSS.

<!DOCTYPE html>
<html>
 <head>
  <title>Sample styled page</title>
  <style>
   body { background: navy; color: yellow; }
  </style>
 </head>
 <body>
  <h1>Sample styled page</h1>
  <p>This page is just a demo.</p>
 </body>
</html>

For more details on how to use HTML, authors are encouraged to consult tutorials and guides.
Some of the examples included in this specification might also be of use, but the novice author is
cautioned that this specification, by necessity, defines the language with a level of detail that
might be difficult to understand at first.

00 Assessable Tasks

Assessable Tasks

Assessable tasks are those core tasks required to create modern web design.

Hand coding the HTML and CSS should come together with the midterm assignment. Bold terms signify assessable tasks:

Tasks / Activities Date Requirements/Indicators
Marking-up Content Week 2 Is the markup valid and semantically correct HTML5? Are images the correct format and size?
Styling the Content Week 4 Is the CSS valid, clean, external, and using structural selectors when possible? Are various layout strategies used to construct the pages?
Constructing the Portfolio Site Week 6 Information Architecture Is the site logically laid out? Is it SEO friendly? Is it tracked using Google Analytics?
Is the web site Future Proof? Week 8 Is the website responsive to a change in viewport size, from an iPhone to the standard web browser?
Explore CSS3 and HTML5 Week 9-11 Are CSS3 & HTML5 being used to create the final website?
Modularity and Interactivity Week 12-14 Are PHP and Javascript being used in the final website?
Forms Week 12-14 Are forms being used in the final website?

01 Intro to the Web

ome to Web Design Basics

Official course description:

This course is an introduction to web design and development within an overview of current web environments. Projects will cover planning and implementation of websites that offer common functionality as well as adhere to good usability, accessibility, compatibility, and validation practices. HTML, XHTML, CSS, interactivity, information architecture and navigational structures will be explored, as well as usability and web design strategies.

That is a lot to teach in one semester.

What would you do in my shoes?

I created this comprehensive website where I’ve written out all the lectures. You will always know where we are and what we have covered.

Class links on the right.

I do not read from these pages, but they align pretty close to the lectures. If you do not understand a topic presented in class, you can go back and read it again, and follow the links and examples until you do understand the topic.

The best students read ahead, and implement things like responsive design from the beginning. They do really well, as everything is in the class website, and a lot more besides.

The class website is great if you missed a class or need a reminder later on.

Learning to build websites is cumulative: basic skills are necessary for building advanced ones. You need understand the basic skills, before you can build a website with them.

If you feel you have missed or do not completely understand a topic well enough to move on, reread the supporting material in this website.

Email me whenever you have questions.

You can read the book

Lynda.com is good resource.

You can search the web for solutions.

There are lots of ways that you can get the information. The important thing is that you get it, and that you practice writing code.

The only way to learn to how to code is by writing code. Making mistakes is part of the process. The mistakes that stop you dead in your tracks disappear after the first week or two. Please do not be discouraged if you get stuck at first.


About this Website

Each class is standardized, so you should be able to figure out the information you are looking for, and if not, you can use the search bar at the top of the window to search through all of the pages.

Each class page starts with a topic summary and the homework requirements, like this.

Week 1
1/29

Introduction to Hyper Text Markup Language. Brief history and overview of the web. Activity: Create HTML file. Cover basic HTML elements and page structure. Activity: Website Analysis —create a copydeck, style guide and wireframe for the site you have chooses to review, and compare and contrast the site to its competition. Why does it work for you? Why does the competition’s websites not work?

Homework

Analyze the design and content of a website in line with your main interest. Make a style guide that explores the intent, voice, tone, brand and persona(s) of the target audience for the site. Use images. Mark up the assignment if you can. Watch videos. Read chapters 1-3. Due: Next Week — Due Next Week means due by the following Thursday Morning (that way I can look over the assignments and provide feedback on your markup.). Email the assignments until you get your server space up.


The topic summary and homework assignment is followed by a materials section that has all of the linked files associated with the class.

Green and red colored links are required reading.

Green signifies conceptual overview that helps put the material in perspective.

Red signifies core knowledge that you need to know to continue. That means you should reread the material if you do not understand, or read the corresponding chapters in the book.

How much you understand is clearly displayed by the way you code. I will assess you ability to code throughout the semester.

Materials

Additional materials for this unit can be found by following these links (36 pages if printed out):


The materials section is followed by goals and outcomes. This is what you are to learn.

Much of the learning is scaffolded, meaning that this is a necessary part of a larger skill set that you are to learn. You need to acquire these learning outcomes before the next class. The next class assumes this knowledge and builds upon it.

Goals

The goals of this unit are to:

  • Introduce the World Wide Web.
  • Understand the content strategy that goes into creating web sites.
  • Learn how to mark up content.
  • Set up a server at Parsons/New School using Fetch.
  • Create a page on the web.

Outcomes

At the end of this unit, students will:

  • Be familiar with the web and the code that generates web pages.
  • Have a good idea of the elements that make a website work.
  • Learn basic HTML elements.
  • Mark up a simple page.
  • Set up server space at Parsons NewSchool or through a private host.
  • Publish a page on the web.

The estimated breakdown of time it should take for each topic to be adequately covered in class. Some topics are summarized in a few minutes. Others are demonstrated at length. Emphasis is on those topics that help you master skills needed to build web pages, which are usually done through in class activities.

Step-by-Step

15 Welcome, introductions and hand out syllabus
5 Overview of the course and class portal.
15 Hand Out: Diagnostic Assessment
5 Lecture: History of the web.
10 Exploration of the web. Peek behind web page to look at the code.
15 Discussion: What does the web means to you and your work?
10 Question and Answers
15 Activity: Create content by writing.
10 Break
30 Demo/Activity: Marking up the content. Writing HTML
15 Tools of the Trade
15 Get server space set up.
10 Exercise: publish essay.
5 Go over Homework assignment
10 Q&A

Learn By Doing

  • Paying attention in class is half the battle.
  • Putting into practice what’s covered in class is the other half.
  • Each class teaches a necessary skill. Learn it.
  • Code a little each day, not once in a while. You’ll get over the frustration soon enough, and find that coding web pages is not nearly so difficult, once you understand the little mistakes, that everyone makes in the beginning.
  • There is a lot of support for you to understand each step of the way, from this website, the book, Lynda.com and the web itself.
  • The entire process is scaffolded, meaning that each class builds on the previous class.
  • Missing classes leads to holes in your ability to code websites. Please stay current and go back to a topic till you know it, and can build on top of it.
  • Each assignment targets a skill. Homework is collected and graded and you are given detailed feedback at least four times during the semester, more if you email me and ask for it.
  • There are two main assignments: a midterm portfolio and a professional, standards compliant, website that sells a product for the final.
  • If you complete all the assignments, you will be well on your way to obtaining the knowledge required to build any website that you can design.
  • The focus in the class is on structuring content and its presentation, not on behavior. You need solid HTML and CSS skills to make the most of Javascript or jQuery. Everyone wants the flash and sparkle of an animated website, but without a foundation to build upon, it will be a cliche or worse.
  • Students should not implement jQuery unless they have grasped and are comfortable implementing CSS and HTML. I Ignore Javascript and jQuery implementation when grading, looking only at how well you understand HTML and CSS. That is as far as the aim of this course goes.
  • That does not stop students from using a jQuery template like Boxify as the base for their final, but be aware that I will be looking only at what you’ve added, in terms of CSS and HTML.

What can HTML5 and CSS3 be used for?

  • Create Web Pages and Web Sites for your self
  • Create Web pages and Web Sites for others
  • Customize existing Blogs and Tumbler Accounts, etc.
  • Publish Electronic Books: Calibre Ebook Editor
  • Develop Mobile App Interfaces

The list is longer, as HTML5 and CSS3 is the language of choice for marking up content and styling it. They have become the universal language of content presentation.


Learning a Langauge

The course covers a lot of territory. It requires learning a new language that you do not yet know. This always takes time.

Visit HTML & CSS primer for a brief rundown on what code is and how it works.

The class spends less time on HTML (hyper text markup language) and more time on CSS, (cascading style sheets). We only touch on Javascript (jQuery), PHP and wordpress.

Like any new language, it takes time before you become familiar enough to not make the basic mistakes that stop you cold. Overcoming this will allow you to attempt the larger assignments in the middle and at the end of the semester.

Stay on top of the little steps. The big steps will happen automatically. You will be creating websites by the end of the semester.

There is no magic solution that painlessly provides all you need to know. Like any language, you only get good if you practice.

Write code after every lesson and try, and possibly fail, but try again, to see what works and make what works your own. This can be frustrating at first, as stupid little mistakes can stop you dead in your tracks. That is when you will hate this course. No one likes to be frustrated.

Don’t stop when get stuck. Take a few moments off, and try again.


Validate!

Validate your work often! The validator is your friend that will point out your mistakes.

There are alternatives, like Validator.nu, an alternate address for CSS validator, and direct CSS input.

Do not be alarmed if there are 50 mistakes. That can happen when you have not been using the validator as you should. The problem is usually not major, but if you have not validated in a while, one mistake can trigger a lot of other problems. Fix the first problem that is flagged, and chances are that many of the other problems will disappear.

If using validator does not solve your problems, email me. Email me whenever you get stuck.


Grading

I grade each assignment, usually 100% if done correctly, 80% if it is missing some requirements, 50% if it needs work and 25% if it is merely set up. Your homework can deliver you 125% or even 150% if it goes beyond expectations.

You will not always know how to do an assignment right away. Start the homework on time and hand it in, that way you can go back and finish it at a later date.

By handing in the assignment on time, you can continue to work on it till it meets the requirements, till the end of the Semester. This means you can fix problems that you did not understand at the time with knowledge you gained since. 

This is not an excuse to not do your homework till the last minute. Experience has shown that the homework prepares you to do the main assignment.


Information Overload

Yes, I know, there is a lot of material to read here.

No one is held accountable for all of the reading, watching the videos and following all of the links to pages on the web. That would be insane.

For me, it is better to have too much information than not enough. I’ve done my best to make it accessible in layers.

Read the first page, follow the links. Read the supporting articles. There are a lot of links on the secondary pages. I can’t expect you to follow all of those, or even make sense of them all. Don’t dwell on what you do not understand, but be ready to come back when your more able to absorb the information.

You are responsible for putting the information presented in class to work. Should you need help, all the lectures are written out, the pages in the book are indicated, links to video are available, you can search the web (search for answers to the problem you are having by entering your question in a full sentence) or email me. I answer emails as soon as I am able, usually right away.

How well you know the material becomes apparent in the website you build.


Each unit will point to a number of websites that exemplify current practices. This helps you see how the web implements the topics discussed in class.

Current Practices

A lot of websites deserve to be looked at as standard bearers for the web. A few that have stood the test of time:

  • CSS Zen Garden Original CSS experiment in 2003 that explores what is possible using CSS and galvanized the web toward standards compliant web sites.
  • The Rijks Museum opened the floodgates for the new single page jQuery web design experience. Others had come before, but it pushed this over the top. The user interaction and content are impeccable.

    See the design sensibility spreading Global Change from US.gov.

  • NY Times The New york Times soon followed. A standard setting newspaper that helped move the web away from its addiction to tables in 2007 has just been using jQuery animation. Follow the link to see how design considerations led to a more engaging web experience.
  • The New School Jumped onboard with the JQuery look in 2014 as well. The Parsons Web Site Remained conventional
  • Apple Apple helped define design as the central tenet of computer usage, and did so agains the establishment for many years. Its website is sparse, to focus on what is important, while hiding a site of vast complexity.
  • Facebook Not for what it looks like, but for having taken over a big part of the web. It walled off a large section of the web and privatized the experience. The privacy is good for users, who feel free to share their experiences with friends and family, except the back door, which shares the details with corporations to target advertising and government spy agencies. That’s not all they collect, so watch out what you say or do. That’s the price of freedom, or so they say.
  • Then there is the future of the web. Where is it going? Browser manufacturers are pushing the envelope, trying to create an entirely new interactive medium, using just HTML, CSS and Javascript. Microsoft’s Internet Explorer demo. Read about how it is done.

Community

So what can you do once you learn HTML and CSS?

We start with two websites built in class, but by the end, you should be able to pick up a template like this and create a modern website. It was created by Peter Finlan who uses what he has learned to promote himself in his site.

This exhibits what’s best about the web, which is a global community that shares and cares about web design. They are there for you. All you need is HTML and CSS to join.


There is nothing like examples to motivate your own work. Please be motivated to do your very best. You are the one who gains from learning these skills.

I’ve had several students who have successfully pursued a career in web design, the most recent is Urara Ito (Current Portfolio Site and Student Portfolio Site), who landed a job with Yahoo! Japan just a year after taking the class. Everything is here for you to make this a reality. All you need is to put in the time.

Previous Semester Work

Communication Design: kathryn lawrence

Design Marketing: Yvonne Yeh

Communication Design: Francesca Davoren-Britton


My desire is for you to expand your horizon beyond what is taught in class. The News and External Resources Links are a gateway in that direction. This section include links to external resources. It is highly recommended that you explore and make use of them.

Sometimes the information is pertinent to skills I expect you to have, like visual literacy and typography for students who have not been exposed to the general principles used in designing visual communication. Other links list important resources or important blogs and magazines that you can subscribe to.

News and External Resources

design notes from a design course included for students who are not primarily design majors and have not been exposed to the elements and structure of visual communication. Visual Literacy is taken for granted in this course. Learn about that here:

  1. color
  2. concept
  3. form
  4. content
  5. figure & ground
  6. balance
  7. proportion
  8. unity
  9. elements

The readings are from the book, 7th edition. HTML5 & CSS3 Visual QuickStart Guide (8th Edition) ($24.29 at Amazon) by Elizabeth Castro and Bruce Hyslop. You can read the book cover to cover, or just those sections in which you need help.

It does not matter if the class material compliments the book, or if the book compliments the class material. One way or another, you need to practice till you understand the material well enough to make it your own. If reading this book helps, then by all means, buy it.

The contents of the book are loosely followed in class. This gives you a quick reference as to the topics covered in each chapter. If you elected to rent the book from Pearsons, you can use the links below to go to the content directly.


Readings

Chapter 1: Web Page Building Blocks

  1. A Basic HTML Page 3
  2. Semantic HTML: Markup with Meaning 6
  3. Markup: Elements, Attributes, and Values 13
  4. A Web Page’s Text Content 16
  5. Links, Images, and Other Non- Text Content 17
  6. File Names 19
  7. URLs 20
  8. Absolute URLs 21
  9. Relative URLs 22

Chapter 2: Working with Web Page Files

  1. Planning Your Site 26
  2. Creating a New Web Page 28
  3. Saving Your Web Page 30
  4. Specifying a Default Page or Homepage 33
  5. Editing Web Pages 35
  6. Organizing Files 36
  7. Viewing Your Page in a Browser 37

Chapter 3: Working with Web Page Files

  1. Starting Your Web Page 43
  2. Creating a Title 46
  3. Creating Headings 48
  4. Understanding HTML5’ s Document Outline 50
  5. Grouping Headings 58
  6. Common Page Constructs 60
  7. Creating a Header 61
  8. Marking Navigation 64
  9. Creating an Article 68
  10. Defining a Section 72
  11. Specifying an Aside 75
  12. Creating a Footer 80
  13. Creating Generic Containers 84
  14. Improving Accessibility with ARIA 88
  15. Naming Elements with a Class or ID 92
  16. Adding the Title Attribute to Elements 95
  17. Adding Comments 96

Lynda.com is a resource for instructional videos. She has been at it for a long time, and there are a lot of videos on Web Design (36). They are a great resource.

Signing on to lynda.com

Lynda.com HTML Video Tutorials

Web Design Fundamentals and HTML Essential Training.


The last item on each page contains the definitions, words used in the class that you should be familiar with.

Definitions

These are the terms that participants should be familiar with during this unit:

The W3 organization definitions of HTML, XHTML and CSS:

HTML (the HypertextMarkup Language) and CSS (Cascading Style Sheets) are two of the core technologies for building Webpages. HTML provides the structure of the page, CSS the(visual and aural) layout, for a variety of devices. Along with graphics and scripting, HTML and CSS are the basis of building Web pages and WebApplications.

What is HTML?

HTML is the language for describing the structure of Web pages. HTML gives authors the means to:

  • Publish online documents with headings, text, tables, lists, photos, etc.
  • Retrieve online information via hypertext links, at the click of a button.
  • Design forms for conducting transactions with remote services, for use in searching for information, making reservations, ordering products, etc.
  • Include spread-sheets, video clips, sound clips, and other applications directly in their documents.
With HTML, authors describe the structure of pages using markup. The elements of the language label pieces of content such as “paragraph,” “list,” “table,” and so on.

What is XHTML?

XHTML is a variant of HTML that uses the syntax of XML, the Extensible Markup Language. XHTML has all the same elements (for paragraphs, etc.) as the HTML variant, but the syntax is slightly different. Because XHTML is an XML application, you can use other XML tools with it (such as XSLT, a language for transforming XML content).

What is CSS?

CSS is the language for describing the presentation of Web pages, including colors, layout, and fonts. It allows to adapt the presentation to different types of devices, such as large screens, small screens, or printers. CSS is independent of HTML and can be used with any XML-based markup language. The separation of HTML from CSS makes it easier to maintain sites, share style sheets across pages, and tailor pages to different environments. This is referred to as the separation of structure (or:content) from presentation.

The remaining definitions are from Wikipedia

Internet

The Internet is a global system of interconnected computer networks that use the standard Internet Protocol Suite (TCP/IP) to serve billions of users worldwide. It is a network of networks that consists of millions of private, public, academic, business, and government networks, of local to global scope, that are linked by a broad array of electronic, wireless and optical networking technologies. The Internet carries a vast range of information resources and services, such as the inter-linked hypertext documents of the World Wide Web (WWW) and the infrastructure to support electronic mail.

HTTP

The Hypertext Transfer Protocol (HTTP) is a networking protocol for distributed, collaborative, hypermedia information systems.[1] HTTP is the foundation of data communication for the World Wide Web.

FTP

File Transfer Protocol (FTP) is a standard network protocol used to copy a file from one host to another over a TCP-based network, such as the Internet.

HTML

HTML, which stands for HyperText Markup Language, is the predominant markup language for web pages. HTML is the basic building-blocks of webpages.

HTML is written in the form of HTML elements consisting of tags, enclosed in angle brackets (like <html>), within the web page content. HTML tags normally come in pairs like <h1> and </h1>. The first tag in a pair is the start tag, the second tag is the end tag (they are also called opening tags and closing tags). In between these tags web designers can add text, tables, images, etc.

The purpose of a web browser is to read HTML documents and compose them into visual or audible web pages. The browser does not display the HTML tags, but uses the tags to interpret the content of the page.

XHTML

XHTML (eXtensible HyperText Markup Language) is a family of XML markup languages that mirror or extend versions of the widely-used Hypertext Markup Language (HTML), the language in which web pages are written.

While HTML (prior to HTML5) was defined as an application of Standard Generalized Markup Language (SGML), a very flexible markup language framework, XHTML is an application of XML, a more restrictive subset of SGML. Because XHTML documents need to be well-formed, they can be parsed using standard XML parsers—unlike HTML, which requires a lenient HTML-specific parser.

XHTML 1.0 became a World Wide Web Consortium (W3C) Recommendation on January 26, 2000. XHTML 1.1 became a W3C Recommendation on May 31, 2001. XHTML5 is undergoing development as of September 2009, as part of the HTML5 specification.

CSS

Cascading Style Sheets (CSS) is a style sheet language used to describe the presentation semantics (the look and formatting) of a document written in a markup language. Its most common application is to style web pages written in HTML and XHTML, but the language can also be applied to any kind of XML document, including plain XML, SVG and XUL.

CSS is designed primarily to enable the separation of document content (written in HTML or a similar markup language) from document presentation, including elements such as the layout, colors, and fonts.[1] This separation can improve content accessibility, provide more flexibility and control in the specification of presentation characteristics, enable multiple pages to share formatting, and reduce complexity and repetition in the structural content (such as by allowing for tableless web design). CSS can also allow the same markup page to be presented in different styles for different rendering methods, such as on-screen, in print, by voice (when read out by a speech-based browser or screen reader) and on Braille-based, tactile devices. While the author of a document typically links that document to a CSS style sheet, readers can use a different style sheet, perhaps one on their own computer, to override the one the author has specified.

CSS specifies a priority scheme to determine which style rules apply if more than one rule matches against a particular element. In this so-called cascade, priorities or weights are calculated and assigned to rules, so that the results are predictable.

The CSS specifications are maintained by the World Wide Web Consortium (W3C).

Javascipt

JavaScript, also known as ECMAScript,[6] is a prototype-based, object-oriented[7] scripting language that is dynamic, weakly typed and has first-class functions. It is also considered a functional programming language[1] like Scheme and OCaml because it has closures and supports higher-order functions.[8]

JavaScript is an implementation of the ECMAScript language standard and is primarily used in the form of client-side JavaScript, implemented as part of a web browser in order to provide enhanced user interfaces and dynamic websites. This enables programmatic access to computational objects within a host environment.

HyperLinks

In computing, a hyperlink (or link) is a reference to a document that the reader can directly follow, or that is followed automatically.[citation needed] A hyperlink points to a whole document or to a specific element within a document. Hypertext is text with hyperlinks. A software system for viewing and creating hypertext is a hypertext system, and to create a hyperlink is to hyperlink (or simply to link). A user following hyperlinks is said to navigate or browse the hypertext.
A hyperlink has an anchor, which is the location within a document from which the hyperlink can be followed; the document containing a hyperlink is known as its source document. The target of a hyperlink is the document, or location within a document, to which the hyperlink leads. Users can activate and follow the link when its anchor is shown, usually by touching or clicking on the anchor with a pointing device. Following the link has the effect of displaying its target, often with its context.
The most common example of hypertext today is the World Wide Web: webpages contain hyperlinks to webpages. For example, in an online reference work such as Wikipedia, many words and terms in the text are hyperlinked to definitions of those terms. Hyperlinks are often used to implement reference mechanisms, such as tables of contents, footnotes, bibliographies, indexes and glossaries.

Web Browser

A web browser is a software application for retrieving, presenting, and traversing information resources on the World Wide Web. An information resource is identified by a Uniform Resource Identifier (URI) and may be a web page, image, video, or other piece of content. Hyperlinks present in resources enable users to easily navigate their browsers to related resources.

Standards Compliant Web Design

Standards-compliant is a term often used in describing websites and user agents’ (often web browsers) relative compliance with web standards proposed by the World Wide Web Consortium (W3C); also used for emphasizing that one doesn’t use proprietary methods or features of those browsers to ensure interoperability. Although there is no perfect browser that seamlessly adheres to all standards at the time being, huge advancement has been made by several major web browsers (such as Mozilla Firefox and Opera) in the past few years that will ensure better interoperability in the future.
Current use of the term “standards-compliance” generally refers to the adherence to coding practices in relation to the use of HTML or XHTML, with Cascading Style Sheets (CSS) to define the layout, colors, and fonts of a web page. The Web Standards Project (WaSP) is a group, mainly composed of experienced web developers, whose mission is to encourage the use of these standards globally. Their recent efforts have been to promote the use of and adherence to the CSS 2.0 web standard by browsers, including how browsers respond to invalid markup and styles. The tests developed by WaSP are called Acid1, Acid2, and Acid3, with each testing CSS1, CSS2, and CSS2+ (CSS2 + Client-Side Scripting), respectively.

01 Tools of the Trade

All that is needed to code for the web is a text editor. Everything we do is coded by hand. For learning how to code, it is best to write the code itself with a simple Text Editor so that the repetition helps you to remember. Once you know what you are doing, you can use amore advanced HTML or CSS editors and authoring program like Dreamweaver and the new Adobe tools, but not in this class.

It’s our preference to use a text editor, like HomeSite, TextPad or TextMate, to “hand code” everything, rather than to use a wysiwyg (what you see is what you get) HTML and CSS authoring program, like Dreamweaver. We just find it yields better and faster results.

Khoi Vinh, Design Director at NYTimes.com from NY Times Article

Text Editor

The text editor and the browser is all you need to do the work of building web sites. Do not use Microsoft Word or any other word processor. There are many text editors.

We will use Text Wrangler, which is a free download for Mac users. PC users can try Notepad++

SublimeText is popular editor, but it’s better to start simple, and move on once you graduate from the class.

The Browser

We will be relying on standards compliant browsers. While any of the standards compliant browsers can be used, we will use the Safari/webkit engine browser as much of the CSS3 goodness has been developed by the people working on it. In Safari, go into the Preferences -> Advanced tab and select Show Develop Menu in the menu bar.

Chrome is similar to Safari, but last year Google decided to go at it alone. I have since stopped using Chrome as my default browser. Too much of a memory hog, and no longer the stellar performer it once was.

Google is evil, or at least, not benign. Not that Apple is much better.

I could be using Firefox, and do at times, but it has been left out in the cold with the popularity of mobile platform offered by Apple and Google. I have an iPad and iPhone, so Apple is a natural choice for my own development.

When I develop for someone else, I am browser agnostic. I’m often on a PC and use Internet Explorer.

It should not matter which browser you use. Most things work on all browsers, though some the examples may work better on one engine than another.

Firefox with its Gecko page layout engine is similar to webkit, and has the amazing firebug plugin. Opera too, should be considered. It uses the Chrome engine. Internet Explorer 11 on the PC is standards compliant. We have truly entered a new world for anyone who still remembers how it used to be. It goes without saying that no one is to use an earlier versions of IE.

FTP using Fetch

Uploading your files to the server requires a File Transport Protocol tool. We will use Fetch to upload and download files to your web space at school. You can get the free version here. Fill out the form, use the Parsons mailing address (66 5th Avenue, New York 10011) and they will send you a serial number to use with Fetch.

Other open source programs that do this for the Mac and the PC are Filezilla, CyberDuck, Fugu and Transmit.

Setting Up Your Domain

Everyone has server space at school. It will be hosted on the Parsons B Server. You can mask a domain name to that space. Alternatively, you are able to pick up your own domain name and server space. Cost is approximately $10 a year for the domain name and the server space ranges from $25 to $120 a year, and many hosting services include the cost of the domain name in the hosting plan.

Setting Up Your Server Space at Parsons

Art, Media and Technology B.PARSONS.EDU user accounts are set up When I send a list of student names to Scot Weir. They use the standard user name: last name with first initial that you are already familiar with.

Once Scot has created your account, you will be sent an email. The email is from: root and the subject is something like: Important AMT B.PARSONS.EDU [user ID]. SAVE THIS E-MAIL!

This email may have entered your spam folder, which makes it difficult to find. Please find the email and follow the instructions to set up your server space.

The email will have your B Server address, user and password. You need to have your B Server address and your B Server password. If you do not have these, email bugreports@parsons.edu

If you have questions, or if it does not work, you should check to make sure address, name and password are typed in correctly. If it still does not work, email bugreports@parsons.edu

Instructions for setting up the server are found in the B.PARSONS.EDU Server PDF.

Getting your Own Host and Domain Name

A lot of hosts give you a free domain if you subscribe. I personally use DreamHost, as they host non profit sites I’ve worked on for free. Their price is a little higher than most basic plans unless you purchase it for five or ten years at a time.

One host I’ve run across is Ebound hosting, which has a great intro plan that costs only $1 a month. They also have an unlimited plan that gives you everything for under $5 a month including domain name for the year, multiple domains and all the usual goodies in spades. Their help response was quick and resolved all problems the one time I had to use them. Give them a try.

Their cost, with a three year plan, is $4 a month, and that includes a lot of goodies, including a domain free for the first year. Search the web for a discount. There is a 25% discount using this code: EBH25 (at the time I write this). I have no connection with Ebound hosting, but in calling them, a real human answered on the second ring. That’s amazing these days.

Purchasing a Domain Name

Registrars like name.com or Moniker, both of which I’ve used. (there are a lot of accredited registrars)

You cannot point a domain to your New School or Parsons server space, but you will be able to mask your domain to these accounts. That means a frame is created with your domain name above the address bar, but it actually shows the school website, which appears in that frame.

Uploading files to your Server Space

To access your files using Fetch, fill out the Hostname with “b.parsons.edu” then fill out Username with your Newschool ID, set your connection to SFTP, your password, the port to “222” and your initial folder to “public_html”. You should be able to log on.

how to fill out Fetch

The server is laid out much like your hard disk. You will drag files from the finder into Fetch, as if it were a local window. The main difference is that Fetch will not warn you when you are overwriting your files.

The second difference is that upper and lower case letters are completely different, and have nothing to do with one another. On your hard disk, it makes no difference. On the server, your links will not work. My suggestion is to name all files using lower case.

On the parsons B Server, you need to place all your files in the public_html folder. Different hosts can designate different names for this folder.

Setting up your Server Space

I expect you to use your root — public — directory for your own purposes. You will create a new folder and call it parsons (lowercase p) in the root directory. That is where you will develop all of your work for this class. As there is a midterm with associated assignments and a final, create two folders a portfolio and a final folder.

Web Site Organization

web site organization

Index.html and Worksheet.

You will create an index.html page inside of the parsons folder that will contain the links to each of your assignments. You will place a photograph of yourself, along with your name, so I can associate your work with you as a person.

The index.html in the portfolio and final assignment folders will serve as your worksheet. This is where I expect you to document your creative development. See example. Update these files in a timely manner!

I expect your class web space to be organized exactly like this or I cannot review your work.

The web space for each student needs to work exactly the same. This is how I make contact with your work. I will be going to this page to check up on your progress, so keep it current. Your grade depends upon it. Homework needs to be up the day before class — so I have some time to check it before teaching, for issues that can then be addressed in class.

01 HTML5 Template

<!DOCTYPE html>
<html lang="en"> 
<head>
<meta charset="utf-8">
<title>title</title>
<!-- Use this link to an external style sheet
<link rel="stylesheet" href="css/styles.css" media="all">
-->
<style type="text/css">
main { max-width: 1500px; }
section { max-width: 1000px; margin: 10px auto; padding: 0 20px; }
</style>
</head>
<!-- body -->
<body>
<main>
<section>
	<header>
	<h1></h1>
		<nav>
			<ul>
				<li><a href=""></a></li>
			</ul>
		</nav>
	</header>
	<article>
		<p>
		</p>
		<figure>
			<img src="http://b.parsons.edu/~dejongo/12-fall/stuff/01-blocks.gif" alt="blocks" />
			<figcaption>Blocks</figcaption>
		</figure>
	</article>
	<footer></footer>
</section>
</main>
</body>
</html>

01 Writing HTML5

HTML stands for Hyper Text Markup Language. There is a great HTML language reference at W3C working draft that describes the syntax and structure and the semantics of HTML elements and their attributes.

Content is “marked up” using tags to designate the structural significance of that content. Each piece of content so marked up constitute an HTML element, of which there are many.

A first level header is designated by opening and closing tags: <h1> 01 Writing HTML5 </h1>. All parts of the document are marked up with such tags to create HTML elements, even parts that you cannot see but still describe the document, such as the meta tags found in the header, or the <style> and <script> tags that contain CSS and Javascript.

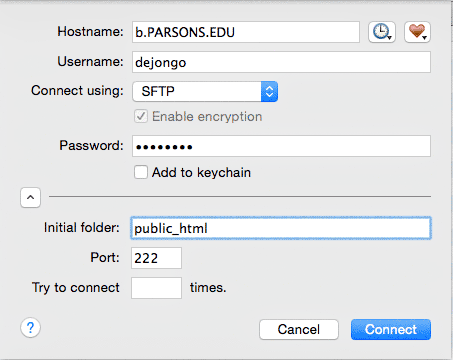
To create an HTML page, open a text processor. Creating a new file and call it index.html when saving. The file needs to be called index.html with a lower “i”. It is the index of the directory in which it is located. It will be the file that is opened upon entering that directory.

Every directory should have an index.html file, as some web servers allow visitors to see the content of the directory when there is no index.html file present. Other files in the directory can be reached by placing links connecting that page on the index.html page.

The following elements make up the HTML page:


The Structure of an HTML Document

The Doctype

The doctype has been greatly simplified in HTML5. The DOCTYPE tells the browser the version of the HTML rules the document will follow. Using the following DOCTYPE tells the browser you will be using HTML5. This is the only DOCTYPE I expect to see.

<!DOCTYPE html>

The HTML Element

The HTML elements contains all other elements. It is the root element, and the language attribute is specified as English.

<html lang="en">

The Head Element

The head element contains information about the content, but not the content itself. This is known as the document;s metadata. The head element does not get displayed in the browser window.

The Character encoding declaration specifies the encoding used to store or transmit the document. The Meta tag charset=”utf-8” tells the browser to use the unicode universal character set transformation format—8-bit.

The title shows up as the title of the browser window.

<head>
	<meta charset="utf-8">
	<title>Name</title>
</head>

The header element closes before the body element opens.

The Body Element

Markup written in the body element shows up in the viewport, or browser window. Think of this element as encompassing everything that appears in the browser window.

Everything you write comes between the opening and closing body tag. In the following, only “Hello World!” will show. Comments are not rendered by the browser.

<body>
<!-- Comment your Work! -->
<p>Hello World!</p>
</body>

The body element closes before the html element closes.

The Closing HTML element

Closing the HTML element is the last tag on the page. It closes the tag that holds all of the other elements in the document.

</html>


Element or a Tags?

An element is a single “chunk” of code comprising of a start and ending tag. They are representations of a thing for the browser, an object. Elements have all kinds of properties for the browser, like firstChild, etc.

<div>This is a div element</div>

Tags is the opening and closing code of the elements. <div> is a tag. <div>content</div> is an element.

Elements are not tags. Some people refer to elements as tags (e.g., “the P tag”). Remember that the element is one thing, and the tag (be it start or end tag) is another. For instance, the HEAD element is always present, even though both start and end HEAD tags may be missing in the markup.” From W3 HTML specification


The Inherent Structure of HTML

HTML is concerned with the structure of the content, and not with how the content should be displayed.

The natural flow of content is inline, meaning that content flows horizontally, like the letters on a line of text. In English, that is from left to right, but it could be in any direction.

In addition to the horizontal inline flow of content, elements can be determined to be block like and flow vertically. Block elements do not flow like characters, but like paragraphs, as entire blocks of text. By default, their width expands to fill the parent element and the flow is vertical. They flow down the page, starting from the upper left hand corner.

In HTML, block elements cannot descend from (be a child of) inline elements. Inline elements are the content of a block element.

CSS can change the display property of an element. It can make inline elements display as block elements, and block elements display as inline elements. That is very useful, usually to make inline elements act like block elements.

Valid HTML requires that block level elements do not descend from inline elements. Changing the elements displays with CSS does not change the validity requirements of the HTML document.

Tag Attributes and Values

Tag Attributes

HTML tags can take attributes, which describe certain aspects of the elements, with different elements having various assigned attributes. There needs to be a space between each attribute. Attributes for the img tag, for example, are src, width, height, class, and alt.

Example: <img src ="file_name" alt="logo">

Values

Every attribute has a value, even if it is an empty value. For example, the value of the src (source of the image) is the location and name of the image. While it is no longer a requirement to put either double or single quotes, as long as there are no spaces or other non-alphanumeric characters, it still best practice to do so.

Example: <img src="file_name" alt="logo"> />

Role Attributes

The role attribute describes the role(s) the current element plays in the context of the document. In the official language of the W3 “The XHTML Role Attribute allows the author to annotate XML Languages with machine-extractable semantic information about the purpose of an element. Use cases include accessibility, device adaptation, server-side processing, and complex data description.”
Example: <nav roll="navigation">

Understanding the Tag Hierarchy

DOCKTYPE

html

head

meta
title
style
body

main

header

nav

ul

li
li
li
li
section

article

h2
p
p

img
figure

img
figcaption
p
footer

HTML is a collection of elements arranged in a kind of containment hierarchy. This is a parent – child relationship, where the enclosing tag is the parent of the enclosed tag, which is its child. The entire structure can be likened to a tree, with the <html> tag as the single trunk from which the rest of the branches arise, first splitting into the two main branches, the <head> and the <body>. inside the body tag are all of the other branches that make up the document.

After the <doctype>, the HTML document starts with the <html> element that contains all other elements. It contains only two tags, the <head> and the <body> tags.

The <head> tag contains information about the page (meta-information), but that is not visible, like the <title> tag, <meta>tags and <html>, <style> and <script> tags and links <link>to styles and scripts.

The <body> tag contains all of the content, everything that’s visible in the browser window. The tags are usually several levels deep. Nesting tags is very useful, for it groups elements together. This makes it easy to create the different parts of the layout.

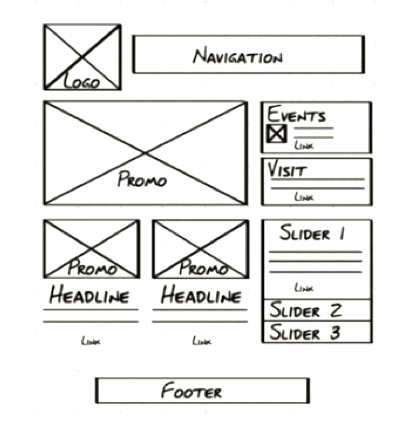
In the figure on the right, the <wrapper> contains all of the other visible content. This element is usually given automatic margins that center it horizontally in its parent tag, the <body>. If the <wrapper> is moved to the right, all the child elements contained within it are moved to the right as well.

Because each element is a child of another element, there are only clearly determined paths. For example, the <img> is a child of <p>, which is a child of <article>, which is a child of <section>, which is a child of <wrapper>. The complete path of the <img> tag is html body wrapper section article p img. This path would select all images in the paragraphs contained in article, section, wrapper, body, html. Since there are no other images, only the image with the red background is targeted by this path. The <img> in the figure has a different path, for example.

How to Write the Code

A tab is used to show how many levels the code is nested from the <html> element. This results in a visual way to check if the code is nesting properly. The code should look like :

<html>
	<head>
		<title>title </title>
	</head>
	<body>
		<main>
			<section>
				<header>
					<h1>Headline for Page</h1>
				</header>
				<article>
					<p>content
				</article>
				<footer>
				</footer>
			</section>
		</main>
	</body>
</html>

To make it easy on you, there are tools that let you clean up your hierarchies automatically. You’ll want to remember this link right before you hand in your midterm and at the end of the semester, when you hand in your final.

The DOM

The HTML file with all of its codes and content gets parsed by the browser. The syntax of each tag will be analyzed to see how it fits together according to the HTML rules. This results in a document object model where each node represents a branch on the tree.

The nodes drill down into each element to the attributes inside of the tags and to the content of the element. The DOM tree can be seen in this live DOM demo. Paste the HTML5 template into the Markup to test box below to see an example of how the browser parses the tags of a simple document into a DOM tree:

To see the document tree of a more complex example, copy the source code for this page and paste it into the Markup to test box

General Rules To Follow

HTML5 has loosened up the rules somewhat, but it is still desirable to follow these rules for well formed HTML documents.

Close Every Tag

Most Tags contain their content, meaning that there is an open tag and a closing tag. Some tags are self closing, like the <meta>, <link>, <img> and <br> tags. These tags get replaced by the content, in the case of the picture, or cause a line break, in case of the <br>.

Self closing tags should self close, meaning that they end in a /> and all other tags should be closed. Accidentally not closing a tag can cause all kinds of havoc and will be flagged when validating, which you should be doing often in the first few weeks of writing code.

Correctly Nest Every Tag

If a tag opens before a preceding one closes, it must be closed before that preceding one closes. <header><h1>Title</h1></header> not <header><h1>Title</header></h1> CSS relies on proper nesting to target styles to elements, so you have to get this right. In this example, the </h1> tag is nested in the </header> tag, and is the child of the header, which is the parent tag. As a container, a tag acts like a group, and moving a parent also moves all of the enclosed children. Likewise, absolute positioning is based on the coordinates of the parent element.

If you visualize each element as a node on a tree, it is obvious that you cannot open a tag before the previous tag is closed. If you make a mistake, the browsers can sometimes repair the damage, and everything still displays correctly, but don’t count on it, and different browsers have different levels of damage control.

Inline Tags Cannot Contain Block Level Tags.

Block-level elements follow one another according to the document flow, one below the other. Inline elements follow one another as characters in a paragraph. While it would seem obvious to not mix these two up, the validator will catch you if you do.

Keep Tags Lower Case

This is a requirement of XHTML5, which we will not concern ourselves with, but its a good idea anyway.


Tags Used to “Mark Up” the Content

Learning HTML comes through writing HTML. The more you code, the easier it becomes, till it’s second nature. The content is divided into inline and block tags.

  • Inline elements display just like characters, coming one after the other horizontally, till it comes to the end of the line. The line then breaks and resumes at the beginning of the next line down, and so on.
  • Block elements display like paragraphs, coming one after the other vertically down the page in the document flow.

Reminder: Just to make it confusing, CSS allows you to override the object’s default display, and make inline elements display like block elements and vice versa.

There are many HTML elementsup.


Inline Elements

These elements display just like characters, coming one after the other horizontally, till it comes to the end of the line.

span

The span tag selects inline content.

So much information.

So much <span style="color: red;">information</span>.

strong

increases importance

So much information.

So much <strong>information</strong>

emphasis

for emphasis

So much information.

So much <em>information</em>

line break

Breaks the line without creating a new paragraph.

So much
information.

So much <br />information.

One Line Quotations

Quotations inside of a paragraph are suppose to get automatic quotes when you use this tag.

So much information.

So much <q>information</q>.

Anchor Tag (Links)

The anchor element anchors a URL (uniform resource locator, or a unique web address) that targets the destination id or web page by using the href (hypertext reference) attribute.

Any tag can be a target, within any document on the world wide web. To target a tag, it has to contain an id <h3 id="anchor">.

To target the id, you need to use the id identifier, the hash tag # and the id name itself. <a href="#anchor">.

Hyperlink to destination on the same page

Click the example below and you’ll see the page jump just a little.

Hyperlinks to other pages

A hyperlink can address any unique webpage on the world wide web. It can use an absolute address, or a relative address, if the page is on the same server.

Absolute Hyperlink Address

An absolute address starts with http://, as in the address of the page that you are on (look up at the address bar)<a href="http://b.parsons.edu/~dejongo/01-writing-html5/">Writing HTML5</a>.

Relative Hyperlink Address

If the page is on the same server, it is possible to omit the absolute reference, and specify the path to the document from the location of the document containing the link.

Links to a location on the same page are always relative to the page itself.

Targeting tags on other pages

Links to a location an another page come at the end of a absolute or relative address.

and

Image Tag

The image tag gets replaced by the image. That is why it does not have a closing tag. You can make a tag self closing by including the slash mark / right before the greater sign.

You need to specify an alt attribute so that text will appear if the image does not. The title attribute is optional. The title shows up when you hover over the image for a second or more.
description of image for screen readers or when images are turned off

<img src="image_location/name_of_image" alt="description of
image for screen readers or when images are turned off" title="Final Thumbnail" />

Comments

Comments are a way to add notes or hide code. Comments are not displayed by the browser. Use them to notate your document with a description of what's going on in each part of the document.

Comments will help remind you why you did something a certain way (or help someone else figure out how to read your code).

You can also use comments to temporarily hide code that you do not want to use, but do not yet want to delete.

Do not use two dashes in a row -- within the comment, as that causes confusion in some browsers.

<!--
Comment your Work!
-->


Block-level Elements

Block elements display like paragraphs, coming one after the other vertically down the page in the document flow.

div

div stands for division, and it is the generic block element. It is used when an element is needed for styling purposes or as a convenience for scripting. Note that it is not equivalent to the HTML5 section element.

content
<div style="background: pink; padding: 10px;">content</div>

Headlines

How a headline looks depends on how they are styled. You should use headlines to structure your content, not based on how they look.

Headline h1

Headline h2

Headline h3

Headline h4

Headline h5
Headline h6
<h1>Headline h1</h1>
<h2>Headline h2</h2>
<h3>Headline h3</h3>
<h4>Headline h4</h4>
<h5>Headline h5</h5>
<h6>Headline h6</h6>

paragraph

paragraph bla bla bla bla.

paragraph bla bla bla bla.

<p>paragraph  bla bla bla bla.</p>

Block Quote

Used to style quote that takes up an entire paragraph. It is indented and given a different style.

paragraph bla bla bla bla.

So much information.

<p>paragraph  bla bla bla bla.</p>
<blockquote>So much information.</blockquote>

ordered list

Ordered lists are numbered sequentially.

Ordered List

  1. list item
  2. list item
  3. list item
  4. list item
  5. list item
<h3>Ordered List</h3>
<ol>
<li> list item </li>
</ol>

Continuation of the Ordered List

If you plan on breaking the list into several lists, but want them to be numbered sequentially, use the start attribute start="5". This would start the list at 5 instead of 1.

  1. list item
  2. list item
  3. list item
  4. list item
  5. list item
<ol start="6">
<li> list item </li>
</ol> 

Unordered List

Unordered lists is for a collection of unordered items, where the order would not change the meaning of the list. It is always used for navigation, with each menu item considered as part of the list. The unordered list is styled to remove the list style.

  • list item
  • list item
  • list item
  • list item
  • list item
<ul>
<li> list item </li>
</ul> 

Definition Lists

Definition lists is for a list of terms and corresponding definitions. The term to be defined is listed first with the definition coming after the term. A term can have multiple definitions, and a definition can have multiple terms. A definition header can precede the definition.

List Header

Term 1
This is the definition of the first term.
Term 2
This is the definition of the second term.
<dl>
<lh>List Header</LH>
<dt>Term 1</dt>
<dd>This is the definition of the first term.</dd>
<dt>Term 2</dt>
<dd>This is the definition of the second term.</dd>
</dl>
term
definition1
definition2
<dl>
  <dt>term</dt>
  <dd>definition1</dd>
  <dd>definition2</dd>
</dl>
term1
term2
definition
<dl>
  <dt>term1</dt>
  <dt>term2</dt>
  <dd>definition</dd>
</dl>

table

The HTML table layout mode allows authors to arrange data -- text, images, links, forms, form fields, other tables, etc. -- into rows and columns of cells.

Simple Table

table cell item table cell item
<table>
<tr> 	<td> table cell item </td>
<td> table cell item </td>
</tr>
<tr> 	<td> table cell item </td>
<td> table cell item </td>
</tr>
</table>

Fully Loaded table

A table can have a head, multiple table bodies and a table footer. You can span both rows and columns with the rowspan="2" or colspan="2" attribute. This allows for the header to expand down and the footer to expand across in the following example.

The Caption Holds the Title of the Table
Head 1 Head 2a Head 3
Head 2b
table cell item table cell item table cell item
The footer is a place for information about the table.
<table id="table">
<caption>The Caption Holds the Title of the Table</caption>
<col><col><col>
<thead>
<tr><th rowspan="2">Head 1</th><th>Head 2a</th><th rowspan="2">Head 3</th></tr>
<tr><th>Head 2b</th></tr>
</thead>
<tbody>
<tr> <td> table cell item </td>  <td> table cell item </td>  <td> table cell item </td></tr>
<tr> <td> table cell item </td> <td> table cell item </td> <td> table cell item </td></tr>
</tbody>
<tbody>
<tr> <td> table cell item </td>  <td> table cell item </td>  <td> table cell item </td></tr>
<tr> <td> table cell item </td> <td> table cell item </td> <td> table cell item </td></tr>
</tbody>
<tfoot>
<tr><td colspan="3">The footer is a place for information about the table.</td></tr>
</tfoot>
</table>


Iframe

An inline frame places another HTML document in a frame. The inline frame can be the "target" frame for links defined by other elements, and it can be selected by the user agent as the focus for printing, viewing its source, and so on.

The iframe is exhibited with attributes that are determined using the equivalent CSS in the demo width: 98%; height: 300px; border: 1px solid #f000; overflow: scroll;.

<iframe src="01-writing-html5/">height=100 width=200 frameborder=1 scrolling=yes >You need a Frames Capable browser to view this content.</iframe> 

Writing HTML, Absolute and Relative Addresses, Tools of the Trade

Target iframe from Link

You can target any page to appear in the iframe by naming it and using the target attribute with the name target="iframeDemo" as demonstrated above. Click on the links above to load different documents.

A destination anchor is used to position the Writing HTML document at the iframe section. That requires an anchor with the same name <a id="i-frame">. See the link tag above.

<a href="01-writing-html5/#i-frame" target="iframeDemo" >Writing HTML</a>
<a href="01-absolute-and-relative-addresses/" target="iframeDemo" >Absolute and Relative Addresses</a>
<a href="01-tools-of-the-trade/" target="iframeDemo" >Tools of the Trade</a>


HTML5 tags

Before HTML5, the generic markup elements, <div> and <span>, were used to mark up the page. That means the code itself had no way of determining what the content was.

HTML5 changed that.

HTML5 standardized a lot of best practices to create semantically relevant block level tags that help organize the document. It is now possible to tell header content from the content of an article by looking at the tags alone. The most important of the new elements are: <main>,<section>, <header>, <nav>, <article>, <aside>, <footer>, <figure>, <figcaption>, <hgroup>, <wbr>.

Document Layout

<main>
<section>
	<header>
		<hgroup>
			<h1>Name</h1>
			<h2>Name</h2>
		</hgroup>
	</header>
	<article>
		<p>content <wbr> content</p>

the <wbr> tag, or Word Break Opportunity tag, is an inline tag that specifies where in a text it would be ok to add a line-break.

		<aside>
			<p>content</p>
		</aside>
	</article>
	<footer>
	</footer>
</section>
</main>

Adding Navigational Links

Using an unordered list.

<nav>
	<ul>
		<li><a href="#">link to homework</a></li>
		<li><a href="#">link to homework</a></li>
		<li><a href="#">link to homework</a></li>
	</ul>
</nav>

Adding a Picture

With a caption.

<figure>
	<img src="example.jpg" alt="example" />
	<figcaption> Caption </figcaption>
</figure>

Copy and paste this basic HTML5 template into a blank Textwrangler file. It has most of these elements and a basic header, so you can start coding the content right away. Repetition will acclimate you to writing HTML.

01 History of the Web

The Prophet of the Computer Age.

In 1945 Vannevar Bush published an article, As We May Think that helped set the stage for the pioneers who actually developed hypertext, twenty or so years later. By then, the future of the internet could more or less be predicted.

Apple comes out with the Macintosh computer in 1984. A few years later in the mid 1980’s it releases HyperCard for free to all Macintosh users, a condition specified by its creator, Bill Atkinson. Hypercard instantly provided a simulation of what the web would be in easily editable hyper-text stacks. It was a successful hypermedia forerunner to the WWW. It came with a programing language called HyperTalk that is the inspiration for javascript.

Apple’s HyperCard was used to implement an AppleTalk networked based hypertext information database system in the office of CERN where Tim Berners-Lee developed the WorldWideWeb, the very first browser to edit and see what would become the world wide web. Here is the first web site.

Tim Berners-Lee created the browser on a Next computer, using its innovative software to both render and edit web pages. It was later renamed Nexus, to differentiate it from the World Wide Web, and was released as open source in August 1991.

The World Wide Web

The very first popular browser was also inspired by HyperCard. ViolaWWW was developed that same year, and was an attempt to recreate HyperCard in X Terminals. ViolaWWW was adopted as the basis for the Web’s development till Mosaic was released, which was the first widely adopted web browser.

Netscape Navigator was created by the same people who created Mosaic, and was released just as the internet was coming out of the universities and into the public realm. Its popularity exploded and by 1994, industry pundits talked about the birth of a new ubiquitous computer experience that would be computer platform agnostic.

I still remember the heady claims in 1995, that this new medium would undercut Microsoft’s monopoly and that everything would be moved onto the web. Remember, all we had back then were slow and finicky modems that the changed the data-stream into sound, so any communication was very slow.

This challenged Microsoft’s bid for world domination, and it quickly licensed code from Mosaic to build Internet Explorer, bent on making sure that this new paradigm would never happen, or if it did, that it would be on their terms. This resulted in the historic fight for control of the web: Netscape Navigator vs Internet Explorer.

Web Standards

At the time, the visual presentation of the content was delivered by the HTML tags themselves, generally using frames and tables. Pictures took a long time to download, so they were carefully optimized and used sparingly.

CSS1 was introduced in 1996 to separate the presentation from the markup, and was further refined by the release of CSS2 in 1998. The browser manufacturers were slow to integrate these standards, as they were too busy adding proprietary features to ensnare users.

Microsoft’s forceful ways worked. It trounced Netscape Navigator’s domination of the web browser market. Internet Explorer reached 93% market penetration by 2003.

It did this by leveraging its 95% of installed computer operating system base to lock users in. Microsoft gave Internet Explorer proprietary access to the rest of the operating system.

Some think that it almost committed suicide by tying the browser into the Windows Operating System. Microsoft made the entire operating system vulnerable to all kinds of hacks.

Having lost the battle, Netscape Navigator gives up. With the race won and no competition, Microsoft stops development of Internet Explorer with version 6.5, having achieved a monopoly, but the victory would not last. Standards compliant browsers slowly began to make inroads into Microsoft’s world domination.

CSS 2.1, released in 2002, further refined this standard. It was fully embraced by the new browsers on the market.

Apple released Safari in 2003 and Firefox was born out of the ashes of what was left of Netscape Navigator in 2004, and Opera was there as well. This adoption is the beginning of standards based web design so prevalent today.

You can read the story as a comic strip presented below:

The New World

The plan was to sock it to Microsoft by creating stable web applications that could challenge both Microsoft Office and the Windows operating system. With web applications, the new paradigm would make the operating system underneath agnostic, not just for web pages, but for all computer usage.

That was the design goal of HTML5. Google developed Chrome, a browser where each window runs independent from other windows, bringing operating system like stability to the browser for the first time.

The next evolution is a change from computer based browsers to all kinds of handheld devices. Apple’s iPhone, iPad and Google’s Android operating systems are essentially internet devices that replace the desktop computer. To this end, both Apple and Google contributed much to the new HTML5 and CSS3 standards.

This is what Microsoft was afraid of, for its office suite and windows operating system generated most of its money. Though still a lumbering giant, Microsoft is no longer the monopoly it once was, and it decided to get on board.

Everyone wondered what was up when it released a public beta of a mostly standards compliant IE 9. It has since shown that is committed to open standards by releasing the IE10 beta right on the heels of IE 9.

It has joined in, helping to create new standards. That’s a solid affirmation that the future belongs to open, standards compliant computing.

It’s entirely feasible that HTML5 & CSS driven devices will be the future, and that it’s only a matter of time. Jeffrey Zeldman, a pioneers standards based web design, envisions that all interfaces will use such open standards.

A Glimpse of the Old World

The following two videos and the Zen Gardens web site are a snapshot of what the web was like in 2003. Molly E. Holzschlag demonstrates what the web looked like before CSSand after. This new world was brought into focus by the CSS Zen Gardens web site, which demonstrated the power of CSS with the separation of content from form.

The Existing Standards

While development of Internet Explorer stood still, a new crop of browsers aimed toward compliance of the HTML4, XHTML and CSS 2.1 standards, as set forward by the W3 organization, which brings us up to today.

The New Standards

Very exciting changes are here with the next generation, HTML5 and CSS3. This is, in part, because more and more interface elements are being created with HTML5 and CSS3, like the iTunes store interface, iOS apps, Android and others, so it’s possible that in the future, most interfaces will be using this most universal of languages, which places the scope of you learning HTML5 and CSS3 well beyond the browser.

HTML5 and CSS3 examples.

01 Homework

Assignment #1: Create a Website Profile

Choose a professional website that represents your aspirations. If you are a photo major, pick a photographer, for example. It should be a website that represents the kind of website you want to build for yourself.

Analyze the website. This analysis will be the starting point for thinking about your own portfolio.

Who is the primary target audience?What is the content strategy? How does the navigation work? The visual design? Answering these kinds of questions will make you aware of all the elements that go into your website.

Elements of a Style Guide.

Check out the example by Kathryn Lawrence.

  • Intent: What is the intent of the website? Use the intent to inform all of the other qualities. This should be a short and concise statement, as in to sell skills.
  • Voice: What is the voice of the website? Is the site’s voice impassioned, assured, energetic, or conversational? Pick a number of descriptive adjectives that capture the experience that whoever had the site built attempted to convey the intent.
  • Tone: Whereas voice is consistent for the site as a whole, tone is a contextual refinement that helps convey the content. An about page may have a different quality about it than the home page or a page in the shopping cart.
  • Brand: How does the website establish its brand? Is it consistent? Is it upscale, casual, youthful, objective?
  • Persona: Think of the many different users this website is addressing. If we were to write down the characteristics of any of these users and the label them, we would create a persona. Personas are composite sketches that reflect real world behaviors, attributes and attitudes of end users.

    You can start with yourself, as you are one of the audience targeted by the website. Take, for example, Naoto Fukasawa‘s website, a Japanese industrial designer. The audience can be personas representing museums, corporate clients, architects that may use his products in their work, end users, students doing assignments for a web basics class, and the list goes on.

  • Create 3 Personas: Personas are composite sketches that reflect real world behaviors, attributes, and attitudes. Create a character sketch for at least three personas.

    Go into the details why they would be attracted to the site, how the site informs them, and what can they do with this information. Would each of these people come back and be a repeat customer? Show how the site addresses these concerns.

    Tell a story, assign each of these personas a name and personal details. By making them real, you can visualize the audience and walk them through the website. Stories activate many areas in the target audience’s brain, facts do not.

    wireframe

  • Wireframe: Draw a wireframe for the main pages.
  • Copy Deck: In developing a website for a client, the content is often done by different people and the designer requires that all the copy for the web site be assembled into a copy deck. Copy the content of the first page, break it down and label it as if it were part of a copydeck. Take a look at the SAMOCA copydeck for guidance.
  • Competition: How does this website stack up against the competition? What does it have that competitor web sites do not, in terms of voice, tone, brand, style, design and so on? Can anything be learned from the competition?

    This exercise is meant to get you inside the development process of building a website — your portfolio!

    You will mark up your answer and create an index.HTML page with links and linked images that you will bring to class next week.

    Posting the Assignment on your Domain

    Ideally, you can post the assignment on the b.parsons.edu server. Some of you may not gain access to this server. In that case you will need to purchase a domain name and server space.

    Turn to the Tools of the Trade article for instructions of how to set up your website.

    Use Fetch to upload your files.

    Put a “parsons” folder inside the public_html folder.

    Fetch acts like a finder window, so when you drag files into the window, they end up on your server. Unlike your finder, you replace the file when the names are the same. This is how you update files with a newer version.

    Within the “parsons” folder, create a folder called “assignment-1”. The title of your web site profile should be “index.html”. It should end up in the “assignment-1” folder.

    Review Writing HTML article to help you create the HTML file. I have an old assignment as a homework sample.

    Watch Video Series Do Not Fear the Internet

    These videos are much more fun and direct than the Lynda.com videos. The Lynda.com videos are more complete.

    Fun introduction to the basics of HTML and CSS.

    1. Don’t Fear the Internet


    2. Don’t Fear the Browser


    3. Starting from Scratch: HTML


    4. Starting from Scratch: CSS


    5. Don’t Fear Specificity


    6. A great series of mostly more advanced how to videos can be found at CSS Tricks. Here is one on the very basics.

      The very Basics from CSS Tricks


    Grading Rubric

    I realize that English is not everyone’s first language. It is my second language. I am not going to ask the impossible, and I will take such difficulties into consideration. That said, persuasive content is crucial to a successful website.

    1. At bare minimum, I expect a couple of paragraphs marked up for each part of the assignment, pictures sized correctly and placed on the page using HTML5.
    2. Ideally, I expect the writing to be coherent and informative. This assignment will morph into your midterm portfolio, and I expect you to have some respect for your own work, and show that.
    3. I will be pleasantly surprised if you are able to create a story that is engaging and fun to read, and not just coherent and informative.

    Facts sit. Stories dance. That’s why about and bio pages come to life when they shape facts using the framework of a familiar, cherished story line.  Appealing narratives include:

    • Underdog succeeds.  Since the days of the Bible, we love to root for David against Goliath, the unknown who overtakes from behind, the unglamorous tortoise who beats the boastful hare.
    • Metamorphosis.  A caterpillar turning into a butterfly fascinates us.  Just beware of too many transformations in your story.  The butterfly then turning into a bird and then a monkey becomes bewildering.
    • Discovery.  How did you invent, find or formulate what you’re now known for?
    • Triumph.  A goal reached, obstacles defeated, the quest completed.
    • Righting a wrong.  As long as the injustice remedied was uncontroversial to your audience, this makes a stirring tale.
    • Unexpected joy.  Describe a surprising fun result from one of your efforts.
  • 01 Setting up your Server Space

    I expect you to use your root — public — directory for your own purposes. You will create a new folder and call it parsons (lowercase p) in the root directory. That is where you will develop all of your work for this class. As there is a midterm with associated assignments and a final, create two folders a portfolio and a final folder.

    Web Site Organization

    web site organization

    Index.html and Worksheet.

    You will create an index.html page inside of the parsons folder that will contain the links to each of your assignments. You will place a photograph of yourself, along with your name, so I can associate your work with you as a person.

    The index.html in the portfolio and final assignment folders will serve as your worksheet. This is where I expect you to document your creative development. See example. Update these files in a timely manner!

    I expect your class web space to be organized exactly like this or I cannot review your work.

    The web space for each student needs to work exactly the same. This is how I make contact with your work. I will be going to this page to check up on your progress once a week, so keep it current. Your grade depends upon it. Homework needs to be up the day before — so I have a day to check it before teaching, for issues that need to be addressed in class.

    Even if you are not finished with the homework, upload it and show me what you have, even if it is not finished. You work is due on time, and you can revise it according to the syllabus, until the 12th week of the semester. Work not handed in on time will be graded at my discretion.

    01 Visual Literacy

    The web is a design language, and more of you are not Parsons’ students, it become clear that some students need to know something about principles of design.

    Much visual literacy on the web is standardized, so you can copy your way, without knowing exactly what you are copying.

    Visual literacy goes beyond how something looks. It makes communication more effective.

    Visual literacy is used to solve problems in communication. This is a lot like structuring an argument in the academic essay, where reason supplants opinion. Instead of finding causes and reasons why, or a genealogy, bringing visually literate structuring to the communication makes the message more engaging, apparent and clear.

    To that end, I’ve assembled a number of links to help develop visual literacy.

    Fundamentals

    design notes:

    1. color
    2. concept
    3. form
    4. content
    5. figure & ground
    6. balance
    7. proportion
    8. unity
    9. elements

    Inspiration

    Use the following resources to explore your site design. Be inspired — copy, borrow, steal — but make sure that whatever you take, you make your own. The top priority is to effectively communicate the content.

    1. Design Inspiration
    2. Inspirational Sites
    3. Design History
    4. Rijks Studio
    5. Visual Literacy
    6. WookMark images
    7. Fonts in Use

    Type

    The last frontier of web design has been typography. Typography remains elusive for many, so I’ve gleaned useful links to explain the basics in the following typographic resource.