The last part of the video touches on material that we will cover in Week 8: Responsive Design.
The week 2 article on designing for the web had 7 steps, the last is a photoshop comp of what you want your website to look like. Last week’s assignment was to try and build that comp, but your skill level did not allow you to realize that assignment.
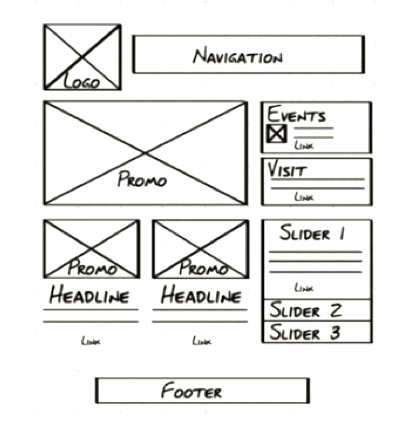
Using what you have learned about Layout Strategies, build your photoshop comp using HTML and CSS.
Many of you may not have caught the intermediate step that was due last week, to test all of your selectors, making sure that you can target each of the elements.
Just target the elements and color the background.
The first two sections of the lynda.com video by Chris Coyer of CSS Tricks on Creating a WordPress Template covers turning a photoshop comp to a HTML/CSS web page.
CSS Tricks is a website by Chris Coyer with lots of good information. He has a video on positioning, where he covers static, relative, absolute and fixed values, if you would like one additional resource:
Grading Criteria
I am looking to see how well you can juggle these boxes, and it takes a while to move them around through the document flow.
It is a lot like when you were a kid, playing with blocks, only here that world is upside-down, as you start on top, and build your way down. You will get the hang of it by doing it.
Validating your work often is a good technique to keep you on the strait and narrow path. Once you get better, you need not check so often, but right now, check every few lines of code.
I will be grading you on levels of confidence, consistency, creativity, innovation, precision, accuracy, efficiency and the ingenuity as you manipulate the elements in the document flow to build your page.
If you have not yet completed all 7 steps of the previous assignment, please do so. Step 7 is a Photoshop comp. Please recreate this in HTML and CSS using an external style sheet.
I want to see the intermediary step, to check and see if all elements are selected. Turn the background of each element into alternating colors, i.e. background: red;, background: orange;, background: yellow;, so that it’s easy to see that all elements are selected. Try to select them using type selectors and being specific. Writing header nav li {} to target the list items in the navigation element that is in the header. If it is not possible to select it that way, try using pseudo selectors li:first-child{} for example, and if that is not possible, use a class. Avoid using id because it is very powerful, and in complicated style sheets, its overuse can lead to difficulties, requiring the use of the important! to override styles, which is really not something we want to do.
Save one page of the assignment in this state and link it to the portal.
Once you have your selectors in place, create rules using absolute positioning for each element and make the web page look like your photoshop comp. Don’t worry if you cannot get it to look exactly right.
Do the best you can. We will cover CSS layout strategies next week, and you will get a chance to do the exercise again.
Here is an example first created in Illustrator and then translated into HTML to start you off. Know that the project requirements have changed, but it gives you an idea.
This assignment uses some CSS3 properties which you will learn about later, but you can play with the CSS3 generators and use these properties now. Click on the picture to see the actual page in HTML/CSS.
Grading Criteria
I am looking to see if you are developing the CSS skills to present the content according to your own critical design directives. You need to develop good technique, not for the simple rule assignment you are now doing, but for more complicated rule assignments ahead, when the cascade rears its sometimes ugly head as you try to keep track of all the inheritance and selector issues.
This requires more than knowing the proper method, because the conflicts are not always so easy to manage. Experience will teach you, but that means you have to make mistakes. Try not to make the little mistakes, like leaving out a semicolon, or misspelling a value. Those are a lot like hitting a wall. To prevent from becoming lost, validate often, and you can catch the little mistakes before they compound into a full-blown mess.
You can see in the CSS demos the havoc that broken CSS code brings. One mistake and the whole thing fails to render, or renders incorrectly. This is why I put emphasis on learning to do it right from the beginning, for problems will only compound as the document tree and the number of CSS rules become more complicated.
As for the creative methodology: you are at Parsons. That means you enjoy conceptual and visual problem solving. Be clear and logical in identifying the problem and the solution, but move me in how you implement that. Show me.
I will be grading you on levels of confidence, consistency, creativity, innovation, precision, accuracy, efficiency and the ingenuity by which you are able to solve the problems.
You are to create an index.html inside your parsons folder that contains your name, a picture, and a link to all of your assignments. Here is an example from a few semesters ago (expect the assignments to be different).
Assignments, when they are due and how much of your grade they represent: You can copy the list and paste it into a HTML5 Template, and turn each topic into a link that leads to your assignment. I did week as an example.
<ol>
<h3>Week 2</h3>
<li><a href="relative_link_to_your_assignment.html">Website Analysis*</a>
<h3>Week 3</h3>
</li><li>landing page— links to your assignments and a picture next to your name.
</li><li>HTML markup of Analysis
</li><li>Worksheet: behind the scenes on creative process for midterm (7 steps)*:
<h3>Week 4</h3>
</li><li>Portfolio exhibiting the CSS selections
</li><li>HTML Wire Frame from PhotoShop comp
<h3>Week 5</h3>
<li>incorporate CSS Layout Strategies in web site
<h3>Week 6</h3>
<li>Quiz
<li>Peer Review Notes / Advice
<h3>Week 7</h3>
<li>Typography Poster
<li>Finished Midterm: Portfolio
<h3>Week 8</h3>
<li>Final Worksheet*
<h3 >Week 9</h3>
<li >Responsive Redesign of Portfolio
<h3>Week 10</h3>
<li>CSS3 Collateral
<li>Class Exercise
<h3>Week 11</h3>
<li >CSS3 Animatics
<li>Class Exercise
<h3>Week 12</h3>
<li>Final: Modular Navigation
<h3>Week 13</h3>
<li>Multimedia Demonstration
<h3>Week 14</h3>
<li>Forms
<li>Peer Review Notes / Advice
<h3>Week 15</h3>
<li>Final
</ol>
The last part of the Semantic Markup article has the correct HTML5 elements you are required to use for all assignments. Most are present in the HTML5 template, so use them to organize your page.
section represents a generic document or application section. It can be used together with the h1, h2, h3, h4, h5, and h6 elements to indicate the document structure.
aside represents a piece of content that is only slightly related to the rest of the page. For complimentary content to the main content (Taken from XHTML 2.0 specification)
figcaption can be used as caption (it is optional).
Designing Your Web Site
Figure out your Target Audience and address them as you define the problem your portfolio has to solve. The first assignment will be your guide.
Do the 7 steps involved in designing a web site. These steps are relevant to any creative project. Apply them to your portfolio website.
Step #7 is to create a comp using photoshop, Illustrator or Indesign. The comp should answer the problem set forth in step #1 and demonstrate the solution, using the material that you have researched, written and collected.
Set the measurements in Photoshop, Illustrator, Fireworks, or Indesign to pixel information so it is easily translates into the pixels when developing the layout in CSS. This way 350 pixels wide in Photoshop will translate to width: 350px; in the code.
Documenting the Design Process
The seven steps are the basis for a sketch-book equivalent I call the work-sheet that is to accompany each major assignment. You will end up with two such work-sheets for the course, one for the portfolio site and one for the final.
The purpose of the work-sheet is to organize all the behind-the-scenes creative-decision making. I will give you credit for good decisions, even if you cannot execute them.
Jot down notes, questions and anything that helps you track your creative process. I will be looking at these to monitor your progress.
As they require almost no coding, I expect them to be finished by the date that they are due.
Set the article width to something like 700px in the <style> in the <head> of the document.
Link to the assignment.
Write in full sentences and use headers to explain what you are writing about. I like to see work that’s structured in a consistent in a logical way.
Write down any questions, comments or observations that you may have in an ordered list <ol> at the top of the document.
Topics will follow the 7 steps in Designing for the web, such as writing in the target audience.
Assess problems and identify solutions.
Include pictures of at least four thumbnails or two mood boards to show the trail of ideas that have led you to your final product. The point here is to show creative development, spatial exploration and how you’ve gone about solving the problems you’ve identified.
You can photograph or scan in the thumbnails together or as individual pictures, and comment them as you wish using <figure> and <figcaption>
Size any and all images to be no larger than the size you present them. Huge pictures take much longer than necessary to download.
Grading Criteria
I am looking to see how your coding skill are progressing, in both the homework and the worksheet. The more you code, the better you get at it. Once again, using the validator will help you to deliver a technically perfect document. Use it often if you are having problems, every few lines of code, that way you can see the mistakes you make and correct them one by one.
I want to see you explore your solution in the creative process from how you state the problem to possible answers, and to have you eliminate all that does not work as well as the answer you end up with. Have many thumbnails to document the process, not just the few that lock into the concept that you’ve gone with. While all of this documentation is overkill for the current assignment, you will get into the habit and develop the proper methods when it comes to creating a complete web site.
I will be grading you on levels of confidence, consistency, creativity, innovation, precision, accuracy, efficiency and the ingenuity by which you are able to solve the problems.
Choose a professional website that represents your aspirations. If you are a photo major, pick a photographer, for example. It should be a website that represents the kind of website you want to build for yourself.
Analyze the website. This analysis will be the starting point for thinking about your own portfolio.
Who is the primary target audience?What is the content strategy? How does the navigation work? The visual design? Answering these kinds of questions will make you aware of all the elements that go into your website.
Intent: What is the intent of the website? Use the intent to inform all of the other qualities. This should be a short and concise statement, as in to sell skills.
Voice: What is the voice of the website? Is the site’s voice impassioned, assured, energetic, or conversational? Pick a number of descriptive adjectives that capture the experience that whoever had the site built attempted to convey the intent.
Tone: Whereas voice is consistent for the site as a whole, tone is a contextual refinement that helps convey the content. An about page may have a different quality about it than the home page or a page in the shopping cart.
Brand: How does the website establish its brand? Is it consistent? Is it upscale, casual, youthful, objective?
Persona: Think of the many different users this website is addressing. If we were to write down the characteristics of any of these users and the label them, we would create a persona. Personas are composite sketches that reflect real world behaviors, attributes and attitudes of end users.
You can start with yourself, as you are one of the audience targeted by the website. Take, for example, Naoto Fukasawa‘s website, a Japanese industrial designer. The audience can be personas representing museums, corporate clients, architects that may use his products in their work, end users, students doing assignments for a web basics class, and the list goes on.
Create 3 Personas: Personas are composite sketches that reflect real world behaviors, attributes, and attitudes. Create a character sketch for at least three personas.
Go into the details why they would be attracted to the site, how the site informs them, and what can they do with this information. Would each of these people come back and be a repeat customer? Show how the site addresses these concerns.
Tell a story, assign each of these personas a name and personal details. By making them real, you can visualize the audience and walk them through the website. Stories activate many areas in the target audience’s brain, facts do not.
Copy Deck: In developing a website for a client, the content is often done by different people and the designer requires that all the copy for the web site be assembled into a copy deck. Copy the content of the first page, break it down and label it as if it were part of a copydeck. Take a look at the SAMOCA copydeck for guidance.
Competition: How does this website stack up against the competition? What does it have that competitor web sites do not, in terms of voice, tone, brand, style, design and so on? Can anything be learned from the competition?
This exercise is meant to get you inside the development process of building a website — your portfolio!
You will mark up your answer and create an index.HTML page with links and linked images that you will bring to class next week.
Posting the Assignment on your Domain
Ideally, you can post the assignment on the b.parsons.edu server. Some of you may not gain access to this server. In that case you will need to purchase a domain name and server space.
Turn to the Tools of the Trade article for instructions of how to set up your website.
Put a “parsons” folder inside the public_html folder.
Fetch acts like a finder window, so when you drag files into the window, they end up on your server. Unlike your finder, you replace the file when the names are the same. This is how you update files with a newer version.
Within the “parsons” folder, create a folder called “assignment-1”. The title of your web site profile should be “index.html”. It should end up in the “assignment-1” folder.
Review Writing HTML article to help you create the HTML file. I have an old assignment as a homework sample.
A great series of mostly more advanced how to videos can be found at CSS Tricks. Here is one on the very basics.
The very Basics from CSS Tricks
Grading Rubric
I realize that English is not everyone’s first language. It is my second language. I am not going to ask the impossible, and I will take such difficulties into consideration. That said, persuasive content is crucial to a successful website.
At bare minimum, I expect a couple of paragraphs marked up for each part of the assignment, pictures sized correctly and placed on the page using HTML5.
Ideally, I expect the writing to be coherent and informative. This assignment will morph into your midterm portfolio, and I expect you to have some respect for your own work, and show that.
I will be pleasantly surprised if you are able to create a story that is engaging and fun to read, and not just coherent and informative.
Facts sit. Stories dance. That’s why about and bio pages come to life when they shape facts using the framework of a familiar, cherished story line. Appealing narratives include:
Underdog succeeds. Since the days of the Bible, we love to root for David against Goliath, the unknown who overtakes from behind, the unglamorous tortoise who beats the boastful hare.
Metamorphosis. A caterpillar turning into a butterfly fascinates us. Just beware of too many transformations in your story. The butterfly then turning into a bird and then a monkey becomes bewildering.
Discovery. How did you invent, find or formulate what you’re now known for?
Triumph. A goal reached, obstacles defeated, the quest completed.
Righting a wrong. As long as the injustice remedied was uncontroversial to your audience, this makes a stirring tale.
Unexpected joy. Describe a surprising fun result from one of your efforts.
