Author: Gentry
Art and Design Final Presentation
Bib presentation
IoT Fall 2015 Final Project
Github link: https://github.com/deevolutionism/IoT_Final_2015
Final Presentation Video:
Quick demo of the project:
Concept:
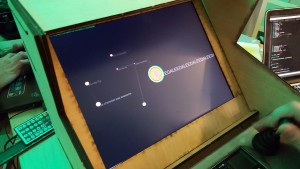
Mediating the constraints of the assignment (enclosed controller + up/down/left/right + P5.js) with my concept (to create an ephemeral social media platform, I decided to make my social media platform somewhat resemble neural networks. This metaphor is suiting because neural networks grow and fade over time as new connections are created and old ones decay. This organic structure reflects the ephemeral behavior I want to be present in my platform.
Research:
John Oliver’s “Dick Pick Program” to help spread awareness about online privacy. Putting privacy in the average man’s terms so that people can more easily understand what type of activities the NSA is capable of. Why should you care about NSA spying? Because they can see your dick pics. Thats an embarrassing breech of privacy right there.
The american public’s perception of privacy. A whole bunch of great of information about what people know and think about privacy: http://www.pewinternet.org/2014/11/12/public-privacy-perceptions/
Another pew interent research poll about the “social media spiral of silence” http://www.pewinternet.org/2014/08/26/social-media-and-the-spiral-of-silence/
Ephemeral Net: http://techcrunch.com/2013/06/30/the-ephemeralnet/
Process: Explained in the video.
Problems: Explained in the video.
Future Iterations/Direction: Improve visual design of the project. Brand the project, create a logo, make some sort of visual identity that can be pasted on the sides of the game cabinet.
Midterm Presentation: IoT
Purpose: To explore alternative networks and engage in current discourse by creating a project for raspberry pi + mesh network.
Concept: Build a mesh-capable, mobile Raspberry Pi with an accompanying should strap/holster for easy portability of the pi as well as a simple chat application.
Target:
- People who are already aware of network infrastructure.
- People who are code literate.
- People who want greater online privacy.
- People interested in exploring alternative communication.
- People who care about preserving democracy.
- Urban explorers.
- Tech hobbyists/enthusiasts.
Research: Lots and lots of research.
- Mesh networks/communities/software
-
http://subnodes.org/ (mesh)
-
https://github.com/WachterJud/qaul.net (mesh)
-
http://www.open-mesh.org/projects/batman-adv/wiki/Quick-start-guide (mesh)
-
https://nycmesh.net/ (mesh)
- https://code.google.com/p/fabfi/ (mesh)
-
http://www.backslash.cc/ (mesh)
-
http://radicalnetworks.org/ (community)
- http://www.openbsd.org/cgi-bin/man.cgi/OpenBSD-current/man8/hostapd.8?query=hostapd&arch=i386 (software)
- http://www.thekelleys.org.uk/dnsmasq/doc.html (software).
-
- Tutorials:
- http://elinux.org/RPi_USB_Wi-Fi_Adapters (list of all raspi supported dongles)
- http://raspberry-at-home.com/hotspot-wifi-access-point/ (tutorial on raspi as AP)
- https://learn.adafruit.com/setting-up-a-raspberry-pi-as-a-wifi-access-point/overview (another tutorial on setting up raspi as AP)
-
https://bogeskov.dk/UsbAccessPoint.html (for rtl8192cu drivers)
- https://nims11.wordpress.com/2012/04/27/hostapd-the-linux-way-to-create-virtual-wifi-access-point/ (hostapd tutorial)
- https://nims11.wordpress.com/2013/05/22/using-hostapd-with-dnsmasq-to-create-virtual-wifi-access-point-in-linux/ (dnsmasq tutorial)
- http://hackaday.com/2012/11/14/mesh-networking-with-multiple-raspberry-pi-boards/
- dongles used/tested
-
TP-LINK WN725N (did not work)
- OLIMEX rtl5370 (produced SSID, no connection)
- LB-Link 802.lln wifi usb (produced SSID, no connection)
- TP-LINK WR702n (purchased, did not test)
-
- Database used:
- http://redis.io/ (for raspberry pi) because it runs locally, requires no connection to the cloud or star network service.
Design Process:
- Iteration 1 – http://portfolio.newschool.edu/demcg318/2015/11/02/portable-meshpi-prototype-1/
- Iteration 2 – http://portfolio.newschool.edu/demcg318/2015/11/02/portable-meshpi-prototype-2/
- Iteration 3
- Moved away from building arm-mounted raspberry pi holders towards something more like a detectives gun holster. The shoulder strap also comes with an attachable 21w solar panel and a small satchel/backpack to carry various accessories (dongles, batteries, hard drives, replacement parts, etc…)
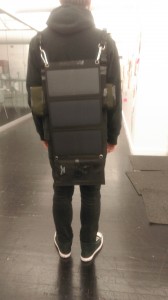

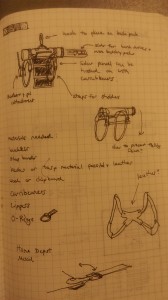
- Benefits include:
- Greater distribution of weight
- concealable/not as conspicuous
- modular. other items/accessories can be attached as necessary.
- Some problems:
- weight issues. The more components you attach to the back of the holster, the heavier it gets and the more it sags in the back.
- cardboard construction. weak, prone to breakage.
- usb power cord attached to raspi is a tad awkward/prone to tangles.
- case for raspberry pi needs more thought/design
- Future iteration:
- leather or synthetic strap construction
- work with fashion designer to sew and work out sagging issue
- construct a better satchel. Experiment with weather proof materials
- experiment with raspberry pi case design. Move beyond cardboard.
Challenges:
- Setting up mesh on raspberry pi. Kernel drivers aren’t fully supportive of ad-hoc mode.
- wifi dongles get very hot.
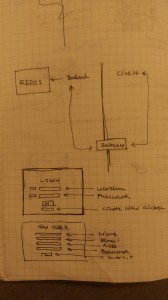
- creating chat history with Redis database and pulling history in order to populate the webpage whenever a new user joins.
- sewing – I am by no means skilled in any way at sewing. I have minimal experience and definitely need to find tutorials or seek assistance.
Conclusion/next step:
- This project required lots and lots of research on the the topic of networks before I was able to start engaging with the topic through a project. Researching all of this stuff confirmed my ignorance on the topic, but also generated lots of interest. When asking People about my engagement with mesh networks, they saw lots of value in the project, however, many weren’t entirely sure what kind of project could be made, other than instantiating a mesh node. Perhaps a future project might involve questions like: “how can I bring awareness and adoption of mesh networks to more average internet users?” or “What sort of applications could I build that would be exclusive to mesh networks? How could such applications be used to generate interest and adoption?” According to my ethnographic research, people were hesitant to join because it only works if many people are on it. People also weren’t absolutely sure that mesh networks are the solution to their privacy problems. So there are lots of questions for future engagement and I think next steps would be to dive into the communities already established around mesh networking to see what’s going on and how I can help.
Google slides presentation:
- https://docs.google.com/presentation/d/1CGuNh5DNDDObzshei2RHpZrjphAnT8JmWWBQhe7ZH8s/edit?usp=sharing
Link to Github repo:
edit: pictures.
Portable MeshPi with Qaul.net
I recently installed Qual.net on two raspberry pi’s in order to experiment with mesh networking. The documentation on using Qual.net with raspberry pi is limited and I found that it requires having quite a bit of knowledge concerning networking in order to properly configure the rapsberry pis.
I was using the Raspberry Pi 2 model B. I downloaded the whole repo here: https://github.com/wachterjud/qaul.net
In order to get Qaul working on the pi, I had to follow their readMe documentation here: https://github.com/WachterJud/qaul.net/tree/master/raspberry
There are two ways to run Qaul on raspberry pi: ethernet or wifi. So far I have only been able to get ethernet to work – but even this, I am unsure wether or not it is running properly.
For wifi, I was having trouble getting the raspberry pi to broadcast the Qaul free SSID and am not sure where to begin debugging as there is an enormous amount of code infrastructure.
Essentially what I got running here was the qaul.net web chat site. This seemed to be served up by the raspberry pi. The pi was hooked up to ethernet – so as long as I was within the same local network, I was able to access the website by typing in the IP. This allowed communication between my macbook and the pi.
The problem with this so far is that it is still dependent on existing networking infrastructure – the network provided by the school. This is no different than creating my own locally served website and simply broadcasting my IP address for others to access.
I recently purchased a TP-Link nano WR702N router and hope to hook that up to the raspberry pi. Perhaps this will allow me to broadcast a wifi signal independent of existing infrastructure.
Portable MeshPi Prototype 2
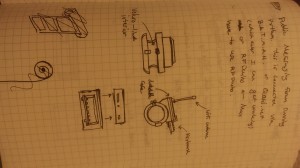
Prototype 2 is also constructed form cardboard. This time, I attempted to solve some of the problems of the initial prototype. This model features a removable/attachable case that houses the raspberry pi. The case can be lock into place. On the bottom, a 10k mAh battery is housed in order to balance the weight of the arm. Here you can see that the lid is now unobstructed and can be fully opened. The lid is also closed and sealed with velcro as apposed to a simple cardboard slit.
  The raspberry pi has its own independent case which allows greater mobility, portability, and protection for the pi. The case can be locked into place on the main arm construction via a pulling/hook mechanism. The mechanism is simple and effective.
  This prototype is far from the end product. Even though this one was properly balanced, it was cumbersome to wear. Additionally, if I moved my arm down to my side, it would easily slip off despite using buckles for tightening. The practicality of this gauntlet-like construction has been severely hindered by the size and weight. Though the location makes it easily accessible you are still limited to interacting with the pi using the opposite arm. In a future prototype I may experiment with a clip-on attachment so that you can place it on a back pack or wear it on any sort of strap, similar to how police wear radios on their chest. This will free up both hands and be far less encumbering. Future material construction might be leather, tarp, or 3D printed material in order to make it waterproof/resistant to weather.
Portable MeshPi prototype 1
Prototype 1:
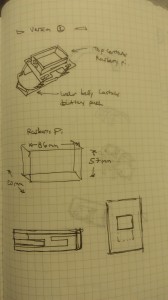
The first physical cardboard prototype of the raspberry pi portable mesh networking device. This one sits on the arm for easy and immediate accessibility. The Raspberry pi is housed within this case. A TP-Link WR702N sits on top of the lid. A batter is placed on the back. Finally, the whole compartment is strapped to my arm.
The lid can be lifted up to reveal the raspberry pi. A touch screen eliminates the need for a keyboard. At the moment, opening the lid requires quite a bit of effort – though it is quite secure. When opened, the raspberry pi is loosely seated and is prone to falling out of the case. No ledge, screws, or adhesives hold it in place. A battery pack is also located on the hind portion of the case. This prevents the lid from opening all the way which can be annoying when trying to use the touch screen. Additionally, the extra weight of the battery made the entire configuration top heavy, which frequently caused it to roll around my arm. Accessing the HDMI port and mini-usb charging port was also difficult because they were blocked by another wall of cardboard.
 Ultimately, this initial prototype construction had many flaws. Perhaps the most severe flaw was its tendency to roll around on the arm. This made it practically unusable unless you constantly held it in place.
In order to fix this, I propose straps be used to tighten the container to the arm. Additionally, the battery will need to be either removed or placed below the forarm, as if hanging, in order to serve as a counter balance to the weight of the pi.
Two Way Communication: Attempt 2
Group Members: Johnny Dunn, Gentry Demchak
Our goal is to eventually get two way encyrpted communication via a python application over RFduino bluetooth. Eventually, a javascript app will also be able to receive decoded messages to be displayed on a message screen.
when running node, we could not open the serial port. we used the same port that the RFduino was connected to.
In our next attempt we may have to write a function that scans all available ports and loop through them until the program can successfully send data via the selected serial port.
Github with in-progress python, arduino, and javascript code can be found.
https://github.com/deevolutionism/Core-Lab-IOT/tree/master/RFDuino%20Communication


