There have been a few made. This is sort of the inspiration for the steam emitting pipe vest that I want to make.
Month: September 2014
Here is a video for a quick DIY fog machine that uses dry ice to produce fog.
alternatively, according to HowStuffWorks, a mixture of glyseral or glycol mixed with water and heated is what is traditionally used in fog machines. however – this requires a considerable amount of energy. Because I will be wearing this device, it might be hard to carry around an energy source that can produce enough heat to vaporize the mixture.
Here is a link to a portable, battery powered machine.
http://www.thatsgoodfog.com/products/machines/tiny-fx/
Some ideas for a sound related Arduino project
Sound is not my specialty. I don’t play any musical instruments. I can’t sing. I can hardly keep a good beat going. But I love sound. Sound is a powerful force. Sound as music can create many reactions. Physically it can make you move, it can make you jump, dance, cringe, or sleep. Music can also induce emotional states. It can make you feel depressed, or sad, or nostalgic. It can make you feel angry, or aggravated, and it can also make you happy, joyous, and friendly.
However, what I find really interesting about sound is its ability to indicate, to direct, and to control people. Video games in particular are filled with sounds. They create vital feedback to the user. For instance, when selecting different option, a sound is produced to indicate that an action has occurred. When a special ability has been collected or a challenge completed, it would be sinful and downright lame to tell the player they have leveled up with plain text. Some sort of sound is required to Or another example: the spaceship. A spaceship interface is filled with various beeps, boops, and blips that help the pilots understand what they have pressed. Sound can indicated initialization, danger, warning, proximity, ejection. Sound is a powerful and important sense that adds depth to our visual environment. Sound can do things that visuals can’t accomplish because our eyes are always maintaining focus. Sound constructs a peripheral environment that we can be enacted on or act upon. Loud, annoying alarms wake us up when we are sleeping. We can be focusing intently on one thing, but a sound can break our attention and tell us that something else is more important.
Bellow are a few sketch ideas.
1. A rotating, glowing lamp that responds to noise.

2. Working in the laser lab can become very overwhelming when there are people coming in for appointments, people coming in to ask questions, and people trying to make walk in appointments all at the same time. Even with three staff, there are occasions where we have difficulty handling everyones questions. To combat that and make it a little easier for staff, we could eliminate the need to argue with walk in students over whether or not they can use a machine by displaying names on a board outside. The board could also display when a machine is free to use – and for how long.

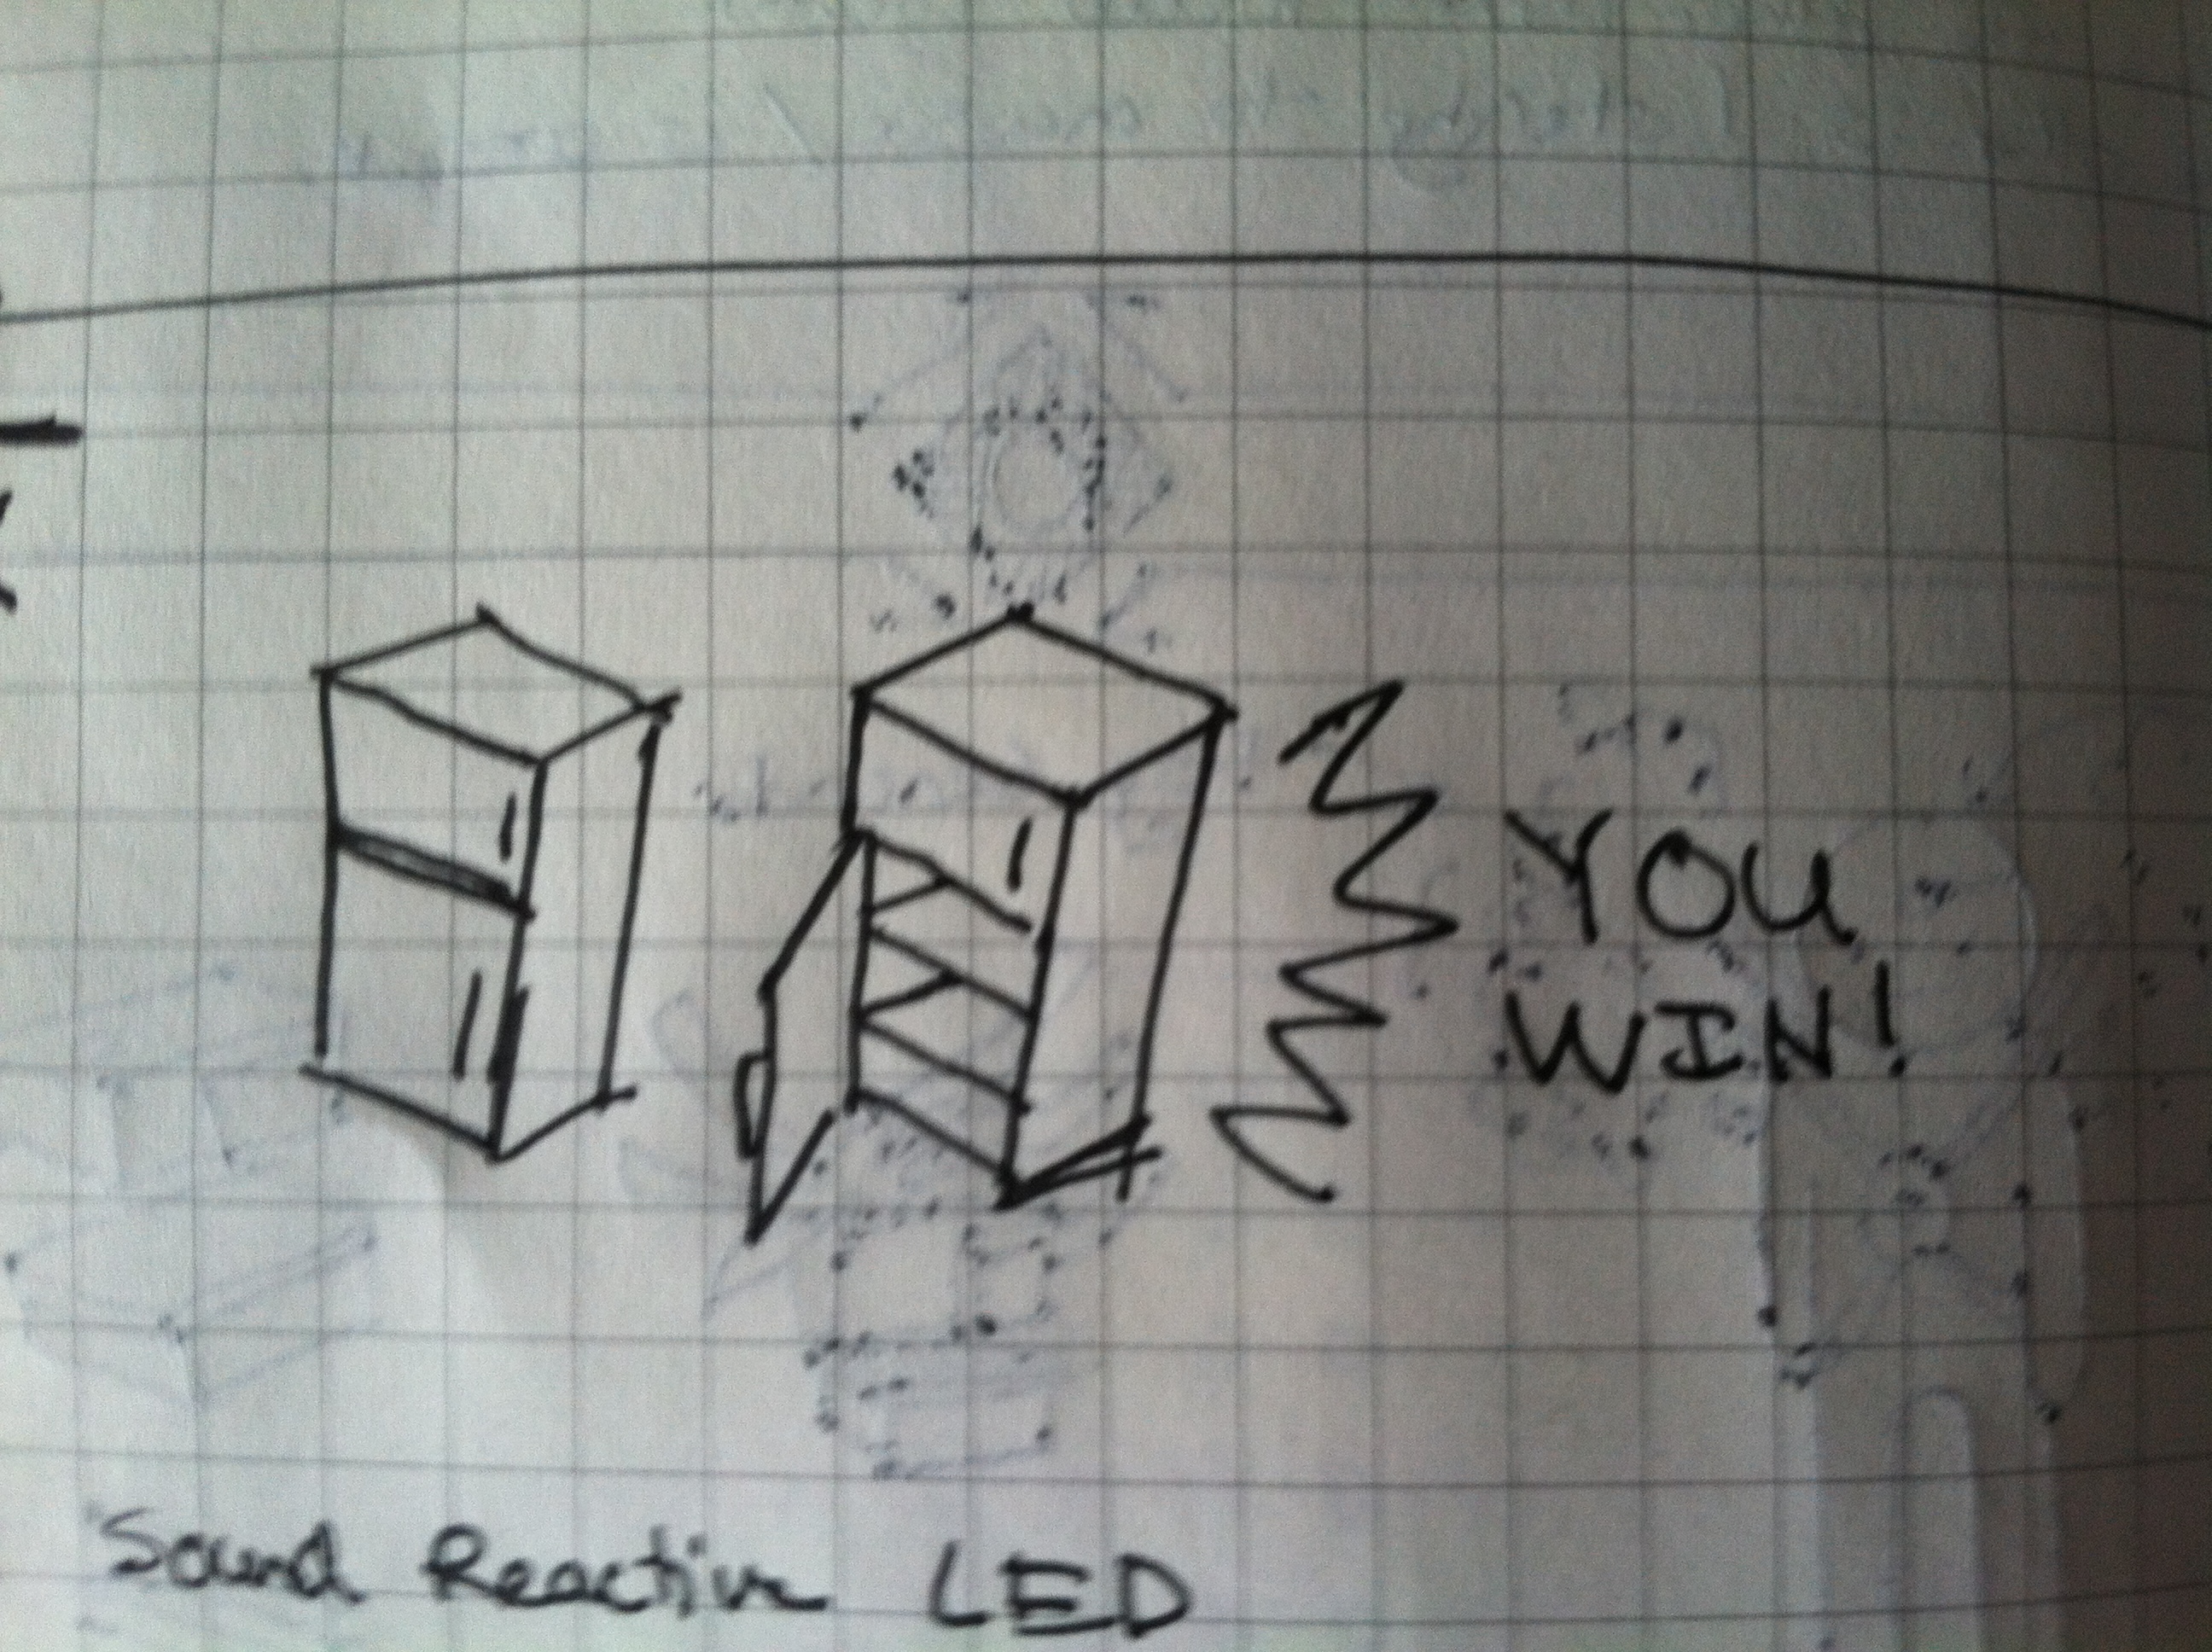
3. Not sold on this idea, but it was an idea non-the-less. The fridge screams “YOU WIN” whenever someone opens the door. There’s no reason behind it.
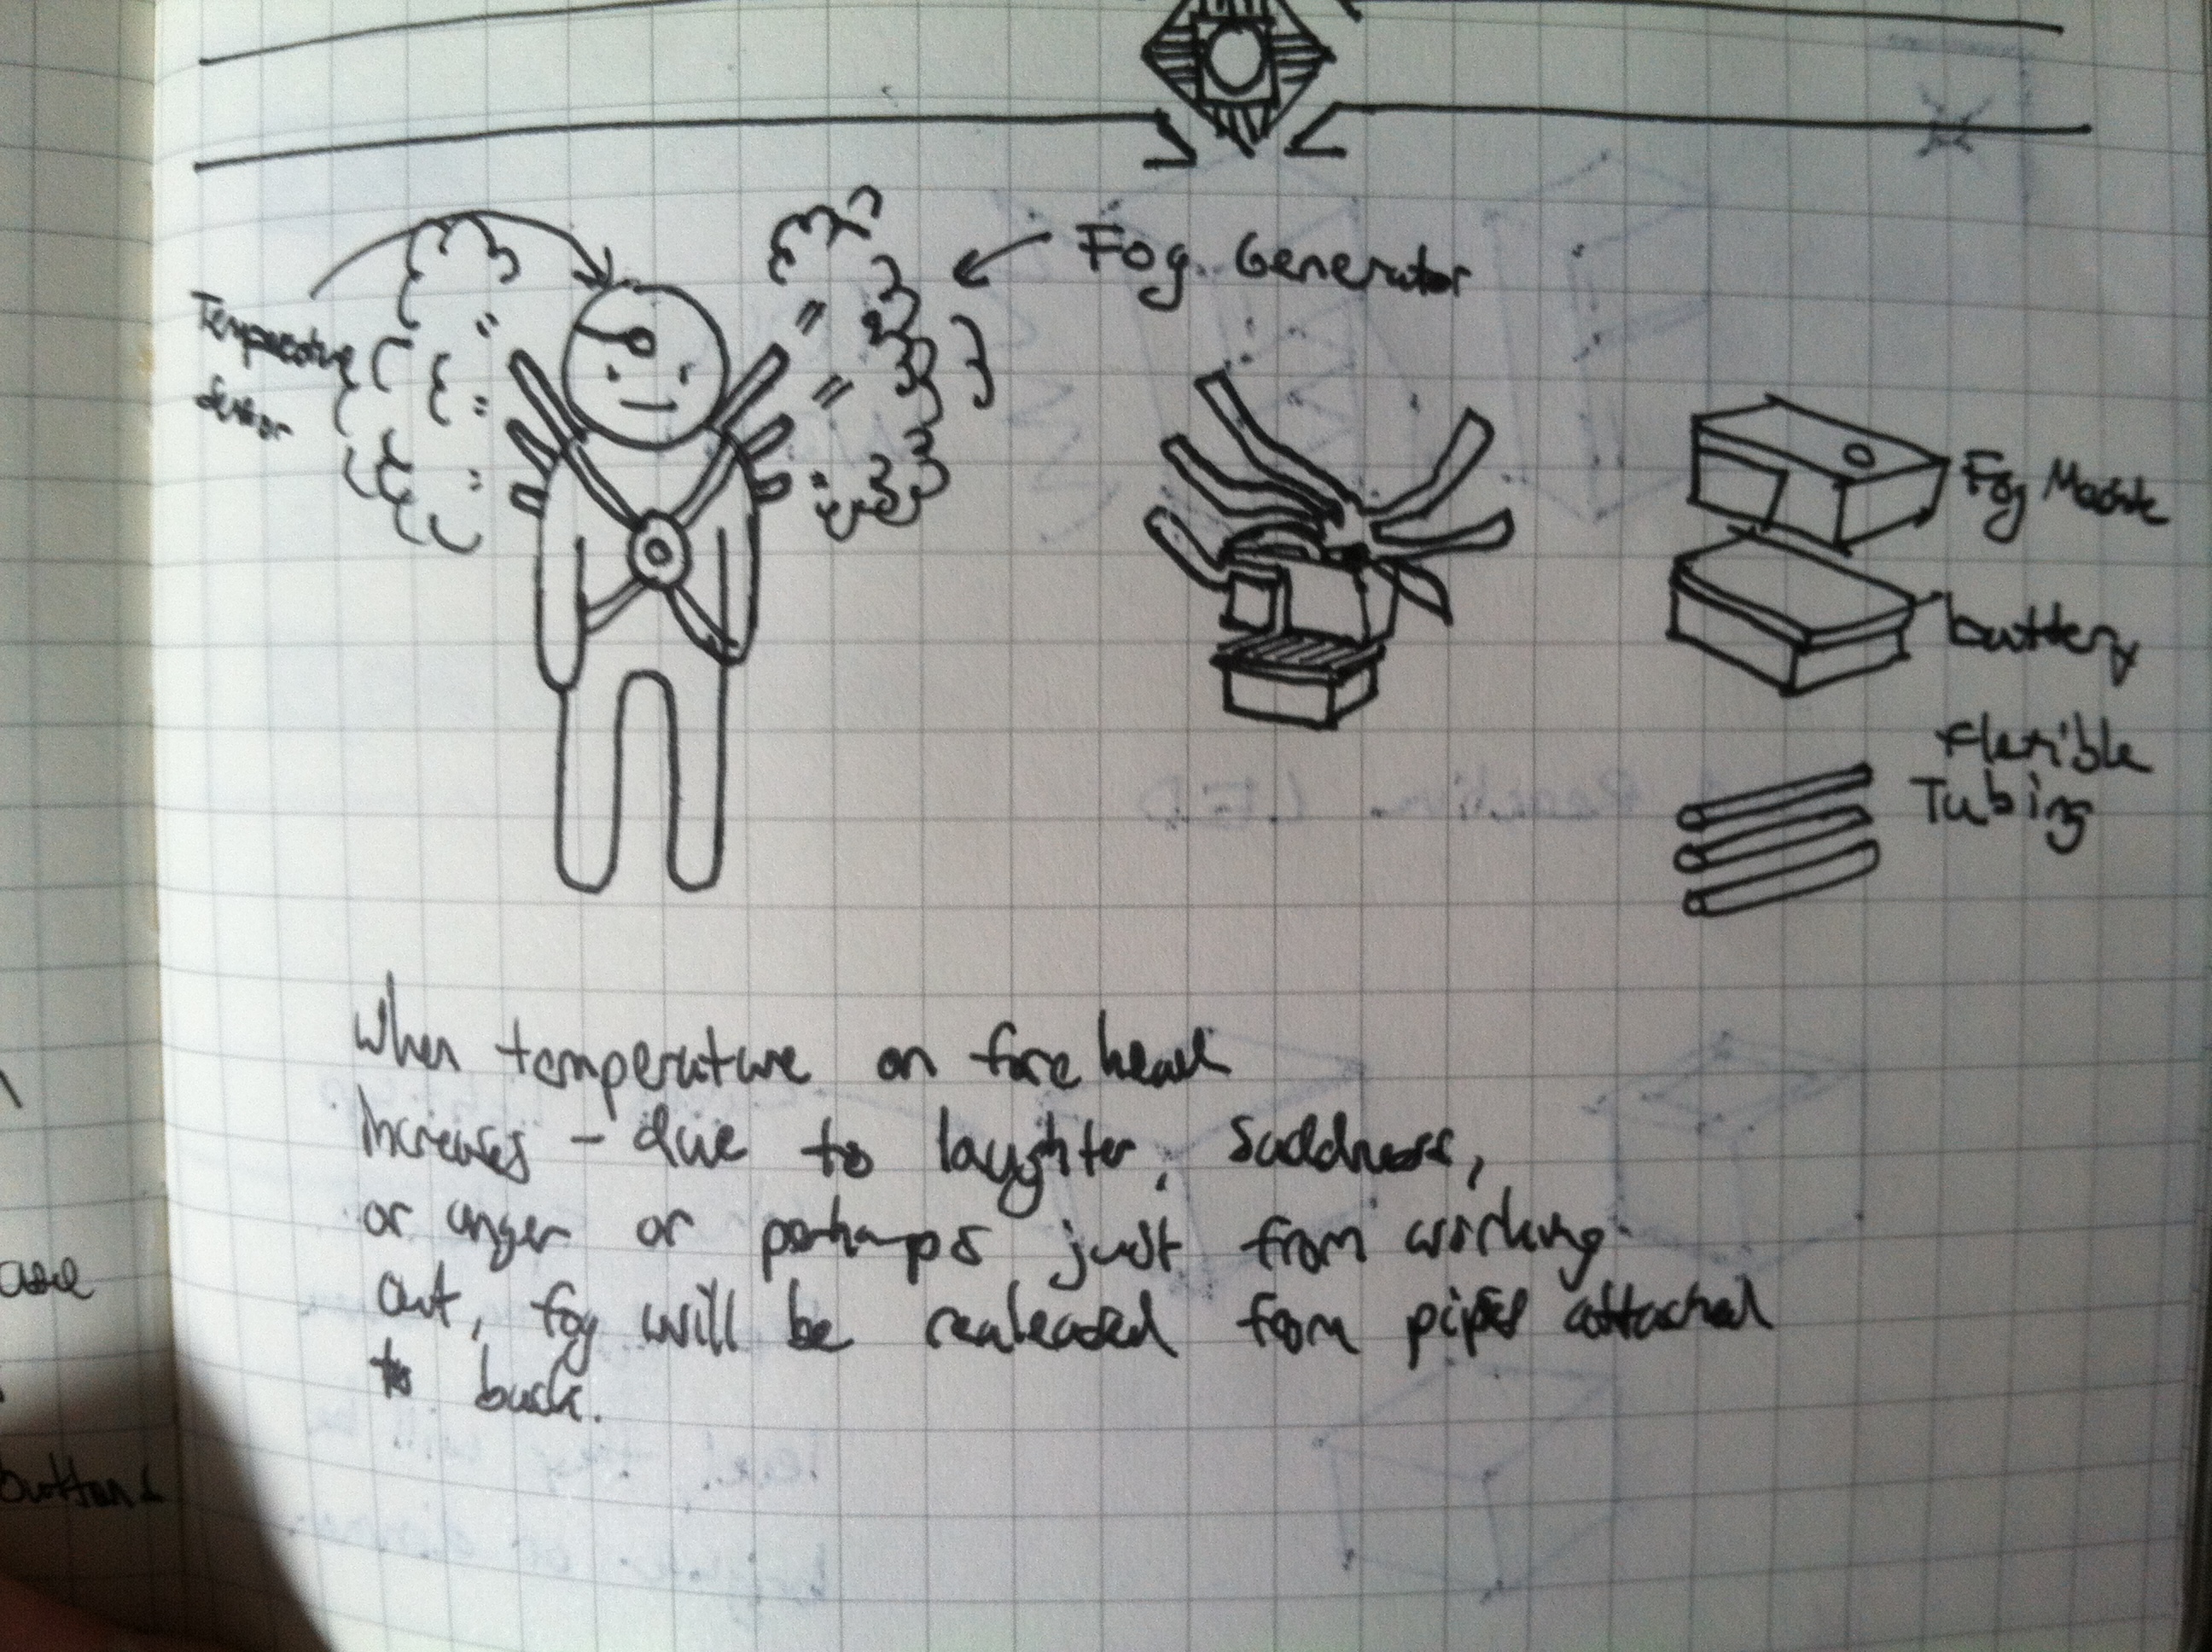
4. This would be quite challenging to do, but would make an AWESOME halloween costume. A fog machine would be attached to the wearers back in addition to a giant battery (how else would you keep it running?). A temperature sensor would be attached to the wearers forehead. When their forehead temp increases, the machine will blow steam out.
5. This is an extension of my previous project. This project


Interactive Arduino served HTML page
here is the code I am now currently using to create an interactive button that will turn on an LED. I am still unable to get the LED to activate. I am combing through the code to figure out why nothing is happening. Something might be wrong with the logic I have written out.


/*
A combination of sketches.
Sketches include examples from
W.A. Smith, http://startingelectronics.com
Tom Igoe
Arduino ChatServer example sketch by David A. Mellis
————————————————————–*/
#include <SPI.h>
#include <Ethernet.h>
// MAC address from Ethernet shield sticker under board
byte mac[] = { 0x90, 0xA2, 0xDA, 0x0F, 0x2A, 0xFB };
IPAddress ip(10, 1, 217, 139);// IP address, may need to change depending on network. This is found by running the DhcpAddressPrinter example sketch by Tom Igoe.
IPAddress gateway(10,1,217,1);// Added gateway, found in system preferences network panel under router
IPAddress subnet(255,255,255,0); //Added subnet as well – this is usually the same regardless.
EthernetServer server(80); // create a server at port 80, or port 23(default) Port 80 works with HTTP requests
int led = 4; //according to arduino reference material on the ethernet shield, the SPI bus shares pin 4 with the micro SD slot and can only access one at a time.I disabled it just in case by activating pin 4.
String HTTP_req; //this will be searched for led8 in order to turn on or off the led
boolean LED_status = 0; //LED status off by default
int ledPin8 = 8;
//I took this setup code from the DhcpAddressPrinter Arduino example sketch. Use serial monitor to recieve the generated DCHP address.
void setup() {
// Open serial communications and wait for port to open:
Serial.begin(9600);
// this check is only needed on the Leonardo:
while (!Serial) {
; // wait for serial port to connect. Needed for Leonardo only
}
pinMode(ledPin8,OUTPUT);
// start the Ethernet connection:
Serial.println(“Trying to get an IP address using DHCP”);
if (Ethernet.begin(mac) == 0) {
Serial.println(“Failed to configure Ethernet using DHCP”);
// initialize the ethernet device not using DHCP:
Ethernet.begin(mac, ip, gateway, subnet);
}
// print your local IP address:
Serial.print(“My IP address: “);
ip = Ethernet.localIP();
for (byte thisByte = 0; thisByte < 4; thisByte++) {
// print the value of each byte of the IP address:
Serial.print(ip[thisByte], DEC);
Serial.print(“.”);
}
Serial.println();
// start listening for clients
server.begin();
}
/*void setup()
{
pinMode(led,OUTPUT);
Ethernet.begin(mac, ip, gateway, subnet); // initialize Ethernet device
server.begin(); // start to listen for clients
}*/
//This code is taken from a startingelectronics.com tutorial on hosting an html webpage with Arduino.
void loop() {
digitalWrite(led,HIGH); //pin 4 activated to deactivate microSD slot.
EthernetClient client = server.available(); // try to get client
if (client) { // got client?
boolean currentLineIsBlank = true;
while (client.connected()) {
if (client.available()) { // client data available to read
char c = client.read(); // read 1 byte (character) from client
// last line of client request is blank and ends with \n
// respond to client only after last line received
HTTP_req += c; //read client one character at a time
if (c == ‘\n’ && currentLineIsBlank) {
// send a standard http response header
client.println(“HTTP/1.1 200 OK”);
client.println(“Content-Type: text/html”);
client.println(“Connection: close”);
client.println();
// send web page
client.println(“<!DOCTYPE html>”);
client.println(“<html>”);
client.println(“<head>”);
client.println(“<title>Arduino Web Page Test</title>”);
client.println(“</head>”);
client.println(“<body>”);
client.println(“<h1>Who do you pledge your allegience to?</h2>”);
client.println(“<h2>Rebels</h2>”);
//client.println(“<form method=\”get\”>”);
//client.println(“</form>”);
client.println(“<form method = \”get\”>”);
client.println(“<input type = ‘checkbox’ name = ‘led8’ value = ‘8’ onClick = ‘submit();’ checked>led8”);
client.println(“</form>”);
client.println(“</body>”);
client.println(“</html>”);
Serial.print(HTTP_req);
HTTP_req = “”; // finished with request, empty string
break;
}
// every line of text received from the client ends with \r\n
if (c == ‘\n’) {
// last character on line of received text
// starting new line with next character read
currentLineIsBlank = true;
}
else if (c != ‘\r’) {
// a text character was received from client
currentLineIsBlank = false;
}
} // end if (client.available())
} // end while (client.connected())
delay(1); // give the web browser time to receive the data
client.stop(); // close the connection
} // end if (client)
}
//Checks arduino HTTP header for led8 value. If it is in the header, it will turn the LED on. If it is not, the LED will turn off.
// switch LED and send back HTML for LED checkbox
void ProcessCheckbox(EthernetClient cl) {
if (HTTP_req.indexOf(“led8=8”) > -1) { // see if checkbox was clicked
// the checkbox was clicked, toggle the LED
if (LED_status) {
LED_status = 0;
}
else {
LED_status = 1;
}
}
if (LED_status) { // switch LED on
digitalWrite(ledPin8, HIGH);
// checkbox is checked
cl.println(“<input type=\”checkbox\” name=\”led2\” value=\”8\” onclick=\”submit();\” checked>led8″);
}
else { // switch LED off
digitalWrite(ledPin8, LOW);
// checkbox is unchecked
cl.println(“<input type=\”checkbox\” name=\”led2\” value=\”8\” onclick=\”submit();\” >led8″);
}
}
THE WEBPAGE FINALLY LOADS!
After a lot of internet browsing through online forums, I was finally able to access the Arduino and load a very simply webpage!
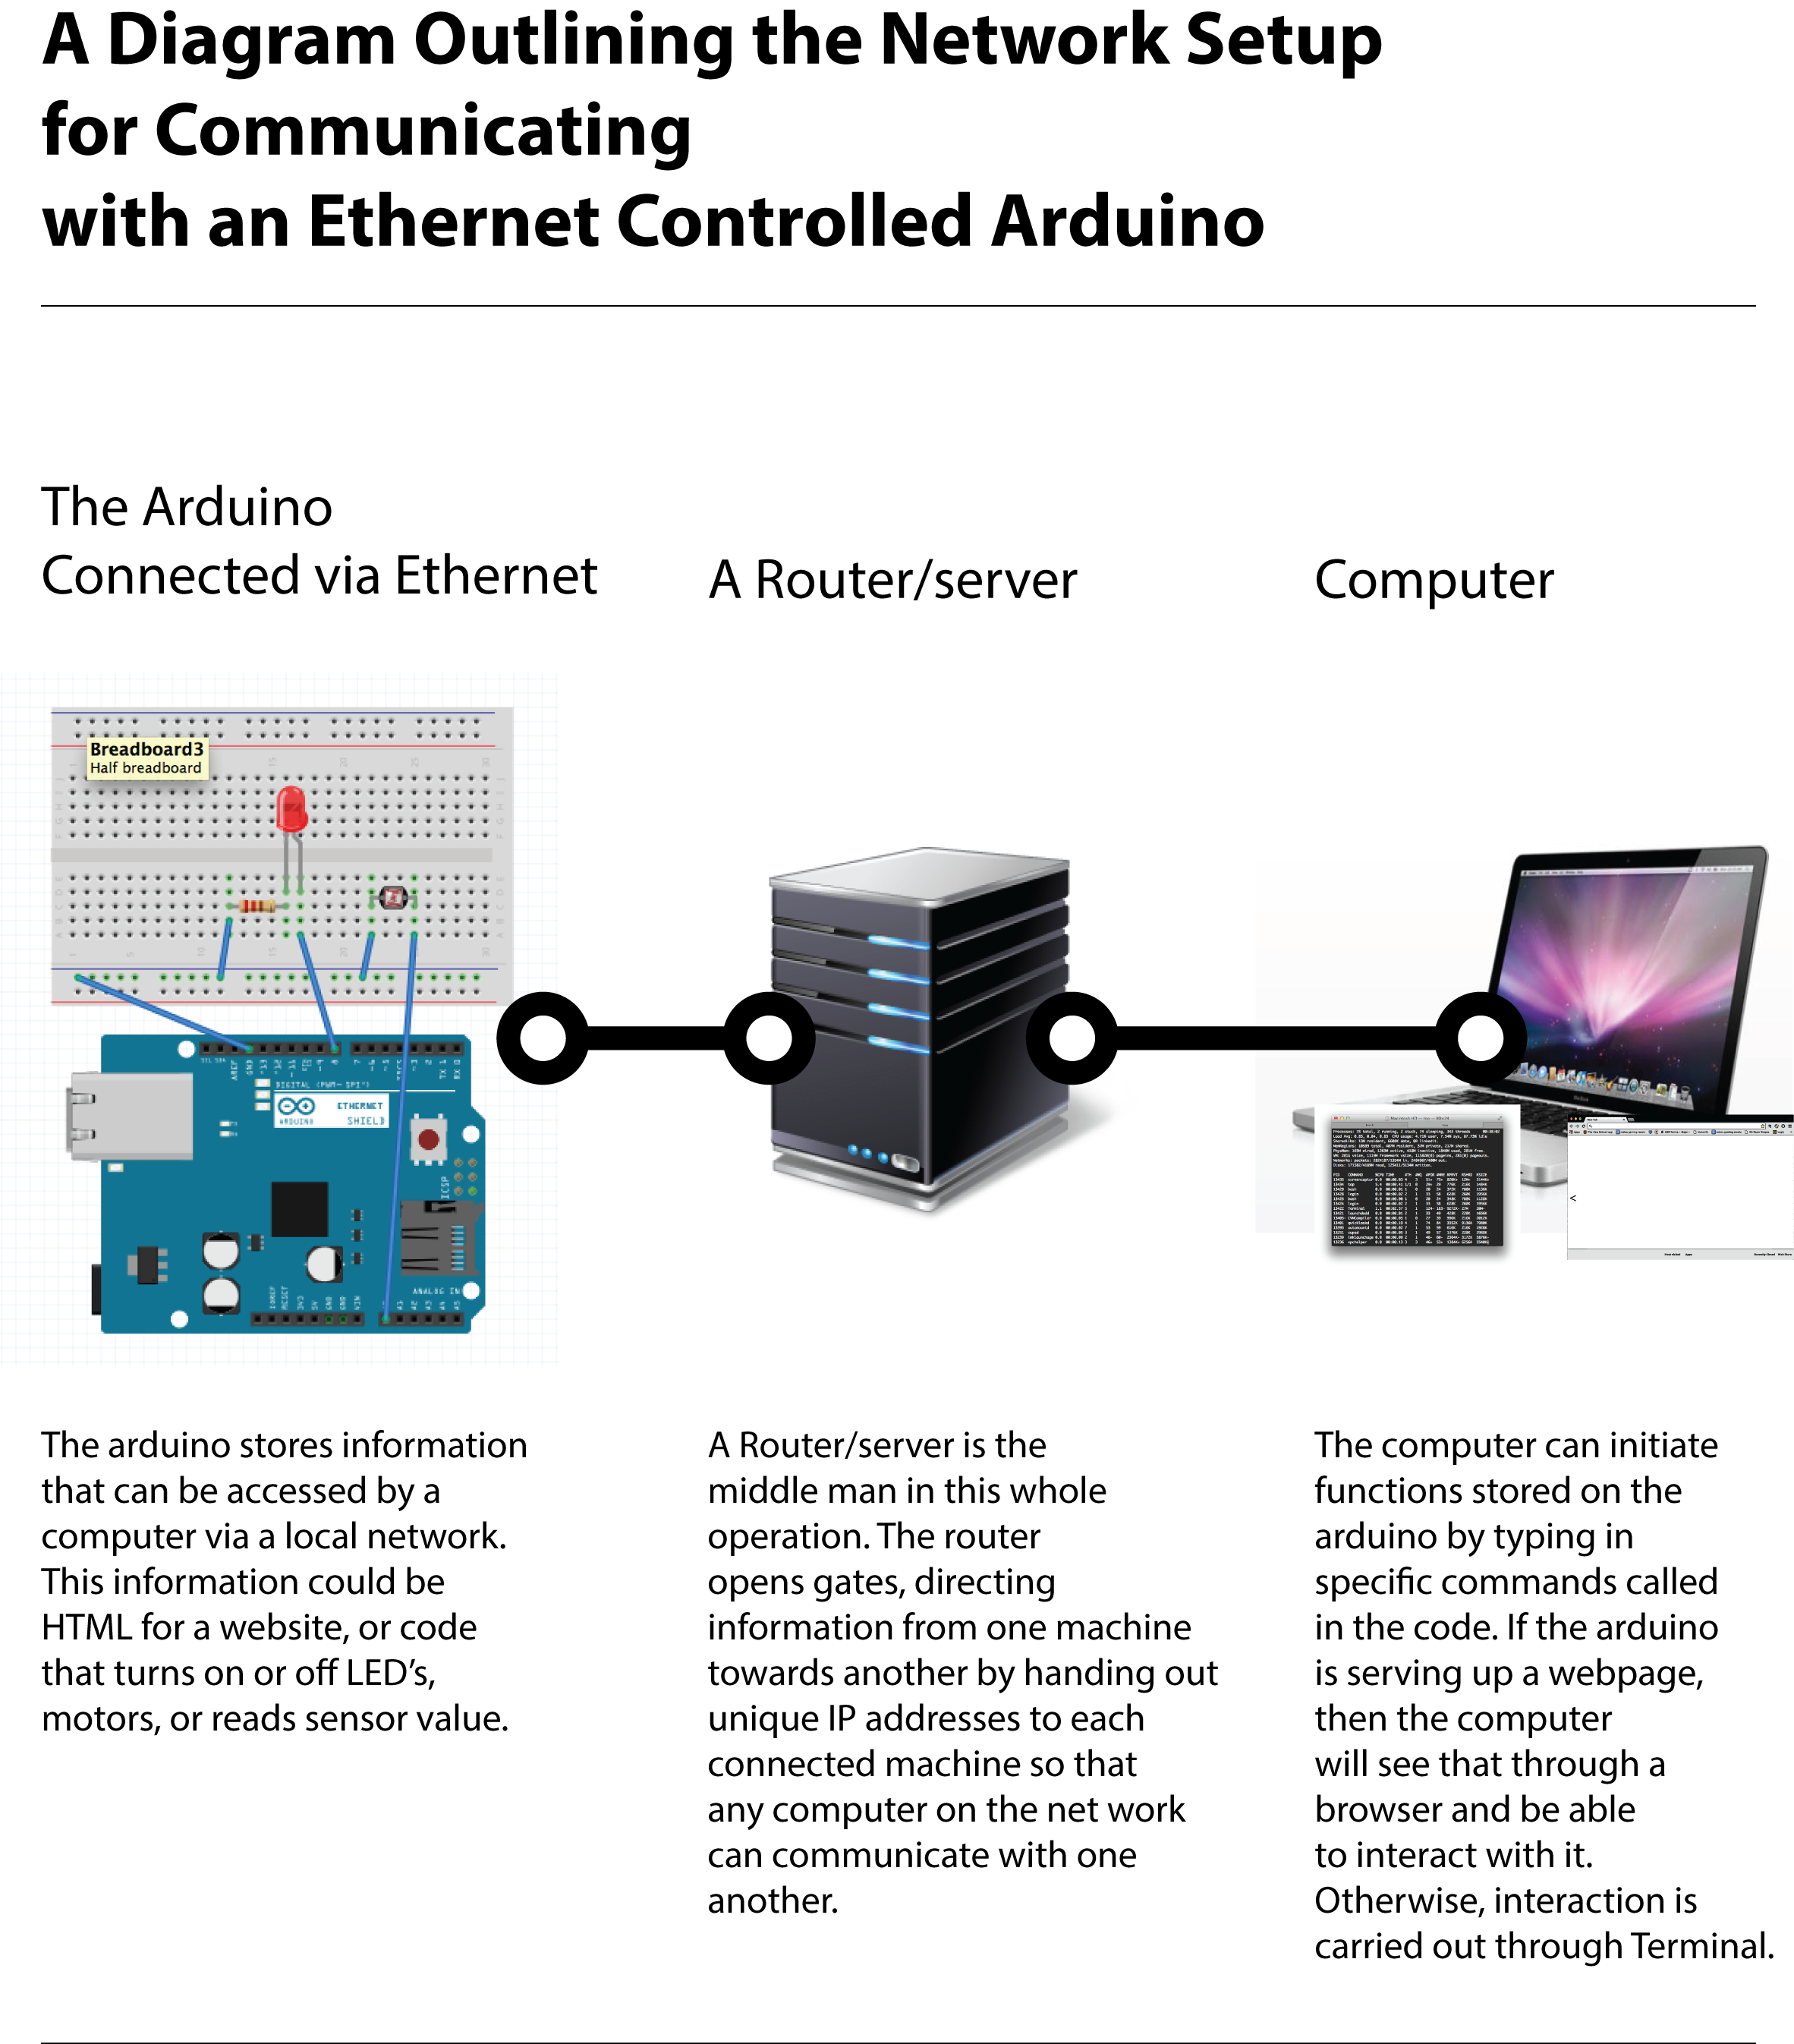
The Arduino forum bellow offered a lot of helpful information on configuring an Arduino over a network. Eventually, this will be more important if I want people to be able to access the Arduino from beyond the local (LAN) dorm network.
http://forum.arduino.cc/index.php?PHPSESSID=uo1p8pdm6omi29fjd0fs9khqa5&topic=112955.15
Basically, to make the Arduino visible over the network I had to give it a unique identity. I did this by inputing 4 different variables:
The mac is the ardunio’s unique hardware identification number. It was found on the back of my ethernet shield as 90-A2-DA-2A-FB. the ‘ox’ before each string seems to be an important part of the sketch, just put the number after each ‘ox’.
byte mac[] = { 0x90, 0xA2, 0xDA, ox0F, 0x2A, 0xFB };
Next I had to give the Arduino a unique IP address. Contrary to what many forums and guides claimed, you CANNOT simply put in whatever number you want into the 4th section of the IP. This is done through an automated process called DHCP or Dynamic Host Configuration Protocol. This requires running the Arduino IDE DhcpAddressPrinter sketch. Running that sketch will print out the IP address assigned to the Arduino by the network in the serial monitor. That IP can then be copy-pasted into a browser to later access the Arduino server. If you are in Kerry Hall at TNS and my Arduino is connected via ethernet, you might be able to see my webpage if you paste that ip into your browser!
IPAddress ip(10, 1, 217, 139);
Next I found the gateway. The gateway is the router’s address. I found this by going into system preferences>network>advanced>TCP/IP where it can be found under ‘Router’.
IPAddress gateway(10,1,217,1);
Next, I input the subnet. According to various forums, the subnet stays the same and rarely deviates from what is bellow.
IPAddress subnet(255,255,255,0);
Finally, I defined which port to forward to and from. I chose 80 because it is the most common for HTTP requests. I’m not sure why, but various internet forums have suggested this.
EthernetServer server(80);
/*
A combination of sketches.
Sketches include examples from
W.A. Smith, http://startingelectronics.com
Tom Igoe
Arduino ChatServer example sketch by David A. Mellis
————————————————————–*/
#include <SPI.h>
#include <Ethernet.h>
// MAC address from Ethernet shield sticker under board
byte mac[] = { 0x90, 0xA2, 0xDA, 0x0F, 0x2A, 0xFB };
IPAddress ip(10, 1, 217, 139);// IP address, may need to change depending on network. This is found by running the DhcpAddressPrinter example sketch by Tom Igoe.
IPAddress gateway(10,1,217,1);// Added gateway, found in system preferences network panel under router
IPAddress subnet(255,255,255,0); //Added subnet as well – this is usually the same regardless.
EthernetServer server(80); // create a server at port 80, or port 23(default) Port 80 works with HTTP requests
int led = 4;
//I took this setup code from the DhcpAddressPrinter Arduino example sketch. Use serial monitor to recieve the generated DCHP address.
void setup() {
// Open serial communications and wait for port to open:
Serial.begin(9600);
// this check is only needed on the Leonardo:
while (!Serial) {
; // wait for serial port to connect. Needed for Leonardo only
}
// start the Ethernet connection:
Serial.println(“Trying to get an IP address using DHCP”);
if (Ethernet.begin(mac) == 0) {
Serial.println(“Failed to configure Ethernet using DHCP”);
// initialize the ethernet device not using DHCP:
Ethernet.begin(mac, ip, gateway, subnet);
}
// print your local IP address:
Serial.print(“My IP address: “);
ip = Ethernet.localIP();
for (byte thisByte = 0; thisByte < 4; thisByte++) {
// print the value of each byte of the IP address:
Serial.print(ip[thisByte], DEC);
Serial.print(“.”);
}
Serial.println();
// start listening for clients
server.begin();
}
/*void setup()
{
pinMode(led,OUTPUT);
Ethernet.begin(mac, ip, gateway, subnet); // initialize Ethernet device
server.begin(); // start to listen for clients
}*/
//This code is taken from a startingelectronics.com tutorial on hosting an html webpage with Arduino.
void loop()
{
digitalWrite(led,HIGH);
EthernetClient client = server.available(); // try to get client
if (client) { // got client?
boolean currentLineIsBlank = true;
while (client.connected()) {
if (client.available()) { // client data available to read
char c = client.read(); // read 1 byte (character) from client
// last line of client request is blank and ends with \n
// respond to client only after last line received
if (c == ‘\n’ && currentLineIsBlank) {
// send a standard http response header
client.println(“HTTP/1.1 200 OK”);
client.println(“Content-Type: text/html”);
client.println(“Connection: close”);
client.println();
// send web page
client.println(“<!DOCTYPE html>”);
client.println(“<html>”);
client.println(“<head>”);
client.println(“<title>Arduino Web Page Test</title>”);
client.println(“</head>”);
client.println(“<body>”);
client.println(“<h1>Hello from Arduino!</h1>”);
client.println(“<p>A web page from the Arduino server</p>”);
client.println(“</body>”);
client.println(“</html>”);
break;
}
// every line of text received from the client ends with \r\n
if (c == ‘\n’) {
// last character on line of received text
// starting new line with next character read
currentLineIsBlank = true;
}
else if (c != ‘\r’) {
// a text character was received from client
currentLineIsBlank = false;
}
} // end if (client.available())
} // end while (client.connected())
delay(1); // give the web browser time to receive the data
client.stop(); // close the connection
} // end if (client)
}
Arduino serves up HTML
I found a great step by step guide online that explains how to configure the Arduino ethernet shield to become a web hosting server. This is the next step up from using terminal. Now, some HTML code is embedded in the code. The Arduino gets a generated IP from a DHCP request. The IP can then be pasted into a modern web browser in which case, if the connection is successful the http will display “HTTP/1.1 200 OK” and then proceed to load the HTML inside the code. However, numerous attempts to load the page have failed.
A number of things could have gone wrong.
1. The router doesn’t have any open spots. The router can only serve up to 254 unique IP’s.
2. The newschool network blocks attempts to access IP’s directly/had security measures.
3. The Arduino ethernet shield should be accessing the HTML through the mini SD card slot.
There could be a lot of things going on in the backend stuff with establishing a working, communicating network that I don’t fully understand. Ultimately, there is more to figure out here and I think there is a lot of potential.
/*Author: W.A. Smith, http://startingelectronics.com
————————————————————–*/
#include <SPI.h>
#include <Ethernet.h>
// MAC address from Ethernet shield sticker under board
byte mac[] = { 0x90, 0xA2, 0xDA, 0x0F, 0x2A, 0xFB };
IPAddress ip(10, 1, 217, 254);// IP address, may need to change depending on network
IPAddress gateway(10,1,217,1);// Added gateway address just incase
IPAddress subnet(255,255,255,0); //Added subnet as well
EthernetServer server(23); // create a server at port 80, or port 23(default)
void setup()
{
Ethernet.begin(mac, ip, gateway, subnet); // initialize Ethernet device
server.begin(); // start to listen for clients
}
void loop()
{
EthernetClient client = server.available(); // try to get client
if (client) { // got client?
boolean currentLineIsBlank = true;
while (client.connected()) {
if (client.available()) { // client data available to read
char c = client.read(); // read 1 byte (character) from client
// last line of client request is blank and ends with \n
// respond to client only after last line received
if (c == ‘\n’ && currentLineIsBlank) {
// send a standard http response header
client.println(“HTTP/1.1 200 OK”);
client.println(“Content-Type: text/html”);
client.println(“Connection: close”);
client.println();
// send web page
client.println(“<!DOCTYPE html>”);
client.println(“<html>”);
client.println(“<head>”);
client.println(“<title>Arduino Web Page Test</title>”);
client.println(“</head>”);
client.println(“<body>”);
client.println(“<h1>Hello from Arduino!</h1>”);
client.println(“<p>A web page from the Arduino server</p>”);
client.println(“</body>”);
client.println(“</html>”);
break;
}
// every line of text received from the client ends with \r\n
if (c == ‘\n’) {
// last character on line of received text
// starting new line with next character read
currentLineIsBlank = true;
}
else if (c != ‘\r’) {
// a text character was received from client
currentLineIsBlank = false;
}
} // end if (client.available())
} // end while (client.connected())
delay(1); // give the web browser time to receive the data
client.stop(); // close the connection
} // end if (client)
}
Terminal to Arduino LED on
This sketch connects with the Arduino through a DHCP assigned IP address. Serial monitor prints out the unique IP. The IP address gets put into Terminal using the telnet function. Using some of the preprogramed functions “ledon” “ledoff” “photo” and “I don’t Understand”. They are pretty self explanatory – but ledon will send a command through the internet that will send a voltage to pin 8, which activates the LED. This test worked.
/*
DHCP Chat Server
A simple server that distributes any incoming messages to all
connected clients. To use telnet to your device’s IP address and type.
You can see the client’s input in the serial monitor as well.
Using an Arduino Wiznet Ethernet shield.
THis version attempts to get an IP address using DHCP
Circuit:
* Ethernet shield attached to pins 10, 11, 12, 13
created 21 May 2011
modified 9 Apr 2012
by Tom Igoe
Based on ChatServer example by David A. Mellis
*/
#include <SPI.h>
#include <Ethernet.h>
// Enter a MAC address and IP address for your controller below.
// The IP address will be dependent on your local network.
// gateway and subnet are optional:
byte mac[] = {
0x90, 0xA2, 0xDA, 0x0F, 0x2A, 0xFB };
IPAddress ip(149,31,195, 76);
IPAddress gateway(149,31,195, 1);
IPAddress subnet(255, 255, 255, 0);
// telnet defaults to port 23
EthernetServer server(23);
boolean alreadyConnected = false; // whether or not the client was connected
int ledPinB = 8;
String commandString;
void setup() {
//set digital pin as output
pinMode(ledPinB,OUTPUT);
Ethernet.begin(mac,ip,gateway,subnet);
server.begin();
// Open serial communications and wait for port to open:
Serial.begin(9600);
// this check is only needed on the Leonardo:
while (!Serial){}
Serial.print(“Chat server address:”);
Serial.println(Ethernet.localIP());
}
void loop() {
// wait for a new client:
EthernetClient client = server.available();
//When client sends first byte, say hello
if (client) {
if (!alreadyConnected) {
// clear out the input buffer:
client.flush();
commandString = “”; //clear the commandString variable
server.println(“–> Please type your command and hit Return…”);
alreadyConnected = true;
}
while (client.available()) {
// read the bytes incoming from the client:
char newChar = client.read();
if (newChar == 0x0D) //If a 0x0D is received, a Carriage Return, then evaluate the command
{
server.print(“Received this command: “);
server.println(commandString);
processCommand(commandString);
} else
{
Serial.println(newChar);
commandString += newChar;
}
}
}
}
void processCommand(String command) {
server.println(“Proccessing command”);
server.print(command);
if (command.indexOf(‘photo’) > -1) {
Serial.println(“Photo command recieved”);
server.print(“Reading from photoresistor: “);
server.print(analogRead(A0));
commandString = “”;
return;
}
if (command.indexOf(“ledOn”) > -1) {
Serial.println(“LED ON command recieved”);
digitalWrite(ledPinB, HIGH);
server.println(“lED turned ON”);
commandString = “”;
return;
}
if (command.indexOf(“ledOFF”) > -1) {
Serial.println(“LED OFF command recieved”);
digitalWrite(ledPinB, LOW);
server.println(“LED turned OFF”);
commandString = “”;
return;
}
commandString = “”;
instructions();
}
void instructions()
{
server.println(“I don’t understand”);
server.println(“Please use one of these commands:”);
server.println(“* photo, to get a reading from the photoresistor”);
server.println(“* ledon, to turn on the LED”);
server.println(“* ledoff, to turn off the LED”);
}
Arduino Echo sketch
I used this to interface with my Arduino via mac Terminal. This bit of code essentially assigns the arduino an IP address using DHCP. DHCP is just a way for routers to automatically generate IP addresses for connecting devices so that users don’t have to set it up manually. I was able to read the assigned IP address, type “telnet 10.0.0.10” or whatever the assigned IP address was into Terminal to connect to the Arduino. if the connection worked, then the arduino responded with hello. anything i typed after that was repeated, or echoed.
/*
DHCP Chat Server
A simple server that distributes any incoming messages to all
connected clients. To use telnet to your device’s IP address and type.
You can see the client’s input in the serial monitor as well.
Using an Arduino Wiznet Ethernet shield.
THis version attempts to get an IP address using DHCP
Circuit:
* Ethernet shield attached to pins 10, 11, 12, 13
created 21 May 2011
modified 9 Apr 2012
by Tom Igoe
Based on ChatServer example by David A. Mellis
*/
#include <SPI.h>
#include <Ethernet.h>
// Enter a MAC address and IP address for your controller below.
// The IP address will be dependent on your local network.
// gateway and subnet are optional:
byte mac[] = {
0x90, 0xA2, 0xDA, 0x0F, 0x2A, 0xFB };
IPAddress ip(149,31,195,1);
IPAddress gateway(149,31,195,1);
IPAddress subnet(255, 255, 255, 0);
// telnet defaults to port 23
EthernetServer server(23);
boolean gotAMessage = false; // whether or not you got a message from the client yet
void setup() {
// Open serial communications and wait for port to open:
Serial.begin(9600);
// this check is only needed on the Leonardo:
while (!Serial) {
; // wait for serial port to connect. Needed for Leonardo only
}
// start the Ethernet connection:
Serial.println(“Trying to get an IP address using DHCP”);
if (Ethernet.begin(mac) == 0) {
Serial.println(“Failed to configure Ethernet using DHCP”);
// initialize the ethernet device not using DHCP:
Ethernet.begin(mac, ip, gateway, subnet);
}
// print your local IP address:
Serial.print(“My IP address: “);
ip = Ethernet.localIP();
for (byte thisByte = 0; thisByte < 4; thisByte++) {
// print the value of each byte of the IP address:
Serial.print(ip[thisByte], DEC);
Serial.print(“.”);
}
Serial.println();
// start listening for clients
server.begin();
}
void loop() {
// wait for a new client:
EthernetClient client = server.available();
// when the client sends the first byte, say hello:
if (client) {
if (!gotAMessage) {
Serial.println(“We have a new client”);
client.println(“Hello, client!”);
gotAMessage = true;
}
// read the bytes incoming from the client:
char thisChar = client.read();
// echo the bytes back to the client:
server.write(thisChar);
// echo the bytes to the server as well:
Serial.print(thisChar);
}
}
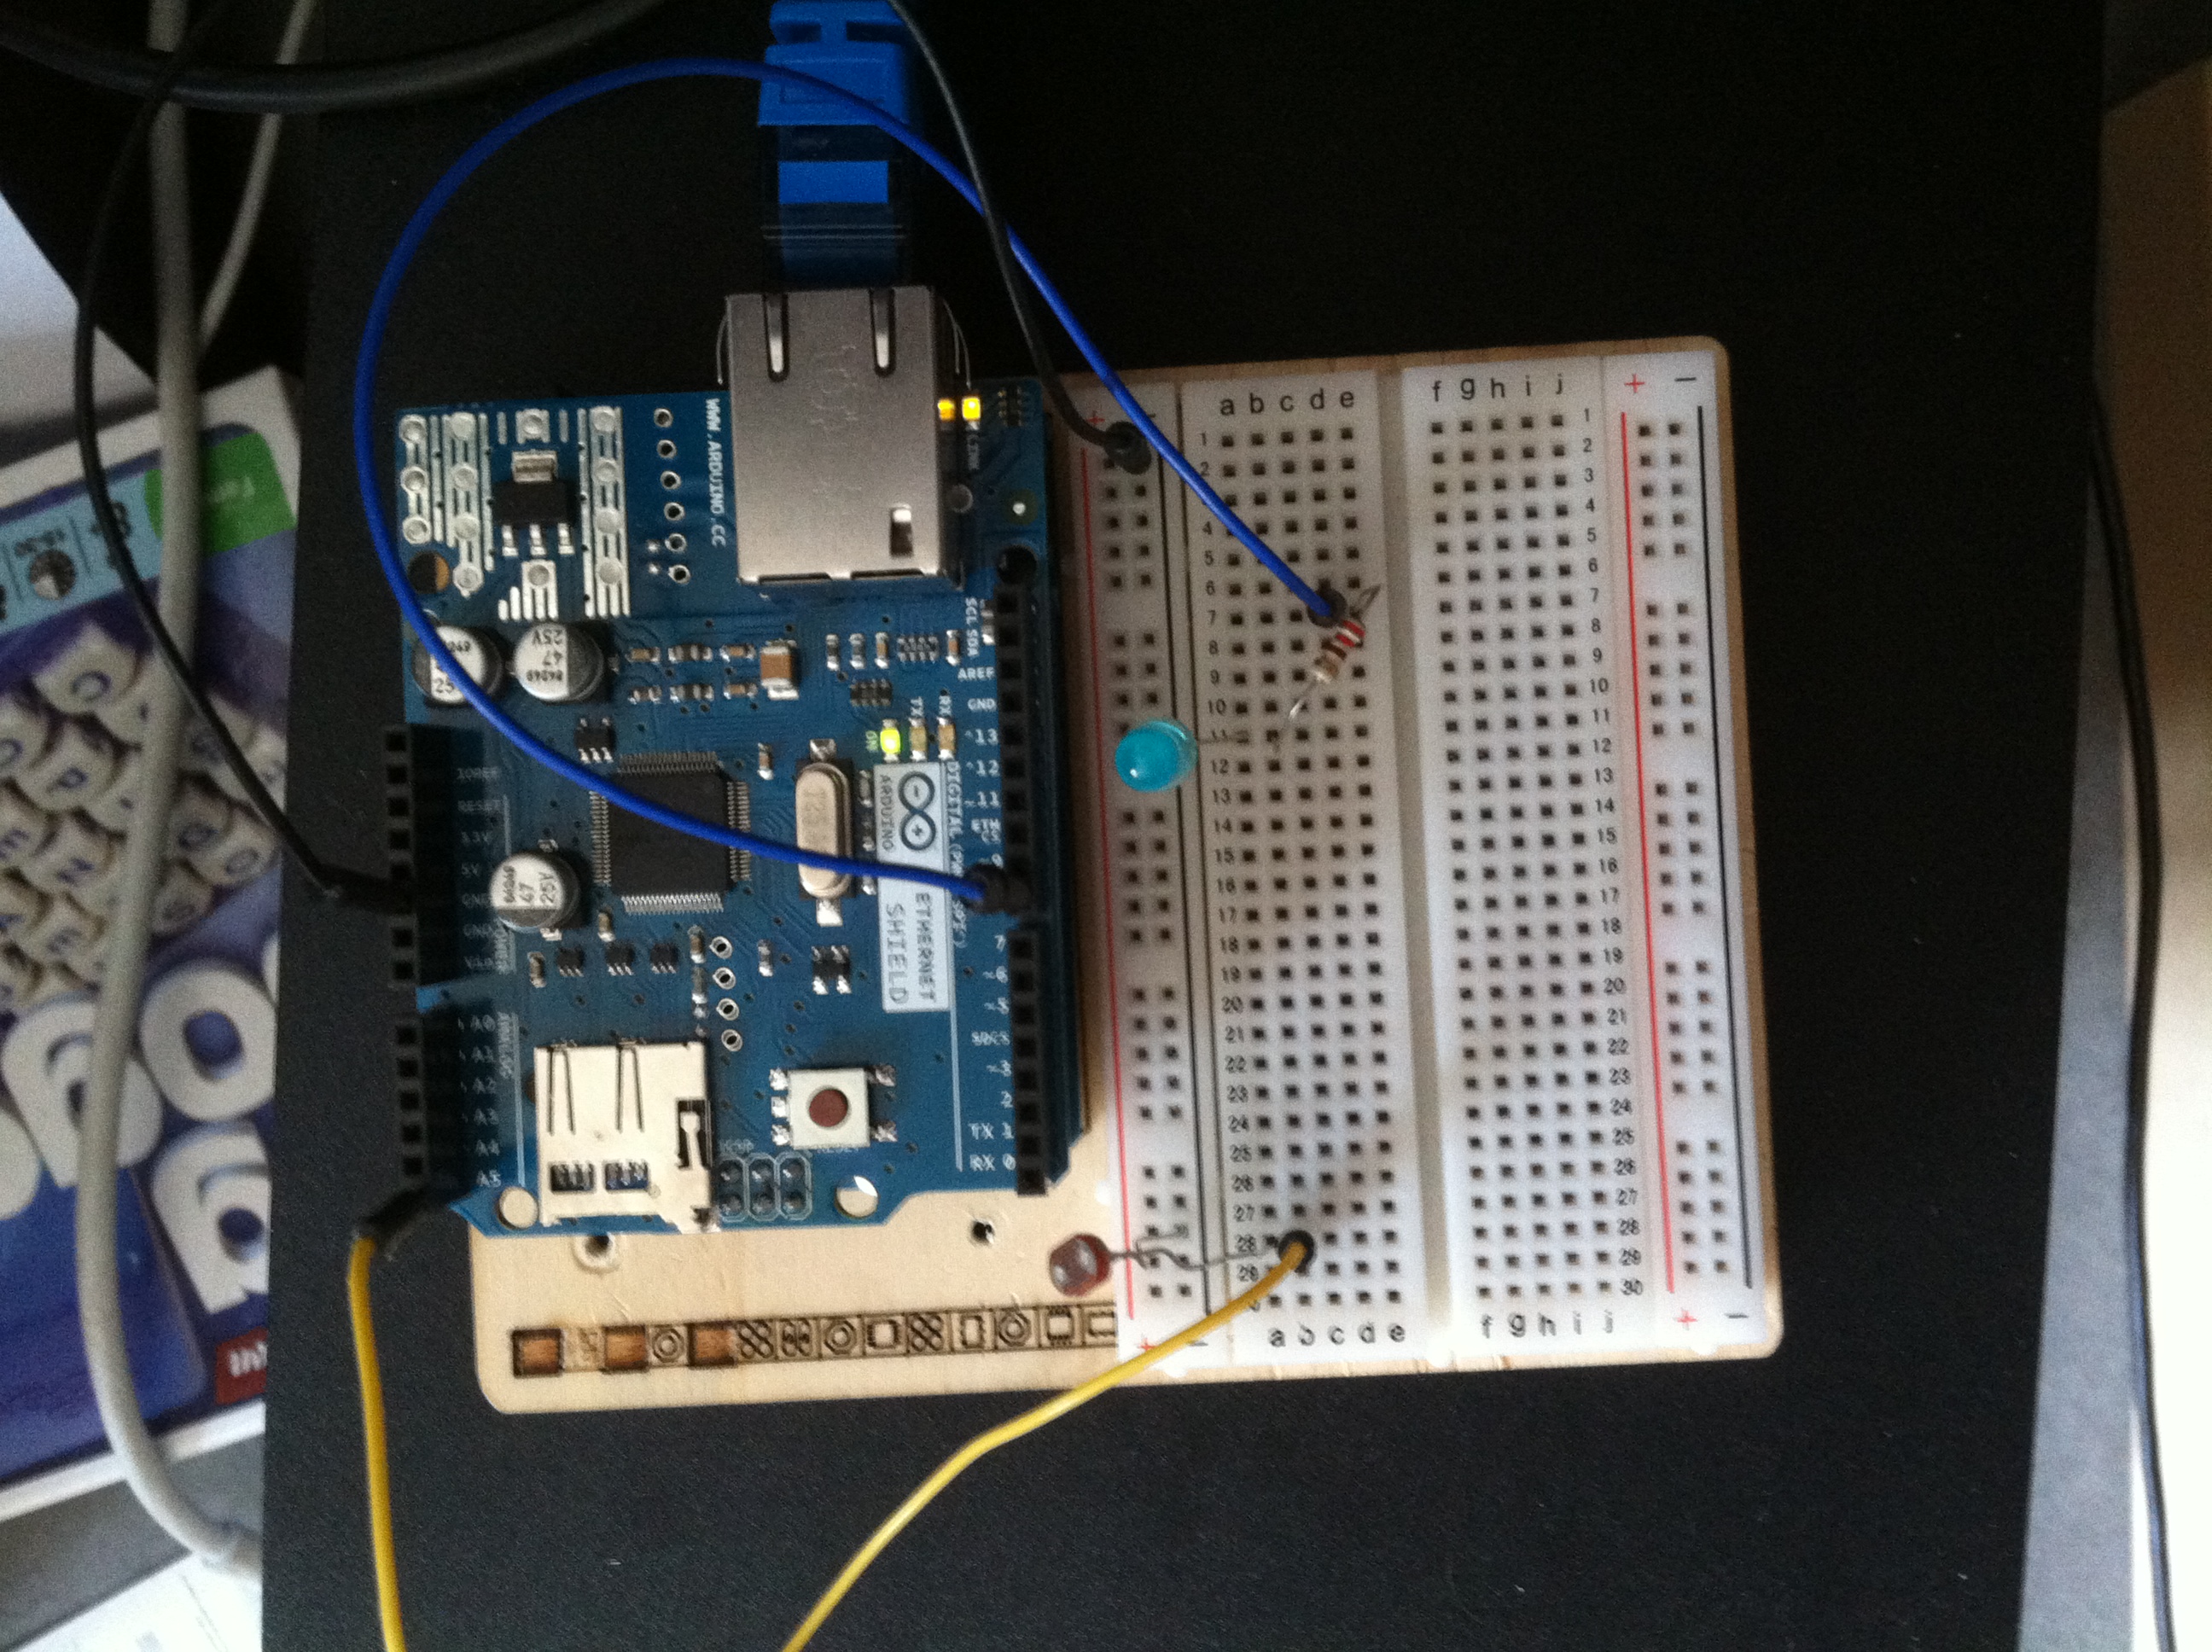
Diagram for Arduino Network
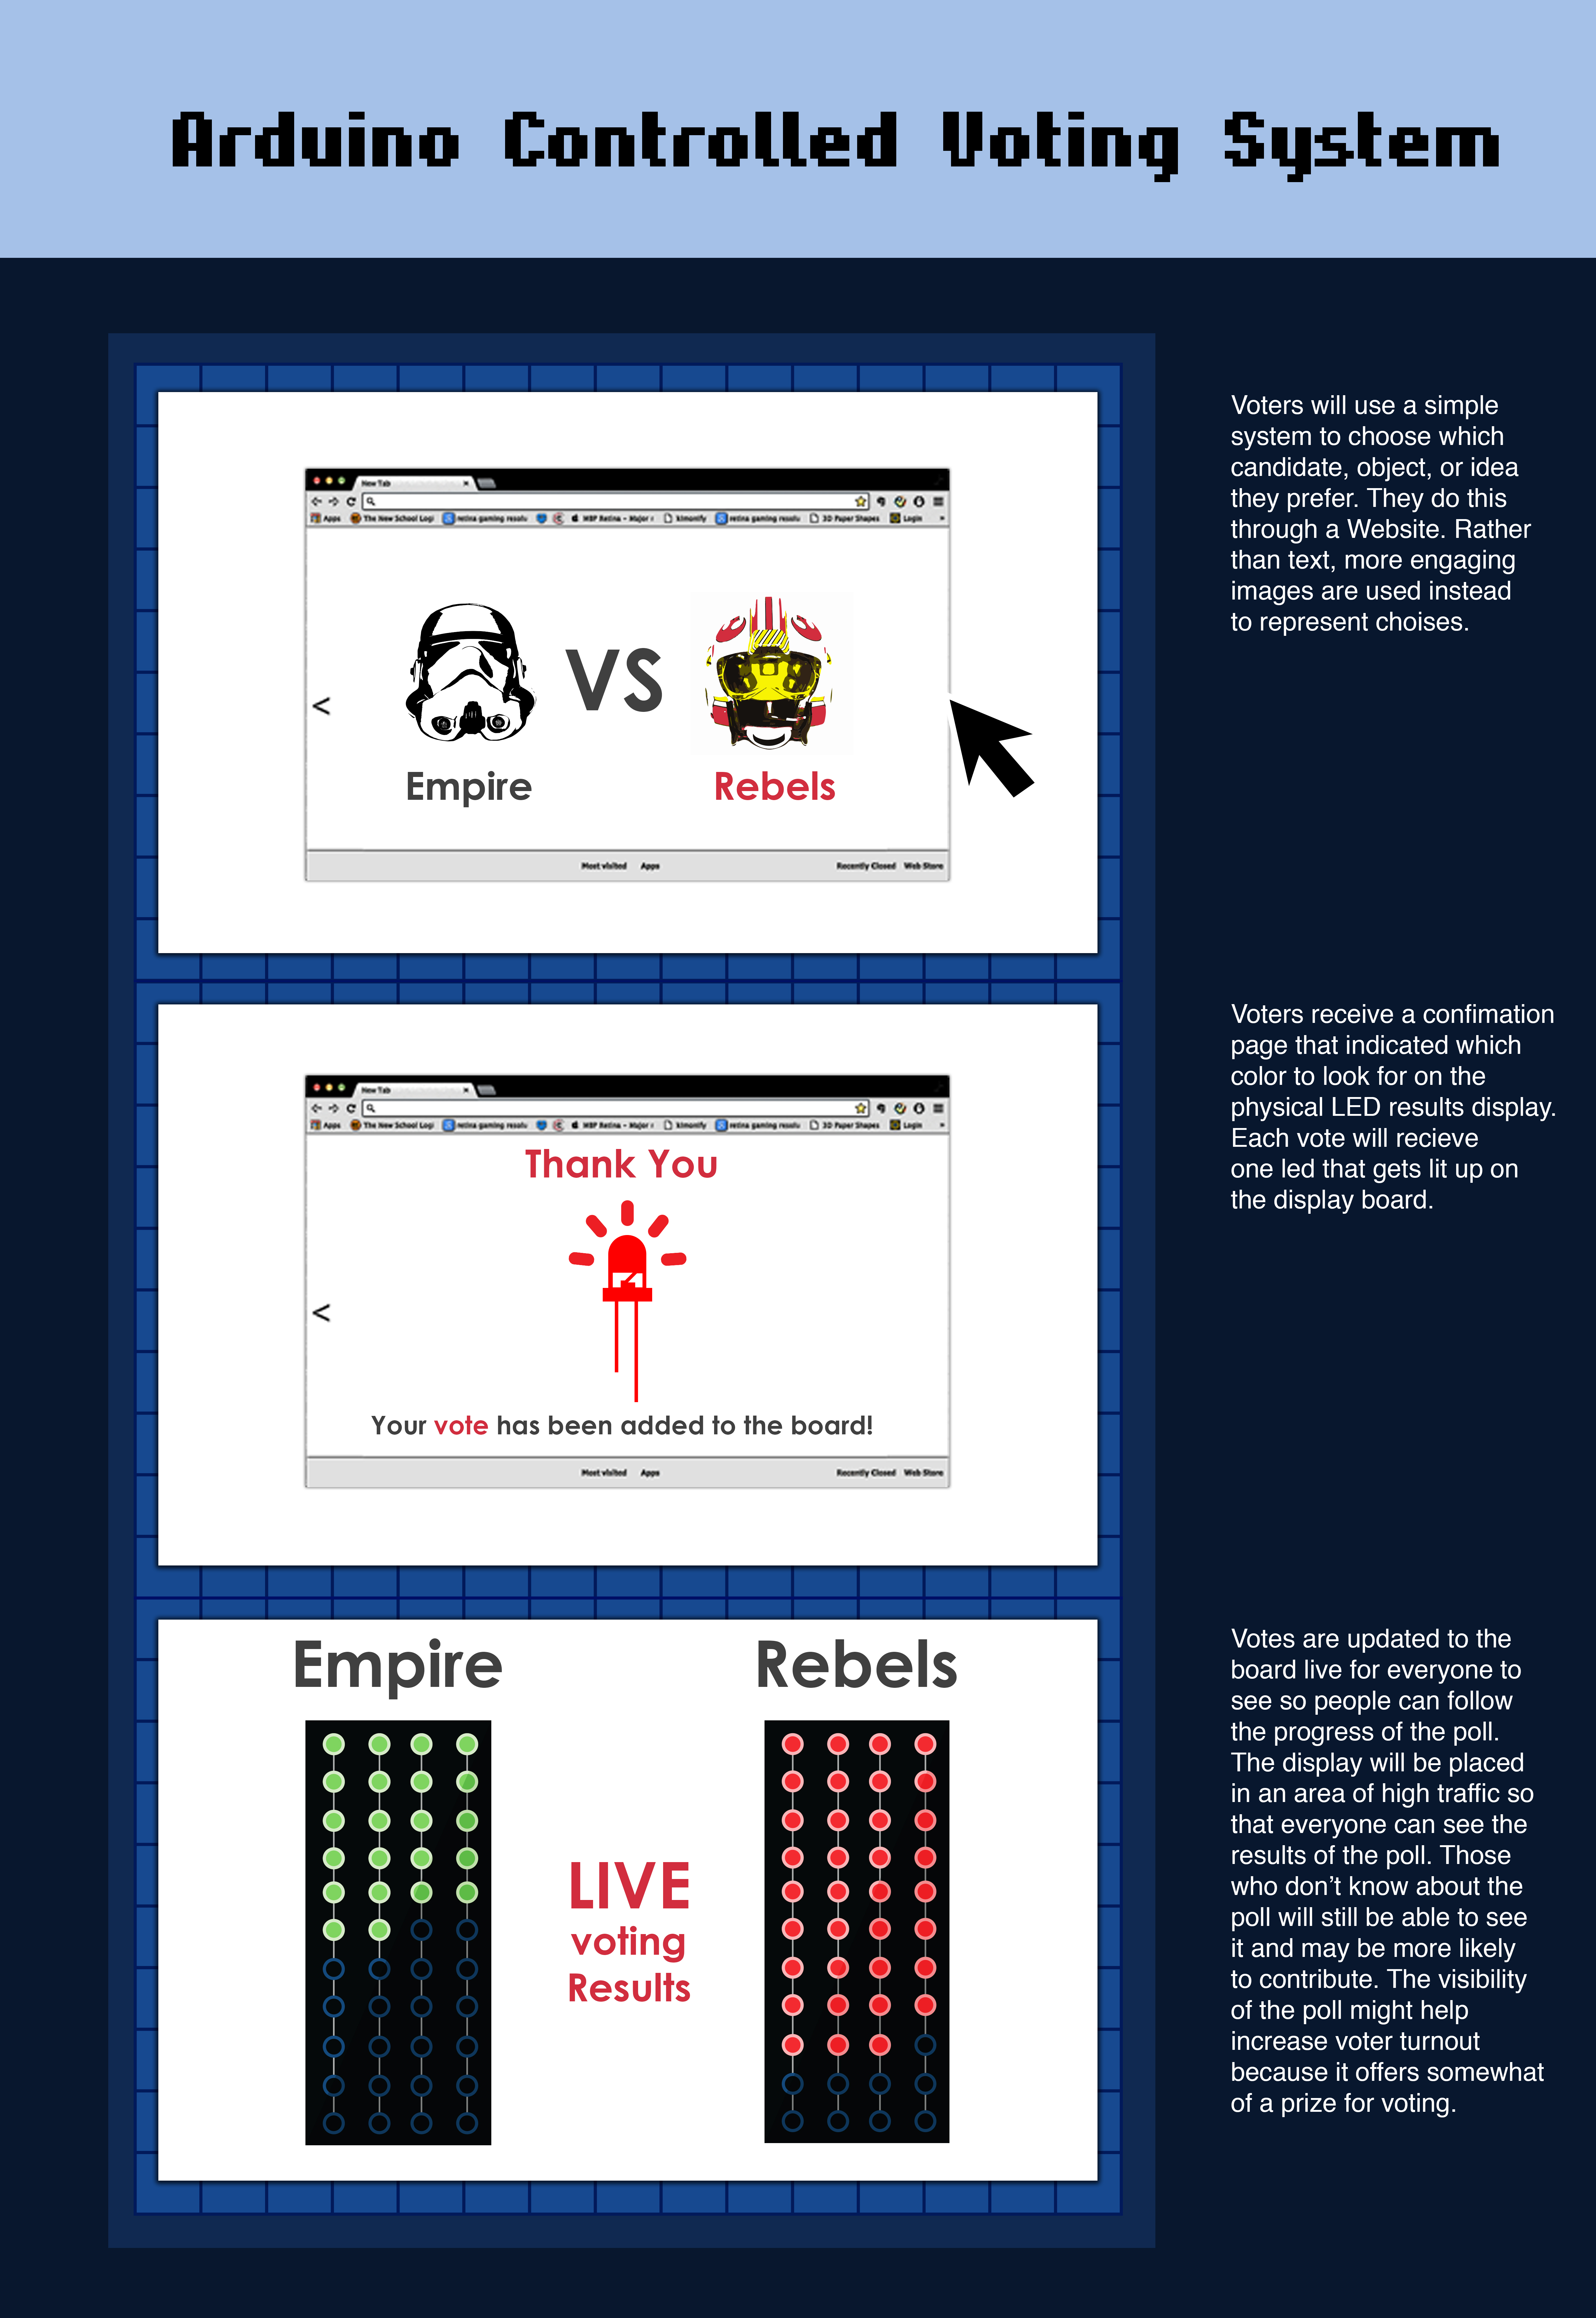
Arduino Controlled Voting System