My perspective and perception of fashion has been changed these last three weeks.
Coming into the intensive program I knew nothing really about the fashion world.
I used to think of all fashion more along the lines of what I now see as industrial fashion, without meaning too. I would look at “crazy” designs and think, “Who would wear that ?” I thought fashion should be made to be creative, but in a wearable/casual way on the streets.
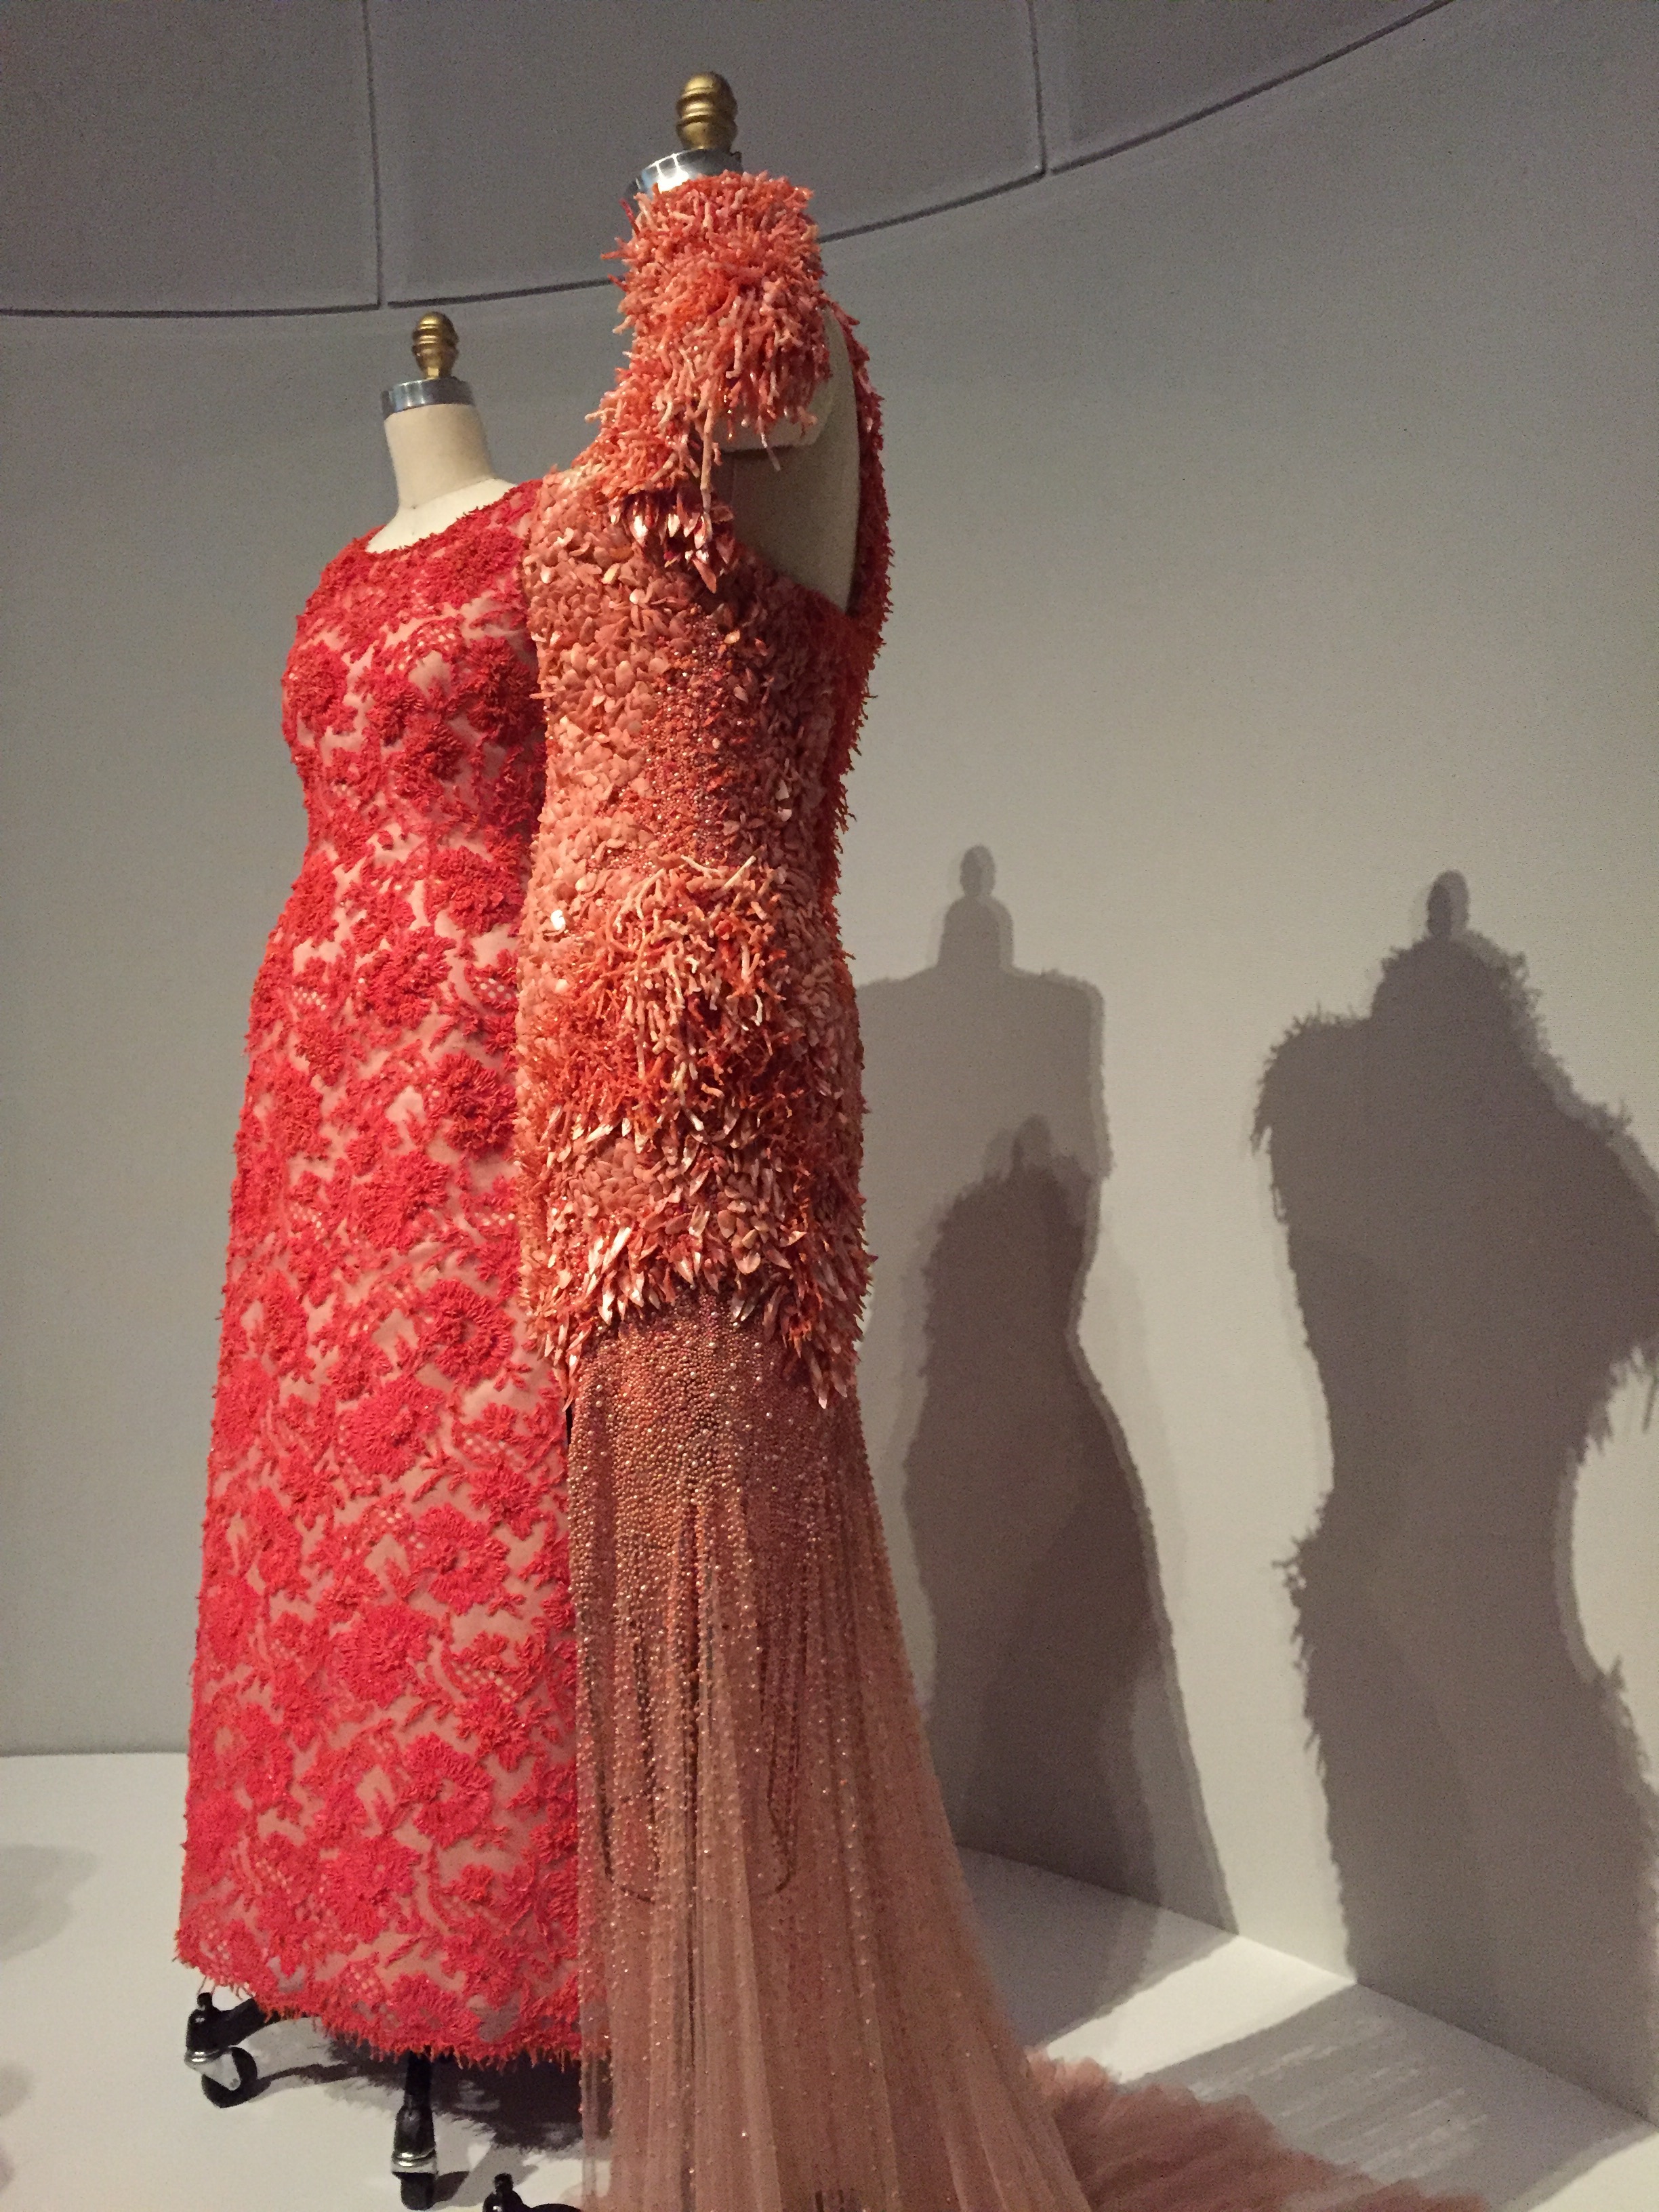
Manus x Machina opened my mind what fashion really means. I realized that fashion doesn’t have to be worn by the masses. It can be an art piece. Analyzing,viewing, and reading the descriptions of the designers tactics and inspiration was amazing.
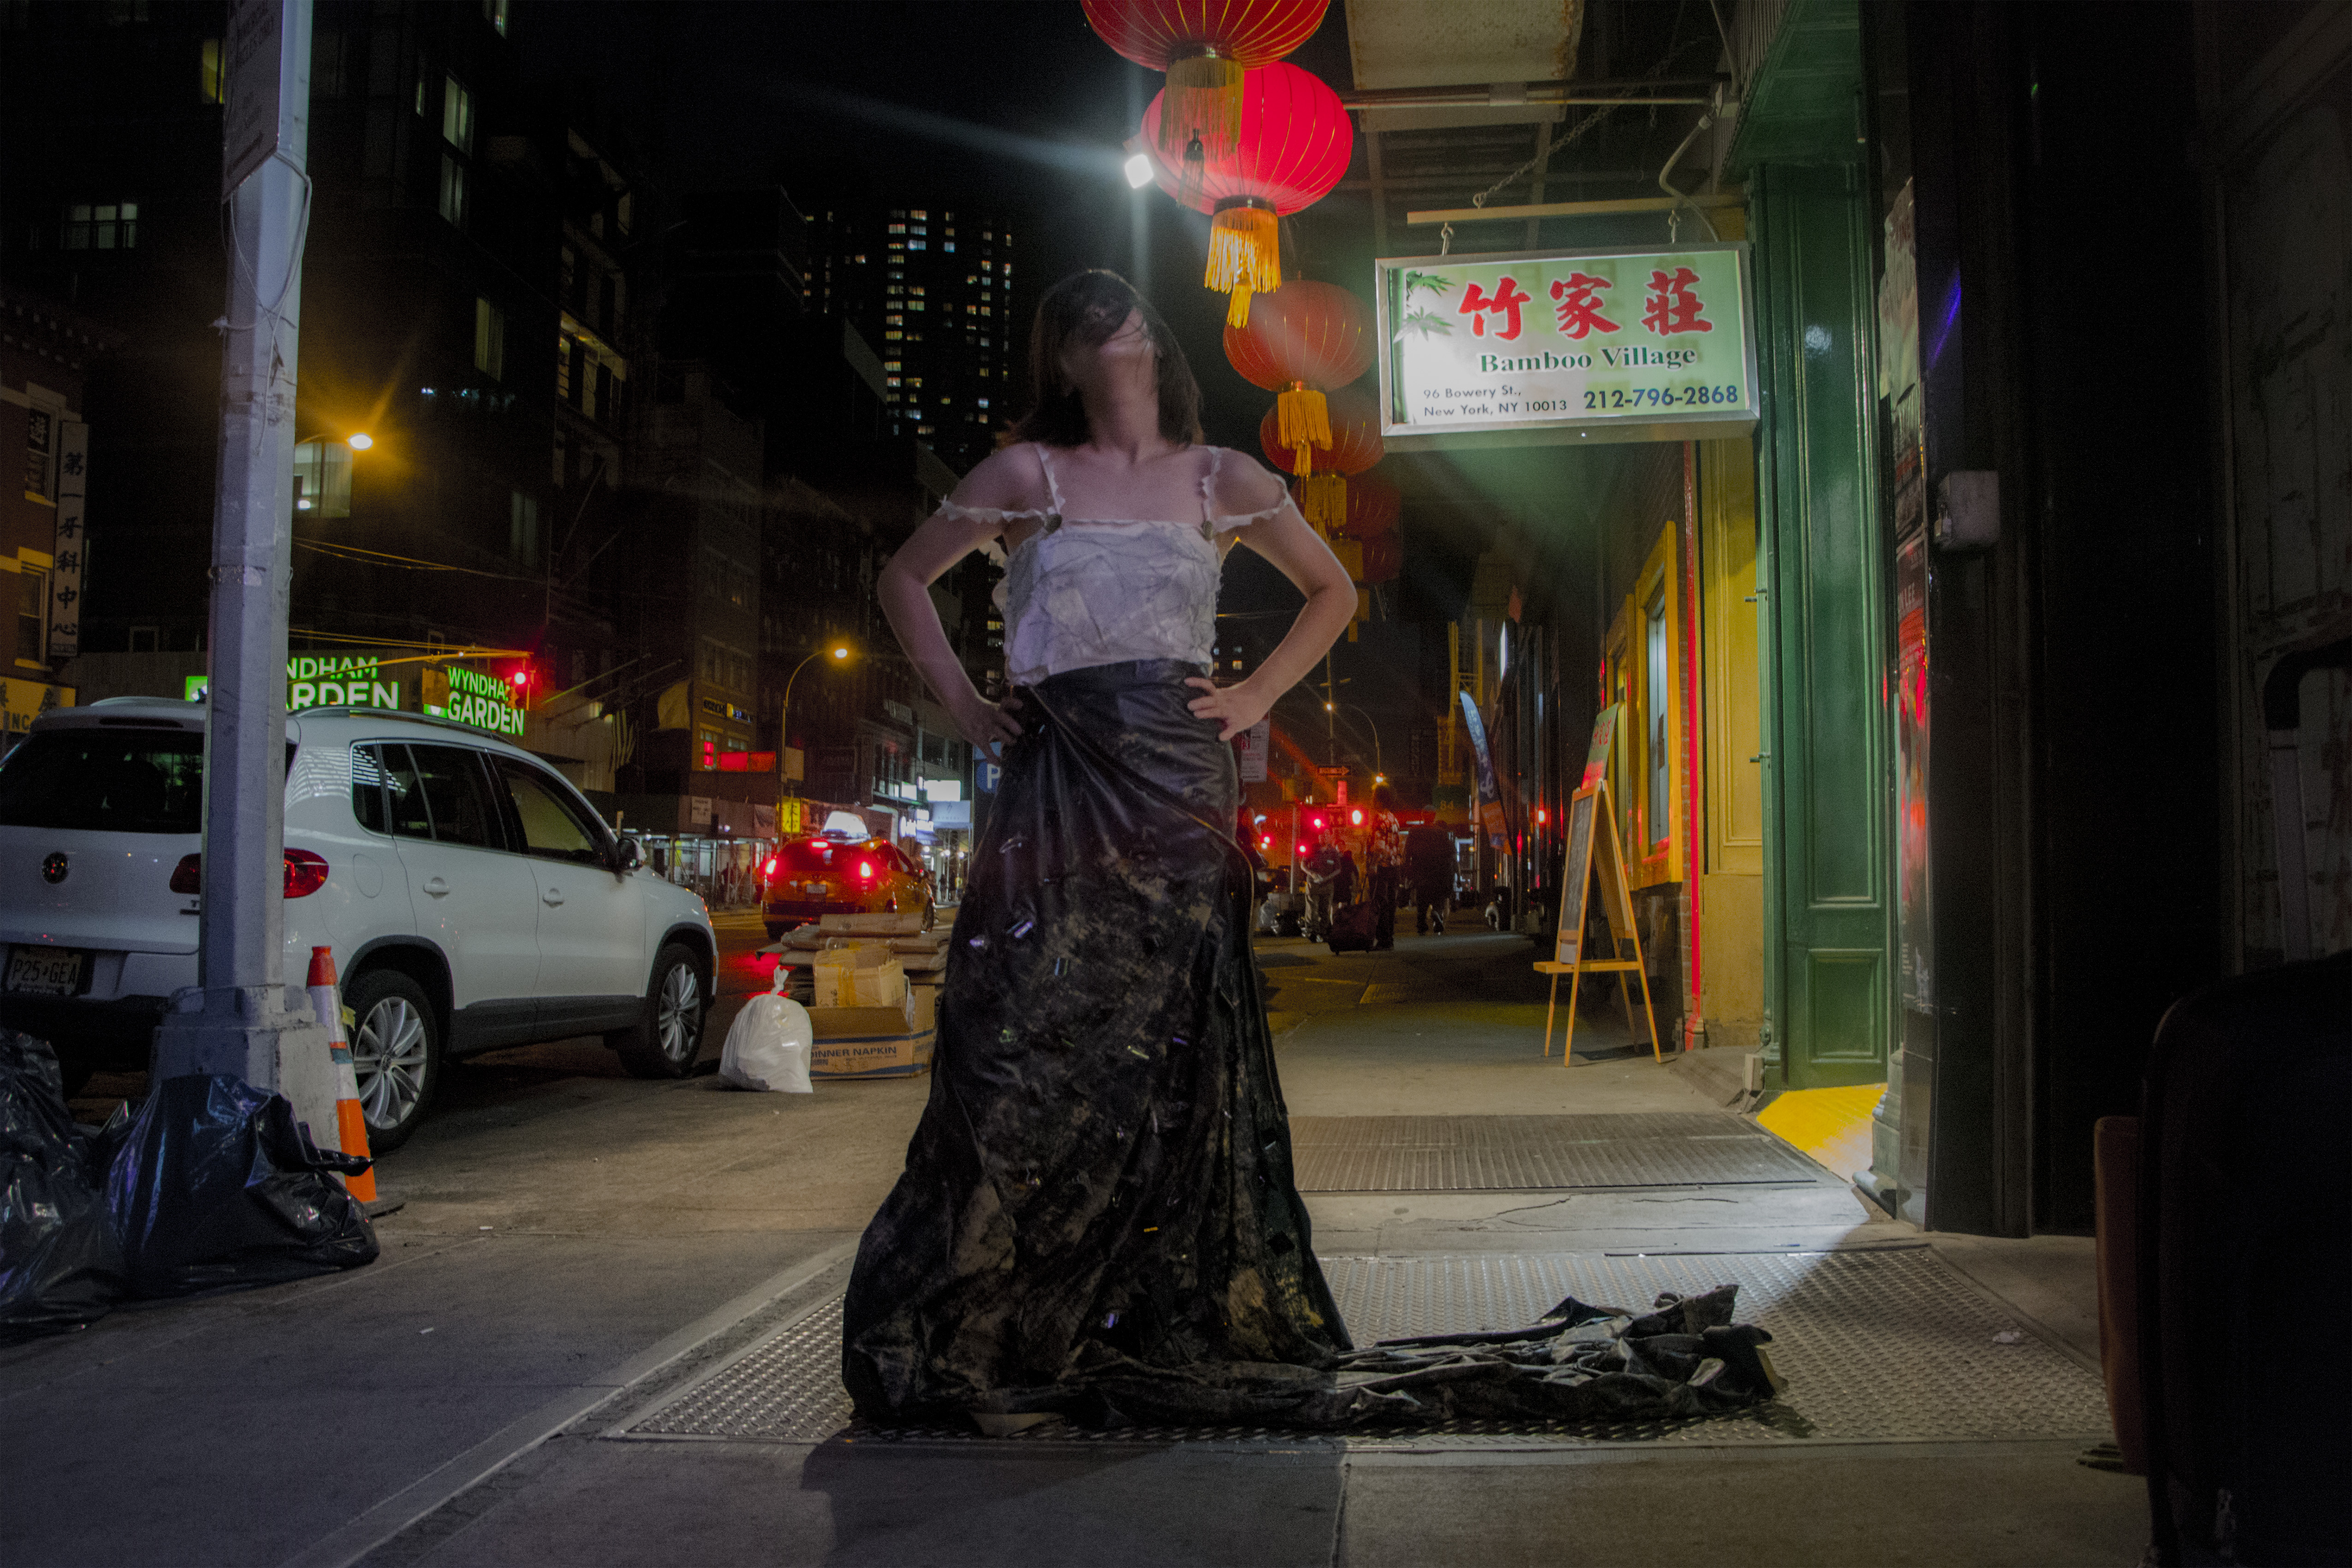
As a class we then went to Chinatown for some inspiration for an upcoming project. My inspiration was the word “brokenness” and how it has so many contradicting points in Chinatown.
Chinatown really embodies the New York theme of individuality. Everyone has a story that you might come across and hear. Also, I observed a lot of ambition. These elements provided inspiration for my garment.
THE ASSIGNMENT:
In class, when Stacy and Aaron said that we would have to make a garment, my first reaction was to be freaked out. I barely knew how to sew and had never made a garment before.
I first considered making a purse, but then realized that it was against the rules. So, I decided to make a dress.
My strategy was unknown at the beginning. I was thinking, “Where do I begin?” “What materials are the easiest to make something with?”. Then I realized in the past (especially on art projects), I had used critical thinking to solve a problem. I remembered that setting boundaries can make some things more difficult, but those same boundaries can cause you to problem-solve and unleash creativity.
PROBLEM SOLVING:
The first step I took to approaching the assignment was to sketch out some ideas:
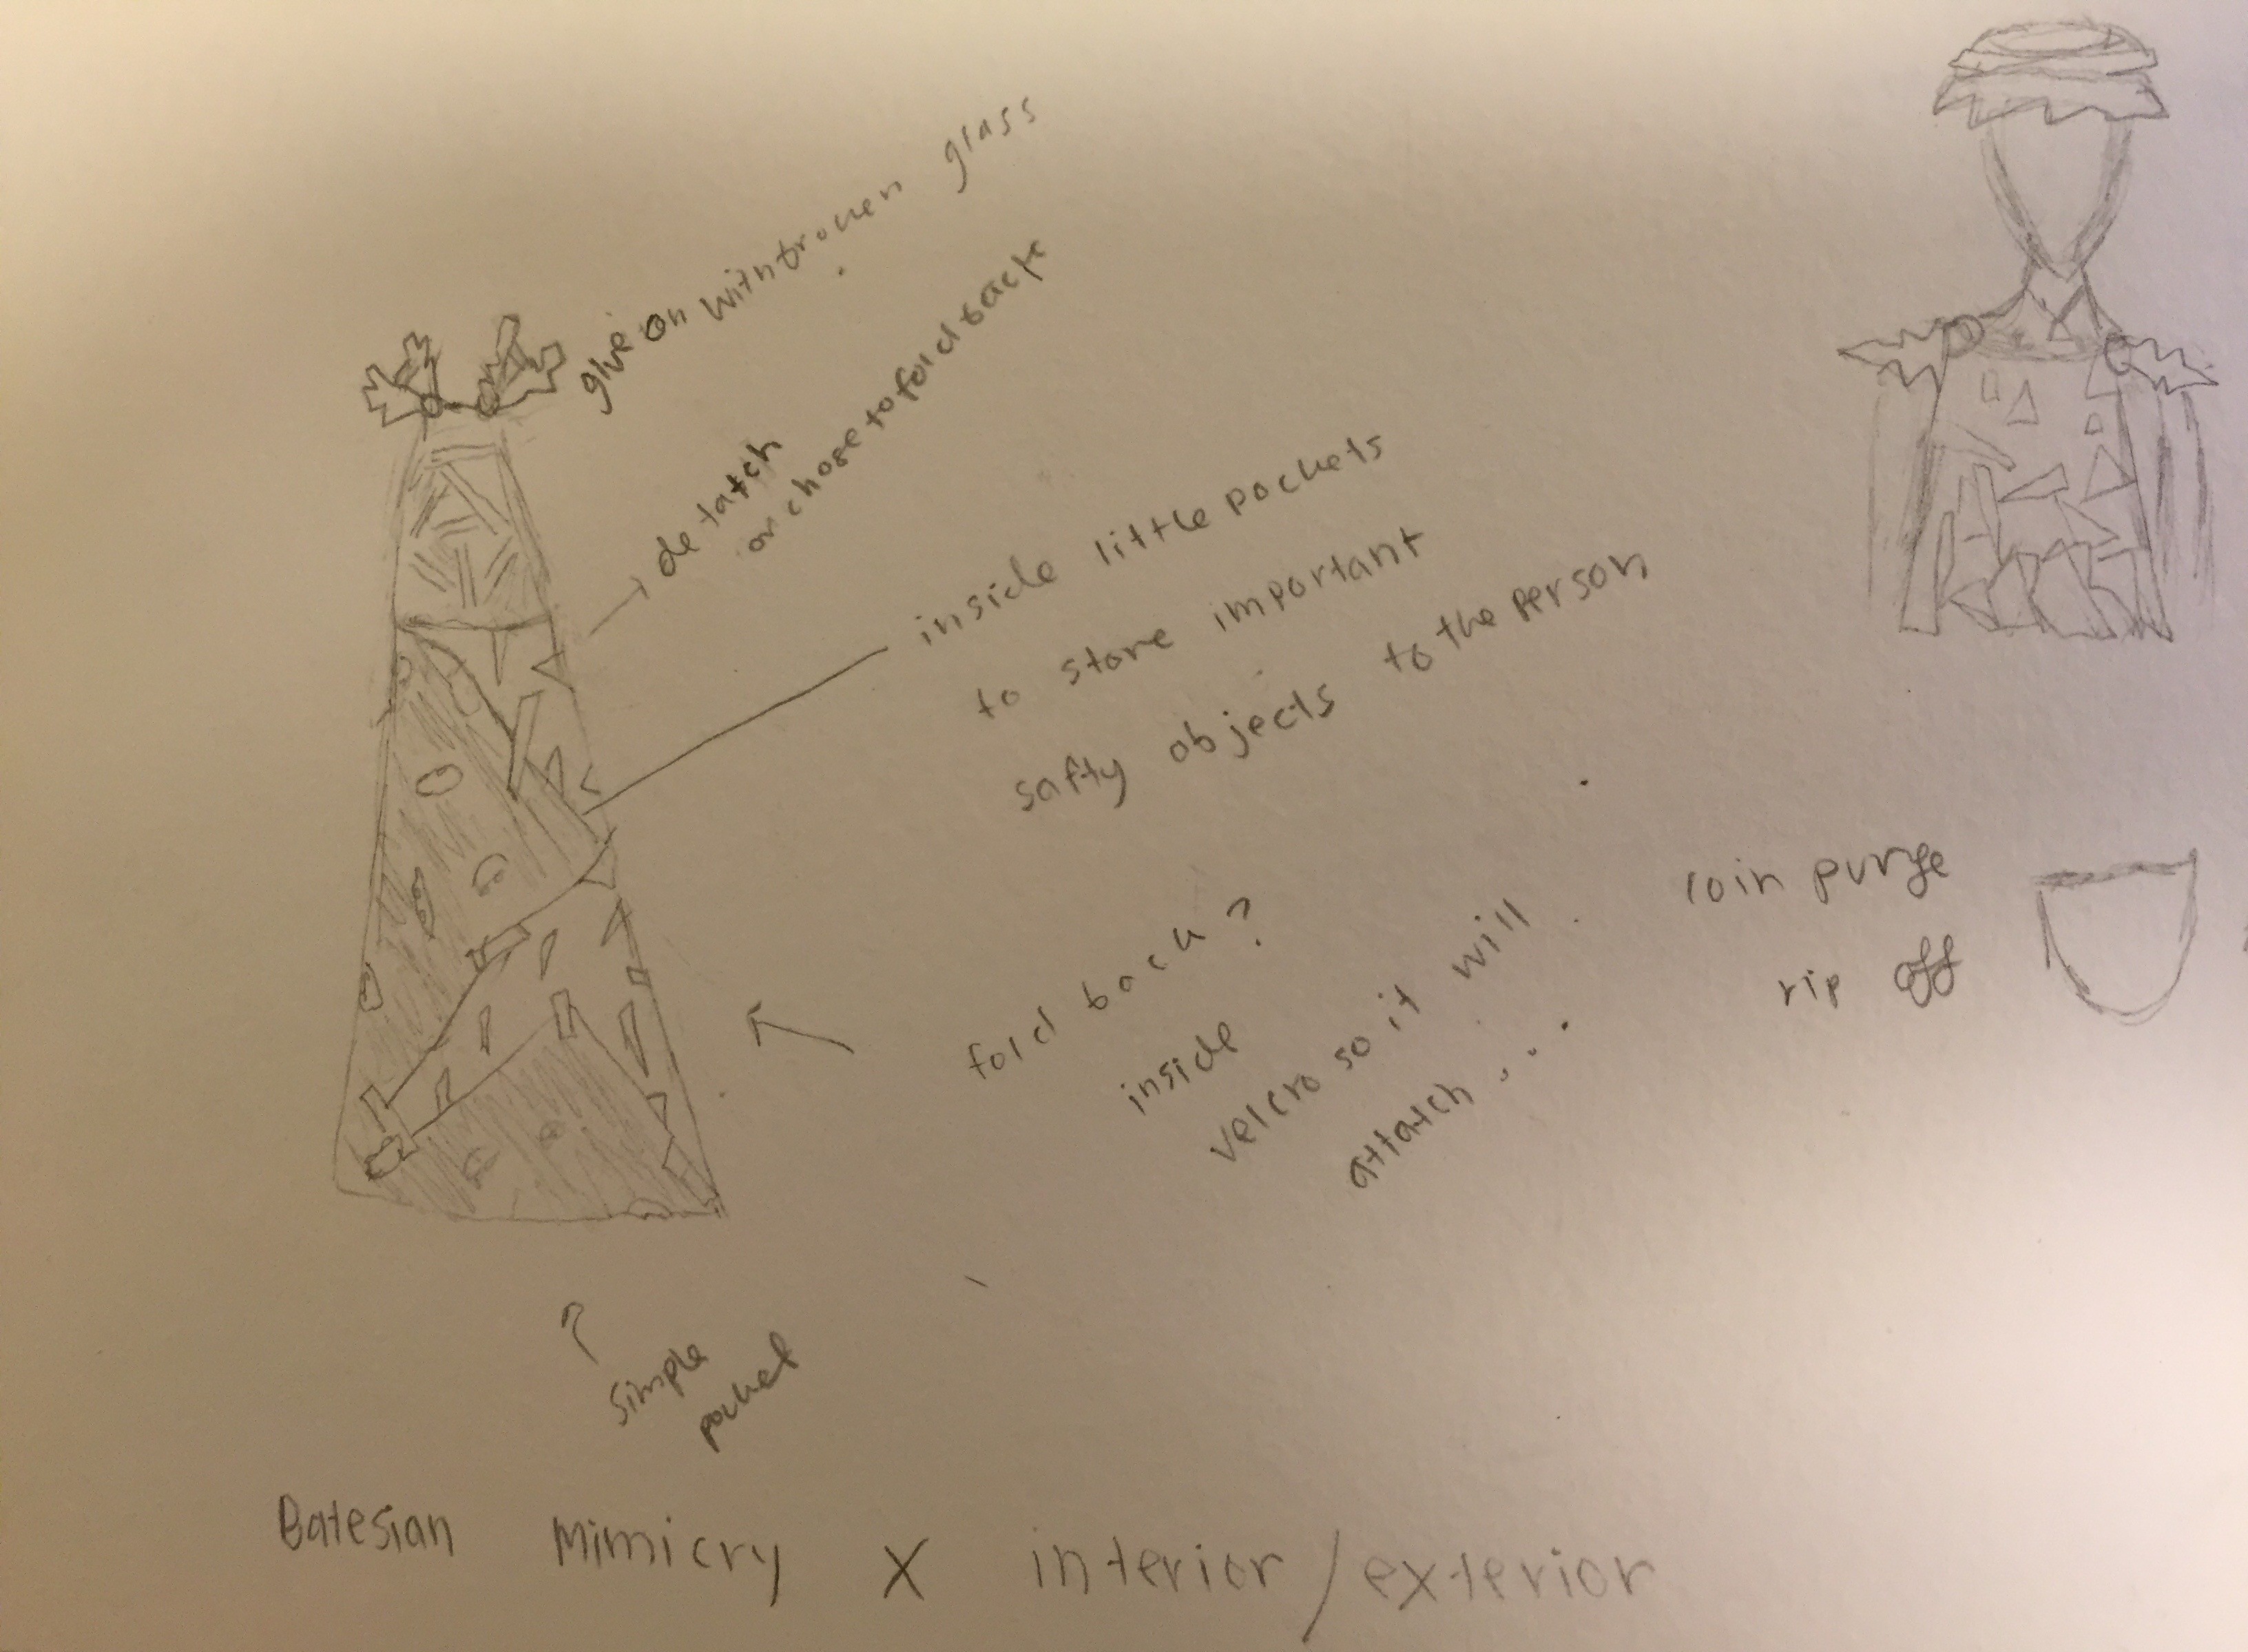
When we had to propose our ideas, I was afraid of doing what was in my brain because I didn’t actually think it could be executed. I was thinking of molding a hard dress out of plaster because I thought the plaster would be easy to form, and turn into a the dress I saw in my mind.
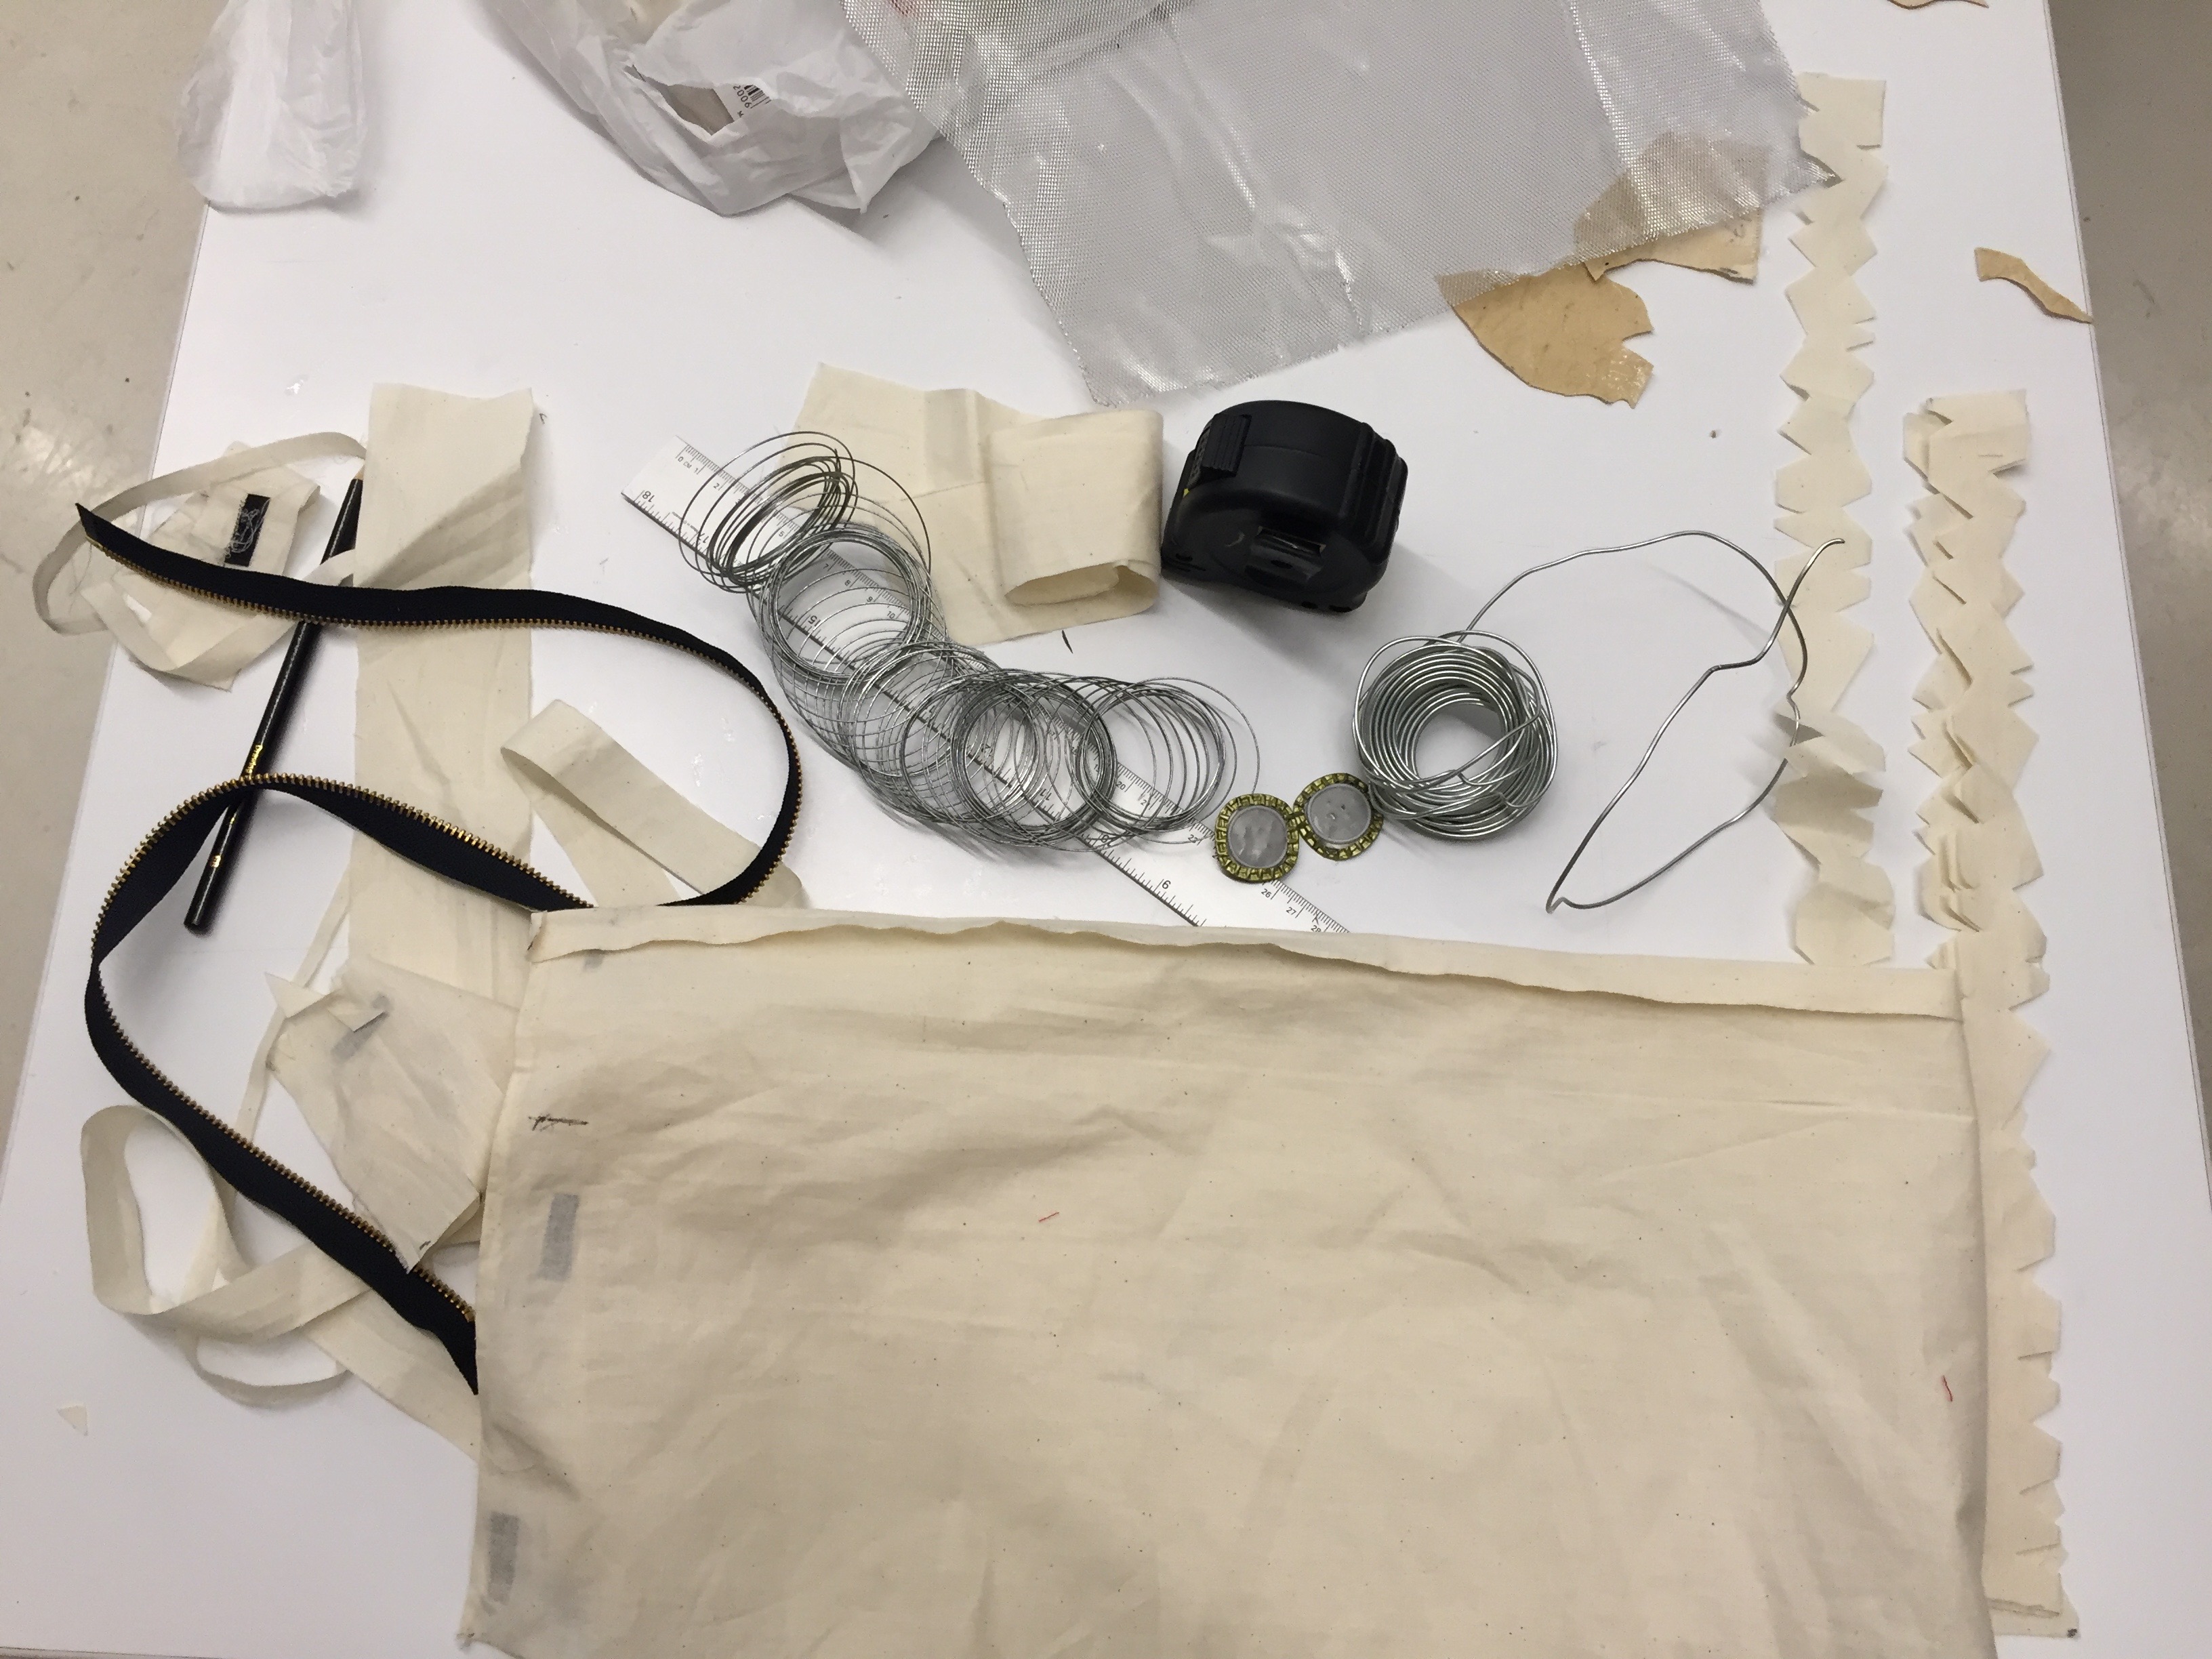
The second step was to find materials:
I honestly had no idea where to start. So I thought of colors that I would like to use that would depict my inspiration from Chinatown.
Some people kept talking about a small material store. So some of my friends and I went to check it out. There I found a unique material that I would use for my skirt part of the dress for only $3 in total (it was on sale! I found some white cloth material for the top there.
Afterwards, I headed towards Blick Art Supplies. I was on a mission for my most important material: Plaster! I was so stoked that they had it there. But…….
The next day I was still not sure how to attach the material to the plaster. I decided to put my design on the mannequin and plan out the dress before jumping into the process of making the final project. To my great surprise, I no longer needed plaster. The unique material that I bought created a beautiful train skirt for the garment.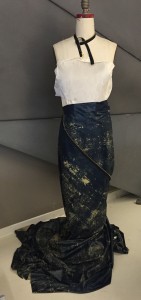
Reevaluating the design:
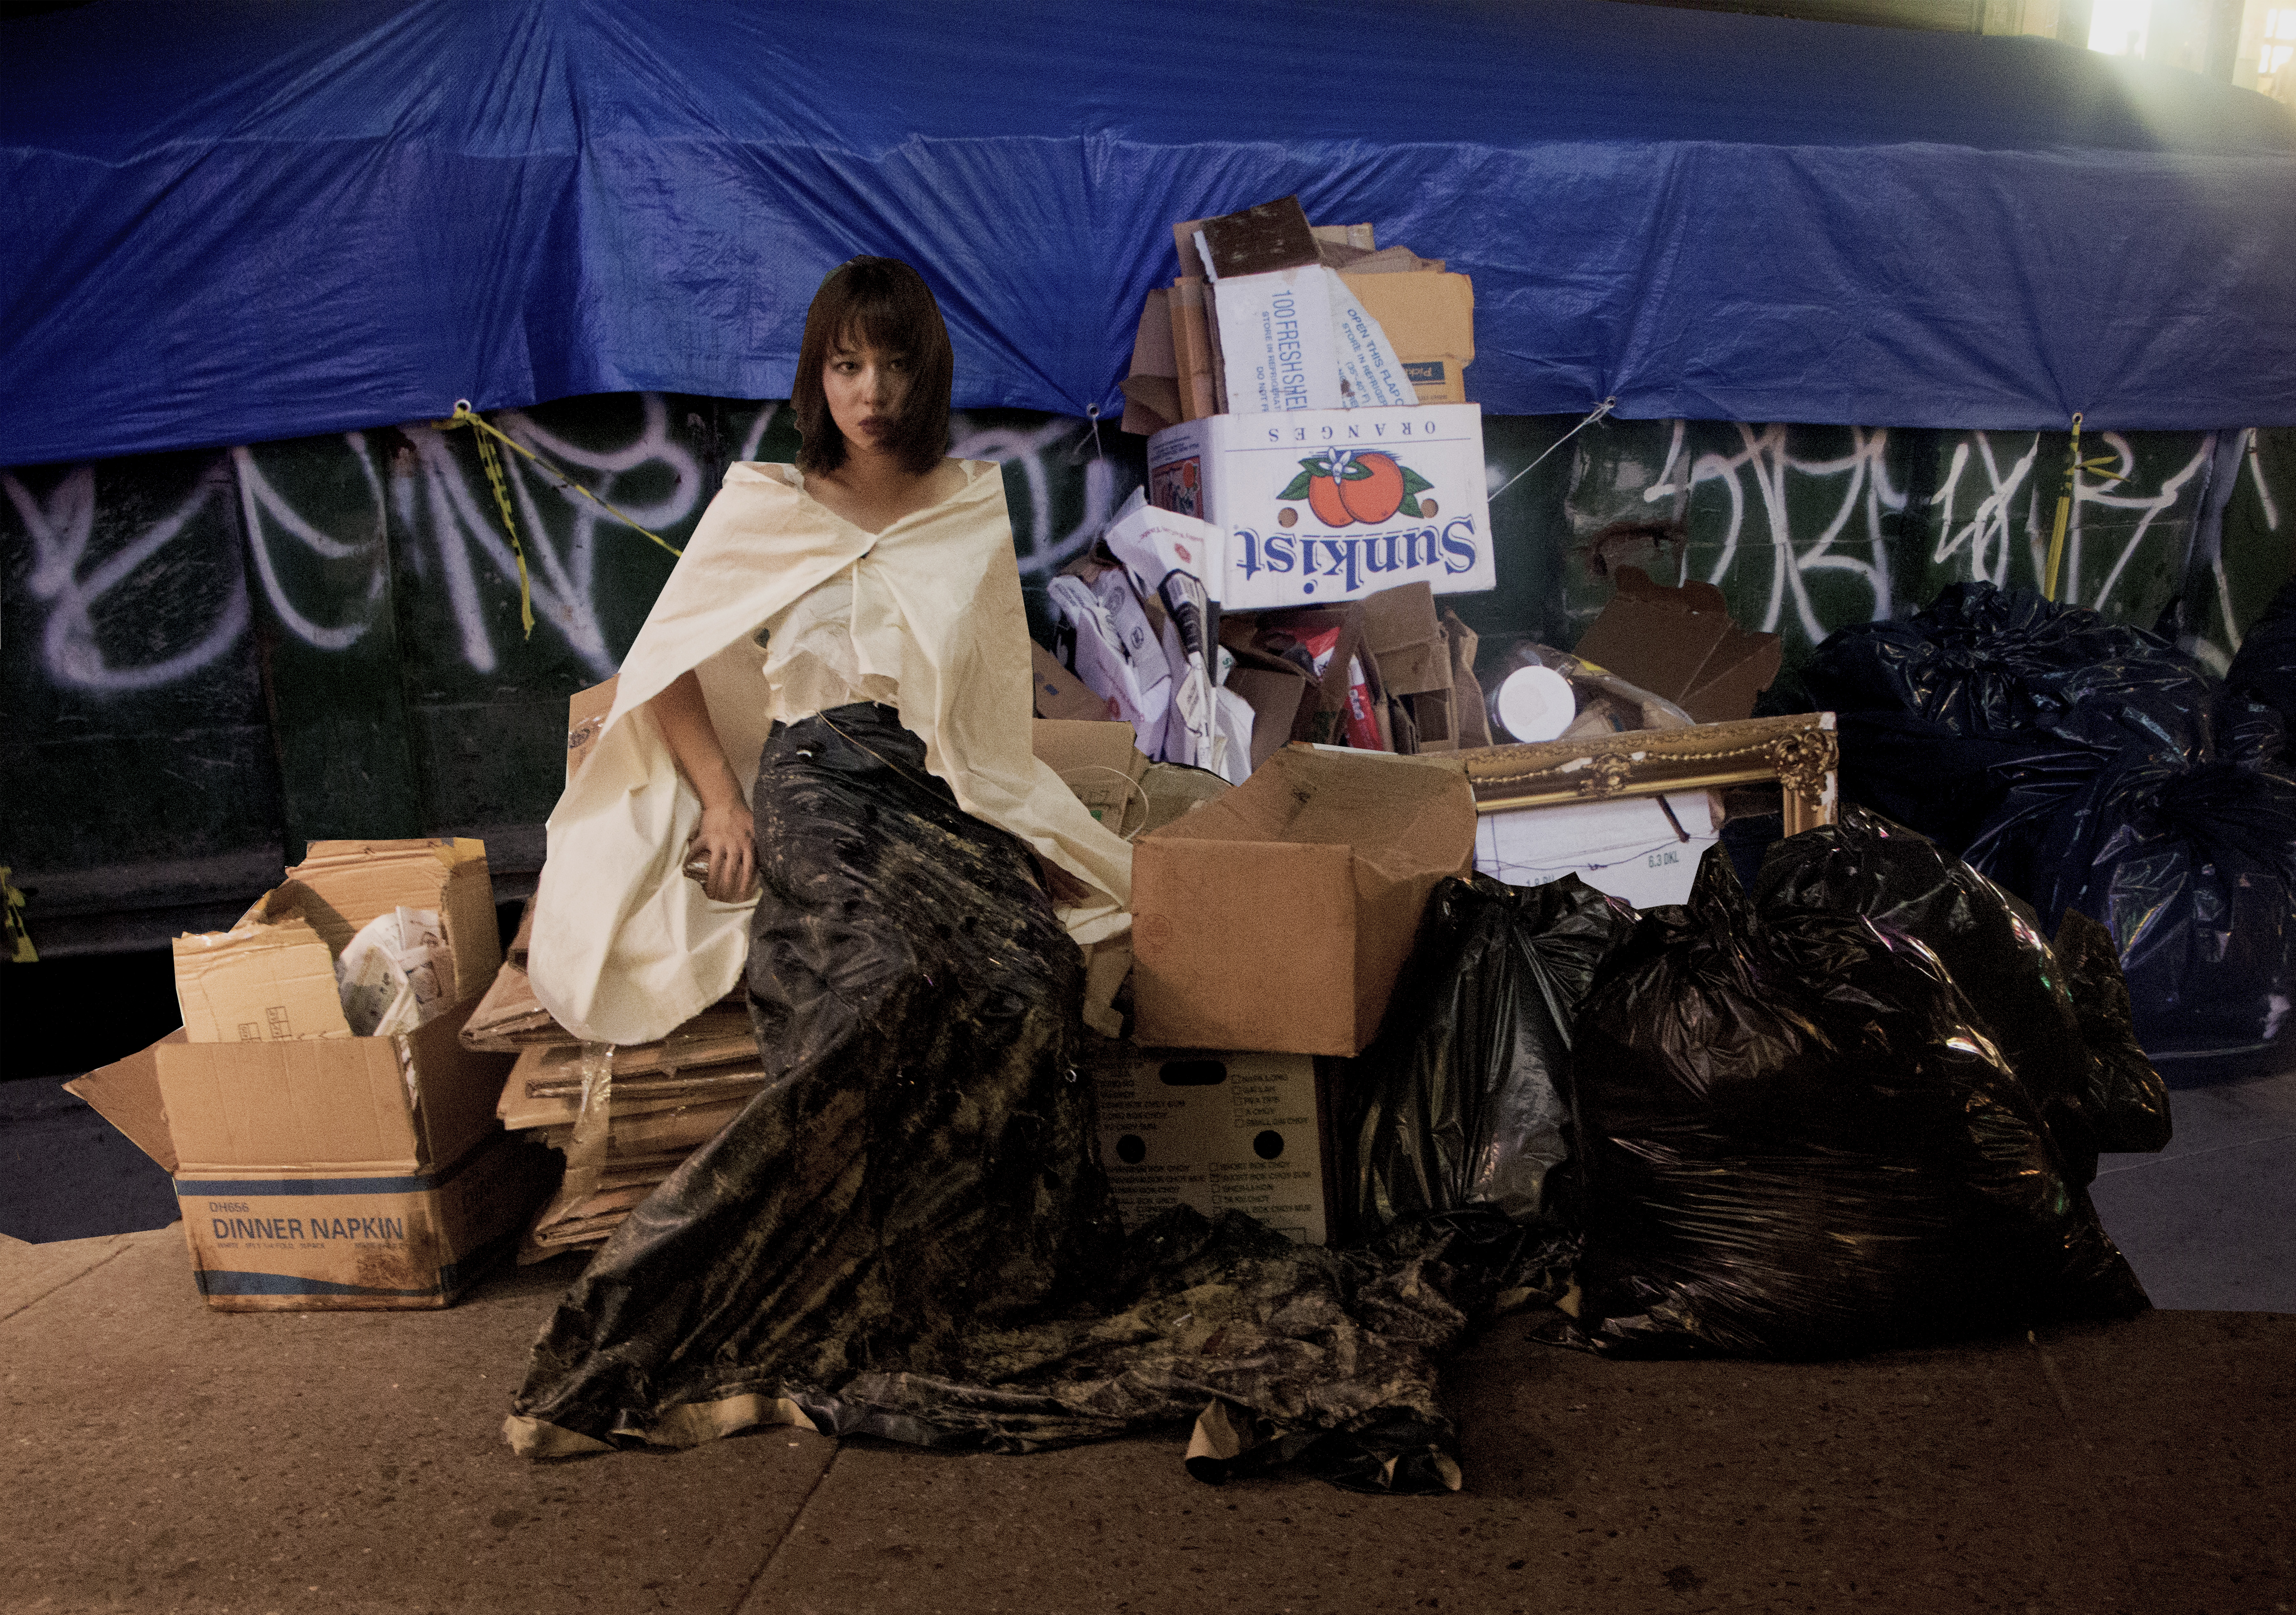
I started to recreate my design, but with the same concept in mind. I really wanted to achieve Batesian Mimicry by using broken glass vs. broken buttons. I quickly realized that I should only use broken glass on one side of the skirt and let it flow into the train of the skirt. I wanted to create an disorderly effect to achieve the word “brokenness” with the glass. With one side of the dress clean and the other side scattered, the random colors and sizes of glass it would show contrast. To separate the glass side from no-glass side, I thought of having a flap on the front side with a broken zipper making a boundary. That front side would allow the person to get inside the dress. On the top of the dress, I realized I could glue small-holed mesh wire and then thread thin wire into it to create more of a design
Ready for hands-on work! :
These are the ways I made the parts of the dress:
GLASS – I placed glass bottles in a huge trash bag and threw it on the ground. Then I grabbed a hammer and started to smash the glass. I hot-glued the glass to small pieces of cardboard. Then I cut slits into the one side of the dress and slid the glass/cardboard inside. With the glass poking outside I then glued the cardboard to the underside of the material.
TOP OF DRESS – I cut the small wire mesh into varying sizes of fixed triangle pieces. I threaded thin wire into the triangles and connected them together with the wire. Then I glued it to the fabric with metal wire. None of the wire was threaded directly into the material, so the top is actually the safest part of the dress. The side of the dress is fastened with velcro to allow the person to get into the dress which connects to the skirt.
STRAPS OF DRESS – I cut material into a zigzag line and attached the straps with velcro to the back of the top. I did this because it would be easier for the person wearing it. The buttons are made from smashed bottle caps that I distressed. They are hot-glued to the straps.
NECKLACE: necklace is optional but you can separate a zipper and make it into a chocker.
SKIRT: I attached the skirt to the top of the dress with hot-glue. The skirt starts to open up in the front. This allows the person wearing the dress to get into the dress safely. The dress has velcro on the inside to attach, so that the skirt stays on.
After proving to myself that I could piece together a garment, I started to measure the model.
Measurement:
It was frustrating at times because sometimes the measurements were off. But in the long run, I am glad that I measured the model so that there was no second guessing if the garment would fit.
I decided to make a cape out of the same fabric that was used for the top of the dress. I had some concerns that the cape might overpower the rest of the garment, taking away from the edgy vibe. So… I put triangle cut-outs in the back of the cape so you could still see the dress. Some of the triangles had mesh and wire with string attached, some were left open.
With the garment completed, it was time for the photoshoot.
READY FOR THE CAMERA:
Photoshoot Prep:
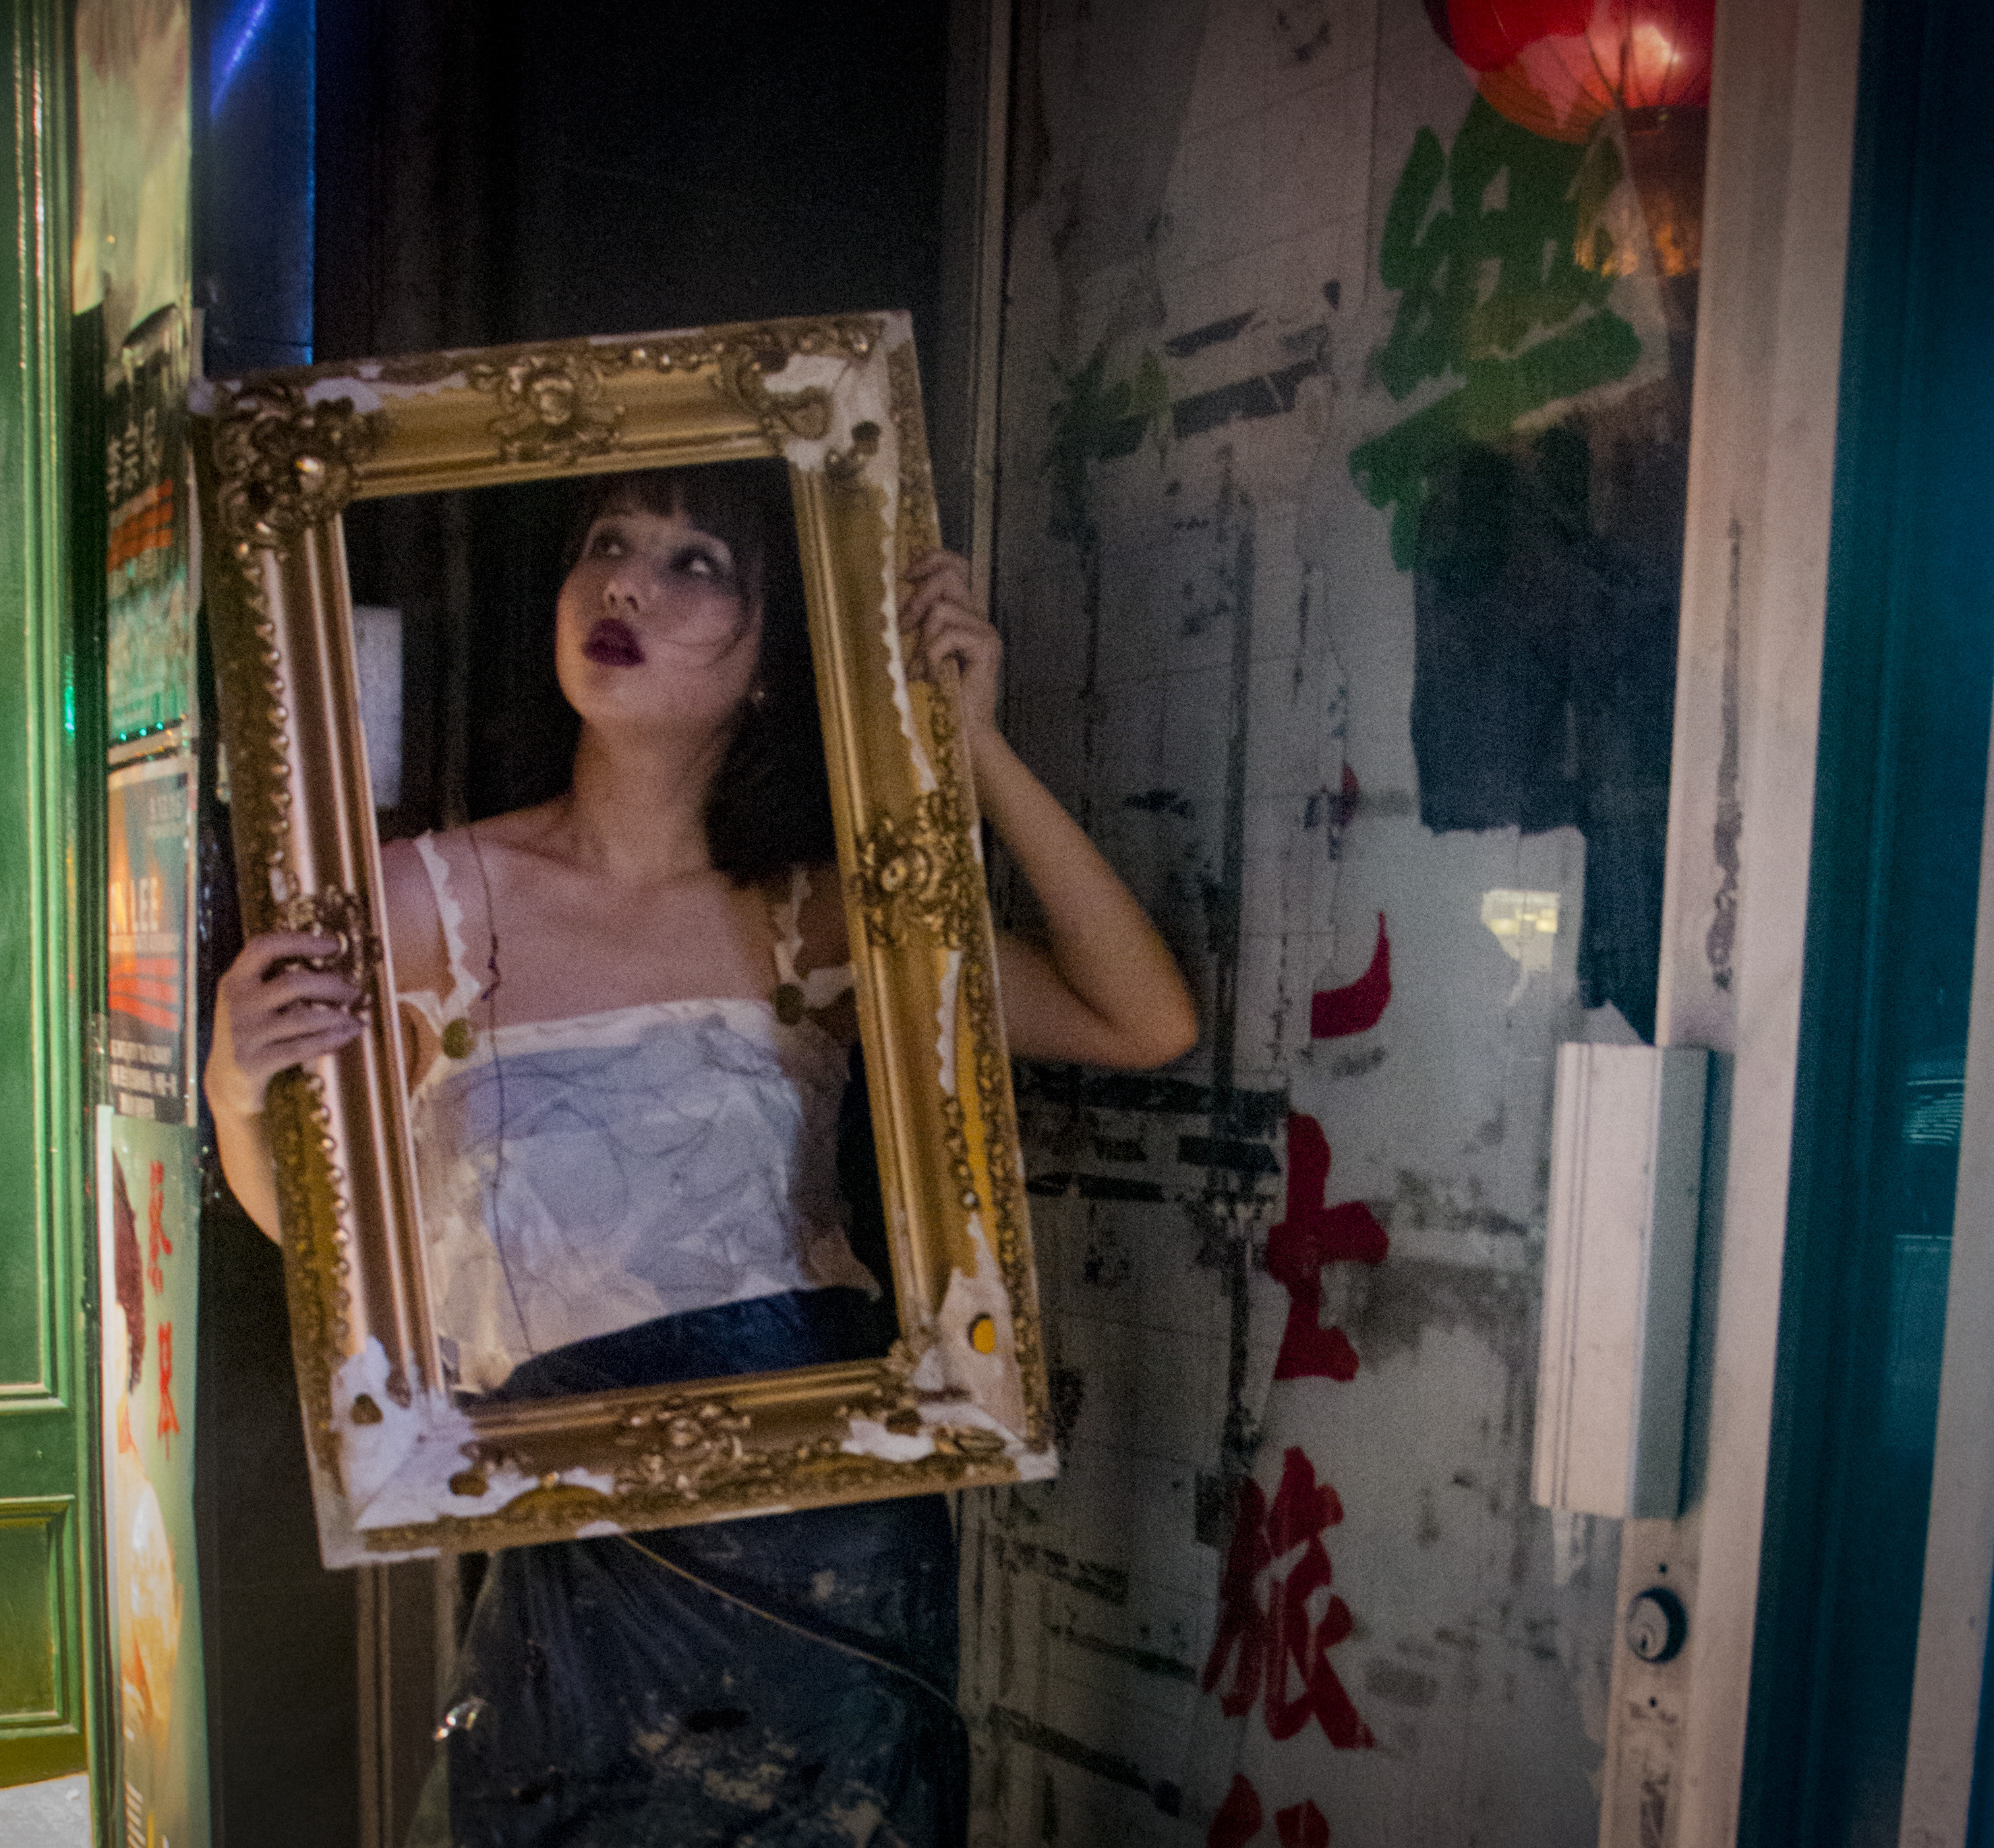
The makeup I picked for my model was inspired by Vivian Westwood’s runway makeup x punk x messy. I used the first colors that caught my eye as matching the color scheme and feel of my project (dark brown, navy blue, etc.). I blended into the face with some white eyeshadow. Mascara was used to pop the eyes and a dark purple/magenta lipgloss was applied. I intentionally applied the make-up quickly (3 minutes to achieve the look), because it I wanted the process to convey the reality of the situation I was trying to depict with my garment. I wanted it to look a bit distressed and not planned out.
Photoshoot:
Finally it was time to take pictures!!!!
I am so passionate about photography, so this was exciting.
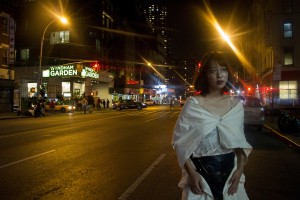
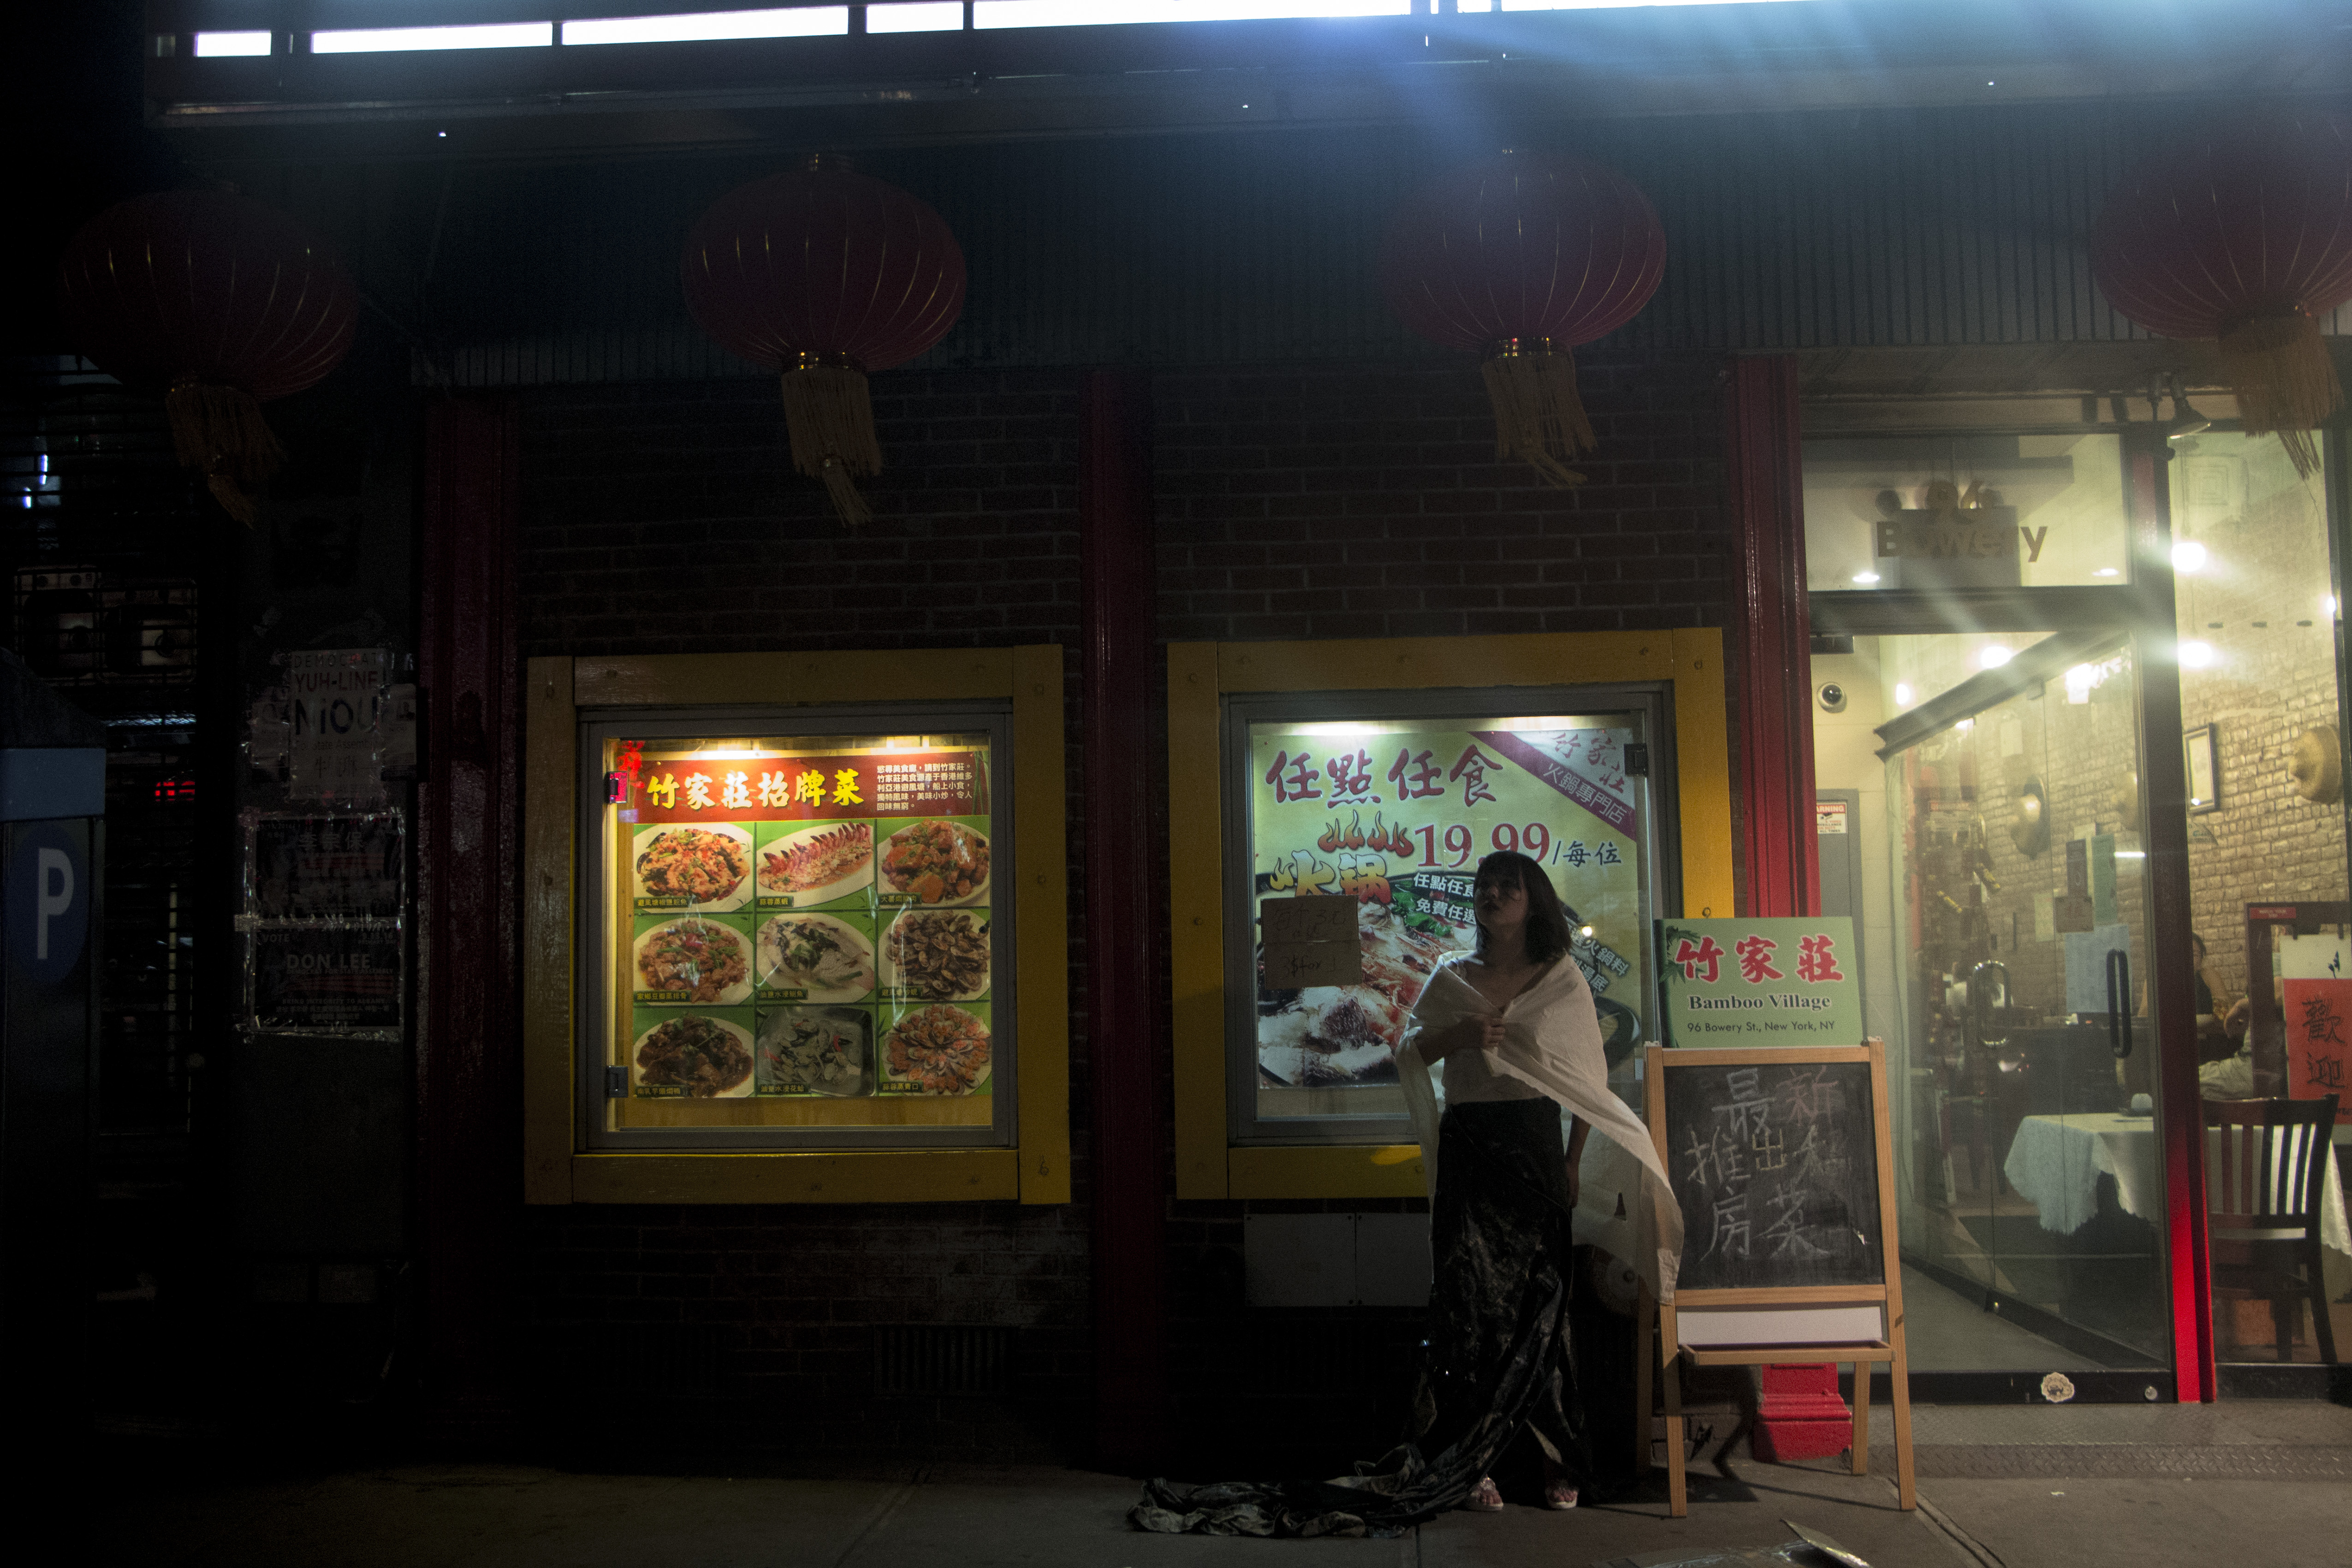
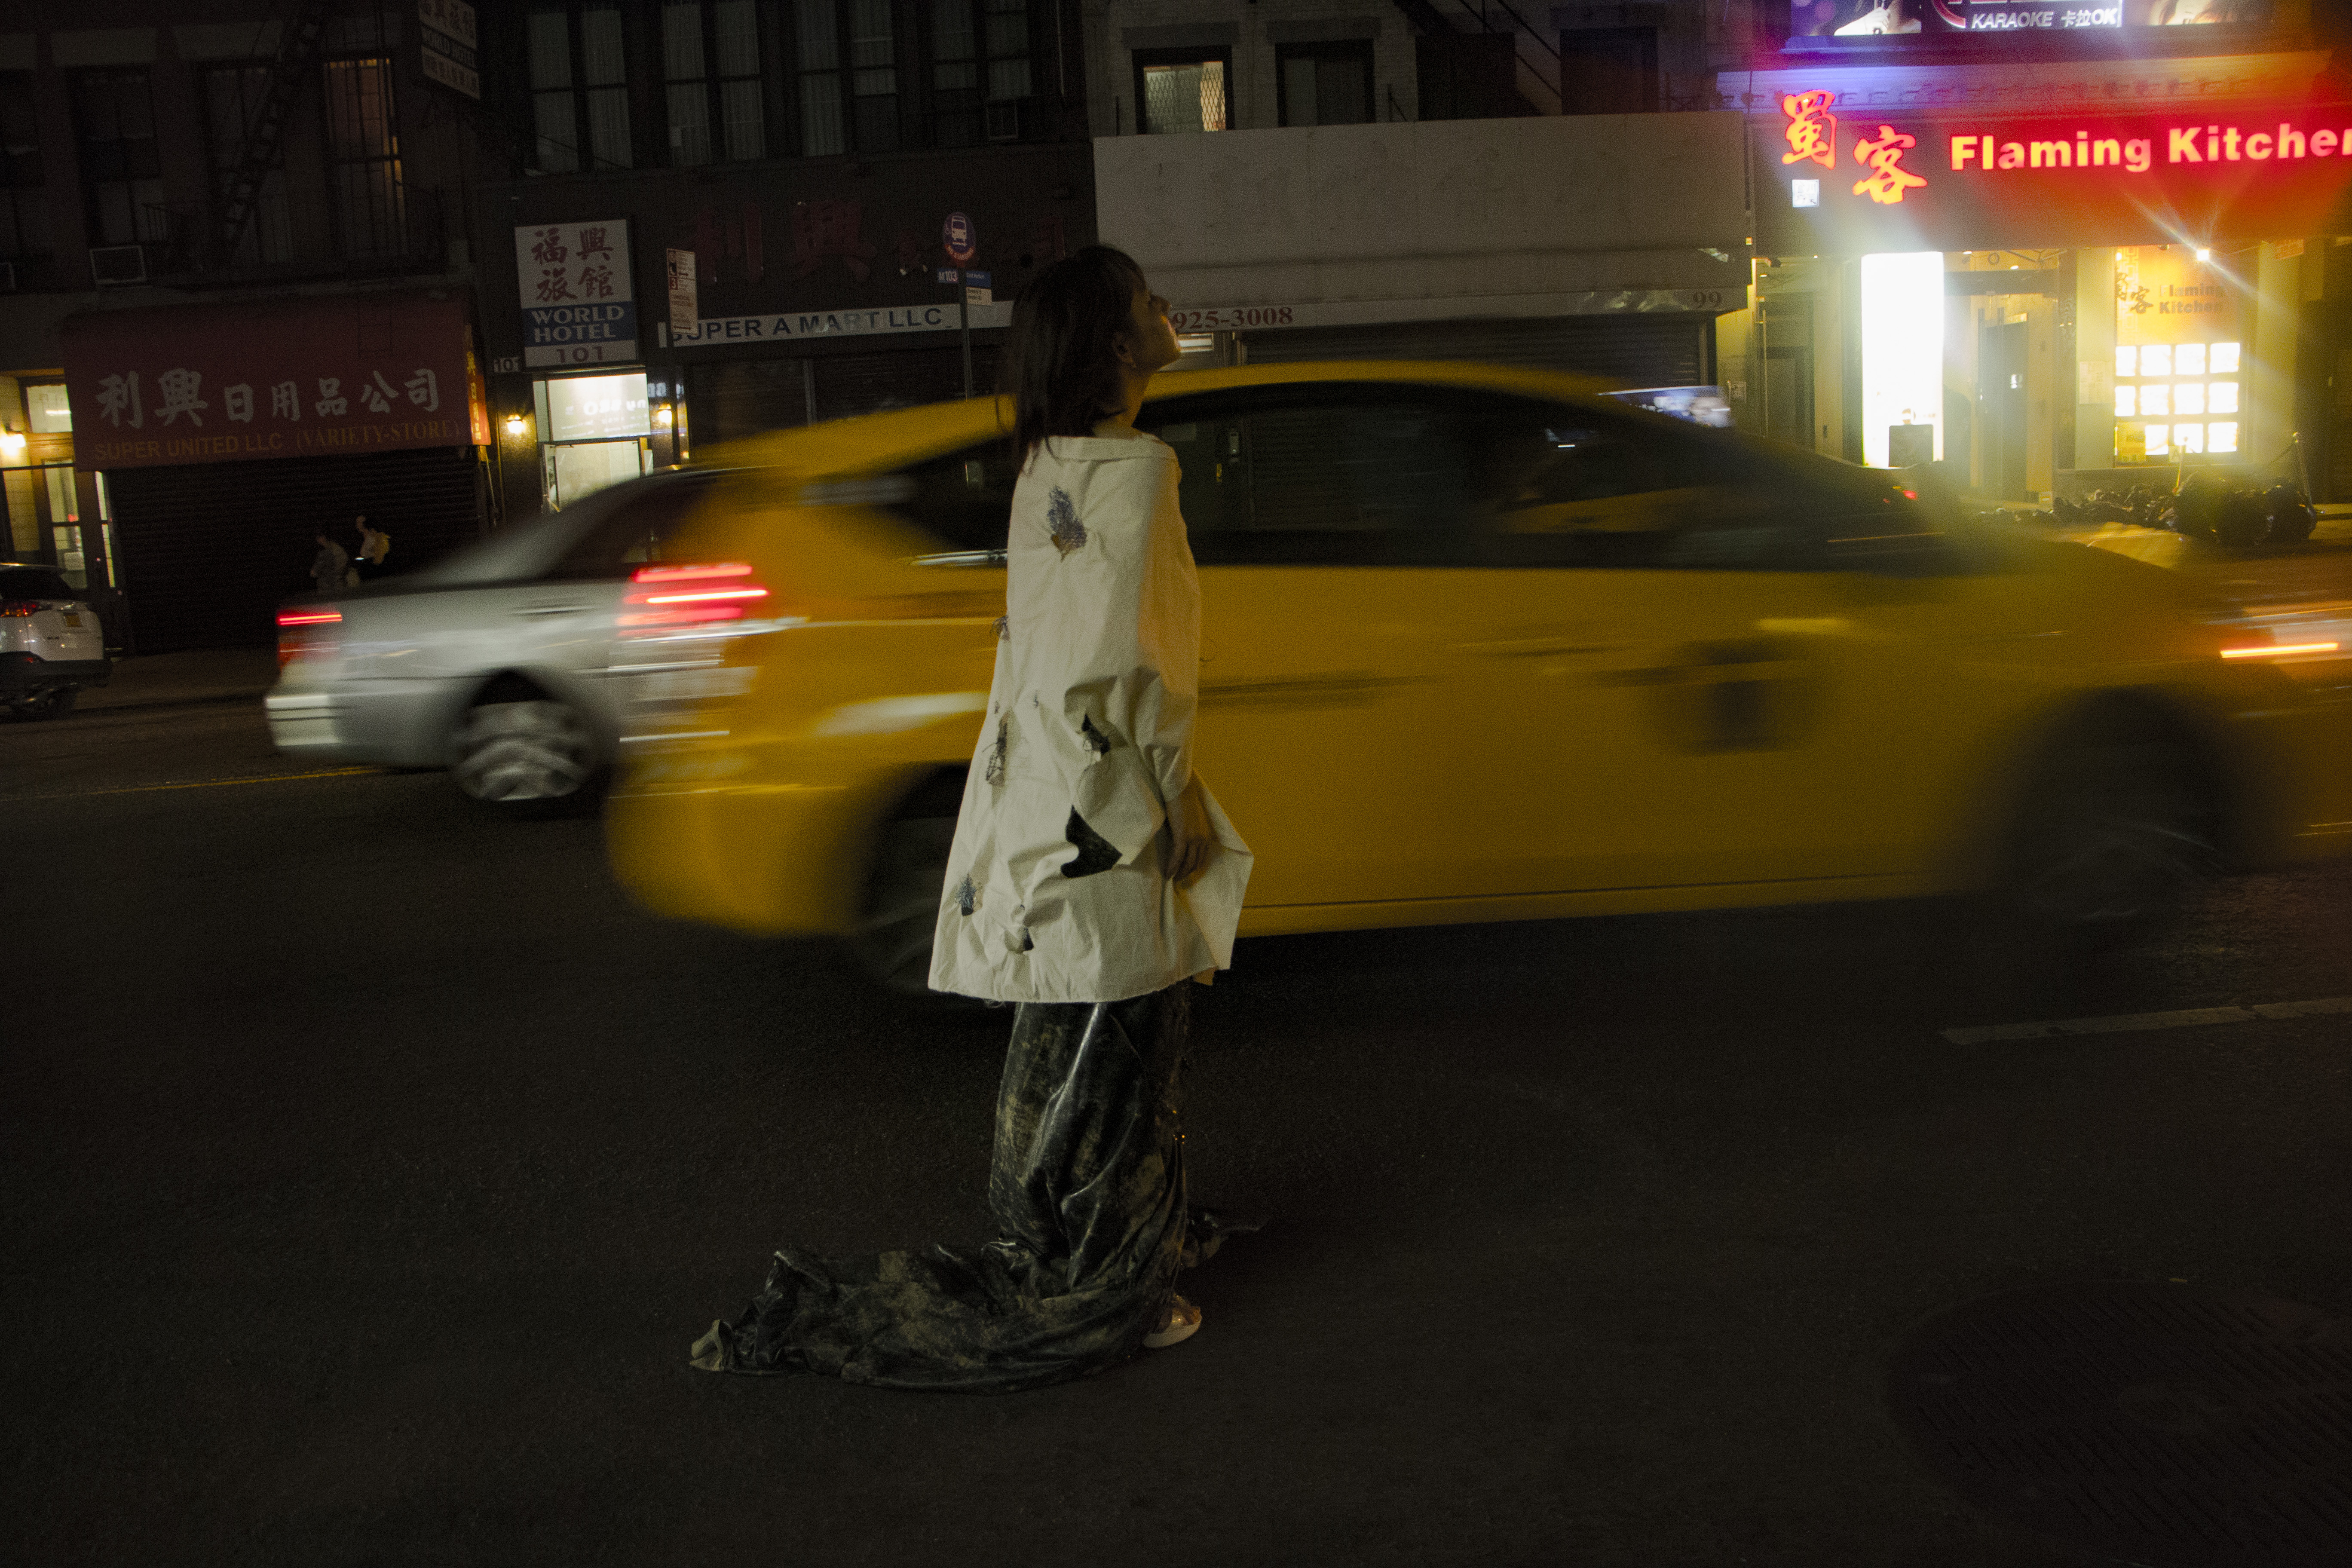
We shot at night.
The dark sky with illuminating colors conveyed the feminine and fatal look of the garment.
The sidewalk was not crowded. This made the shoot run more smooth. The streets had some cars which provided more light to the photos. These circumstances were very helpful and meant that Photoshop was only needed for enlarging and lightening the photos for the exhibition.
I wanted the photoshoot to depict a person who experienced a full range of emotions, with confidence.

Inspired to convey the different types of brokenness. I gravitated towards the word “oblique” which can be interpreted as askew/not perfect.
Chinatown is full of character and contradictions. Chinatown is not perfect; it has a fluctuating style that makes it special.
With this in mind, I named the collection Oblique Counterflect.
THEME(s) BEHIND FEMTAL:
The blend of edge and a classy look achieves the effect of batesian mimicry.
The personality of the dress is very strong, just like the strong background of stories that take place in Chinatown.
The edge of style is more punk like, and the classy look shows the attitudes and attributes that the people hold.
Both blended together show the immigration of the type of people that live there.
Feminine + Fatal = Femtal
Femtal is the main focus of the collection.
The dress and the cape are titled Femtal in the collection of Oblique Counterflect.
Femtal depicts the contrast of what the collection Oblique Counterflect’s inspiration is.
Overall I learned fashion is art, expressive, and can convey a story. Fashion explores.
This prompted a question to arise in my mind:
What if everyone stopped following the “normal” ways of industrial fashion?
What if fashion was used to convey the real, raw stories of people you come across?
We are currently wearing the past with designs that are being picked out for us ahead of time.
Stores are copying each other.
What has happened?
It is a business.
But when seeing Manus X Machina, and seeing true passion and dedication I now appreciate what fashion can be.
When doing this assignment it was energizing and enjoyable. It was incredible to see how all my classmates got something different out of the same Chinatown.
We hear, see, smell, and feel.
So let’s now start to depict our different perceptions through everyday fashion wear: to inspire, appreciate, and understand more.
Very inspiring to see and read about the process from start to finish
Powerful photos, fantastic dress.
It’s hard to believe this is the first piece.
Can’t wait to see more and would wear that skirt everywhere.