Research:
History of shirt:
Already around 925 BC The Hebrew women wore a white linen shirt reaching down to the ground. Among the peoples of the West, the shirt was sometimes used as underwear, sometimes as a dress for women and men. Since the 16th century, it is known in the modern way and is used as a day robe. In the late 19th and early 20th centuries, the button-down high stand-up collar was customary for formal wear. 1863 was invented by the brothers Hönigsberg in Vienna, the semi-rigid shirt collar made of double fabric, which no longer had to be buttoned, but was firmly attached to the shirt. The continuous button placket was introduced to the shirt around 1900 so that the shirt no longer had to be pulled over his head.
Nowadays a distinction is made between the men’s shirt and the woman’s blouse. In men’s shirts, there is the business shirt, which is usually monochrome white or blue or has fine stripes and is worn to suit and tie, and the casual shirt for leisure. The dress includes the dress and dress shirt. The appearance is strictly regulated, such as. White color, reinforced shirt breast and use of cuff and button buttons . From sportswear comes the short-sleeved polo shirt, which is now widely used in casual wear. A fashion emerging in Europe after the Second World War was the Hawaiian shirt. As original work shirts, flannel shirts are still worn as casual wear today. In the military, the field shirt, a jacket-like, robust, longer shirt, is common. It was not until the beginning of the 20th century that the usual buttoned-up shirt began to prevail. Previously, the shirt was slit only about to the chest and had to be pulled over the head when donning. This form of the so-called slip shirt has kept to this day in various traditional areas, such as the fisherman’s shirt, the Austrian and Bavarian costume shirt or the dress shirt.
THE PARTS OF A SHIRT:
Research: The collar:
Basically, there are two categories of collar shapes: turn-down collar and stand-up collar. The stand-up collar is the older form and is a stiff collar that stands upright around the neck. Well-known representative is the Kläppchenkragen, translated in English this means wing tips collar, which is worn only on festive occasions with tailcoat or tuxedo. Another type is so-called mandarin collar, a short stand-up collar on the Chinese model. The turn-down collar consists of the collar web or collar foot and the upper collar, which is folded down when worn. These parts can be cut separately, or cut in one piece. The turn-down collar is the most common type of collar and it comes in many different shapes:Previously, collars were treated with laundry to maintain their shape. In addition one wore shirts with detachable collar. These had the advantage that they could be washed separately because collars pollute faster than the rest of the shirt. In addition, they could also be strengthened easier. Nowadays, cleaning a shirt is not a big hassle, so the collar and shirt are sewn together.Today, the collar insert keeps the shape stable, so that eliminates the awkward strengths. It can be measured in different strengths, such would be “very soft”, “soft”, “medium”, “hard”, “very hard”. Additional collar stays inserted into the collar ends reinforce the wings. These are usually made of plastic and glued into the collar or seldom sewn. High-quality shirts also have removable plastic or metal rods, such as tinplate or brass, depending on customer requirements. In contrast, very noble designs can also be made of horn, mother of pearl, fine wood, silver or fossil mammoth ivory. The collar sticks are removed before washing. So the collar tips are spared and the collar sticks are not lost inside the washing machine. They are usually used again after ironing. The cuffs The cuff is a hand-wide strip of fabric that forms the sleeve end. In addition to the collar, she is one of the most stressed components of the shirt and is reinforced by inserts. It encloses the wrist and can be closed with buttons.Nowaday shirts have two basic forms: the simple and the double cuff. The most common is the sports cuff, a single cuff with attached button. Off-the-peg shirts often have two adjacent buttons so that the wearer can adjust the width to his wrist. Occasionally sport cuffs also have two superimposed buttons that are closed at the same time.Another variant of the simple cuff is the combination cuff. This has a sewed button and opposite buttonholes, so that they can be closed with cufflinks.While single cuffs only get their stiffness through the inserts, double cuffs are handled. The envelope cuff (also Umlegemanschette or French cuff) is twice as long and is folded back once before the button. Cufflinks are used to close.The Neapolitan cuff is a double cuff with two sewed buttons on top of each other. However, the folded part is not completely around the cuff, but leaves the buttons free.Moreover, Dress shirts have simple cuffs without sewed buttons and must be closed with cufflinks.
Research: Yoke/Saddle
The saddle or also referred to as English yoke:
The saddle is the fabric part set in the upper part of the back. It can be executed in one or two parts with a middle seam. In part, it is believed that the two-piece saddle allows a more fuel-efficient cut and the additional seam offers advantages when fitting a tailored shirt. Back part of the shirt The back piece can be fitted smoothly to the saddle or with folds to allow a little more flexibility. Common are two gussets which lie over the shoulder blades or a middle fold, which can be designed as a crease or box pleate.. In a figure-hugging shirt in addition to a side seaming waistline in the lower back part additionally vertical darts attached, so that the shirt fits snugly
Research: Shirt Hem :
The bottom edge of the shirt closes with a narrow hem, with the seam line rounded to the side seam or with a side slit.
Research: button tape :
There is a great variety of button strips, possible are smooth strip, attached strip, concealed strip etc.In a men’s shirt, the buttonholes on the left front part are attached.
Research: Sleeve:
The sleeve is the part of the shirt that covers the arm. It is possible as a short or long version. Short sleeves go up to about half of the upper arm and end with a hem. The long-sleeved shirt reaches from the shoulder to the wrist and ends with the cuff. breast pocketsOften shirts have one or two breast pockets. These can be completely open or closed with buttoned flaps. Occasionally, the flap is not completely sewn through, but a small slit is left open, through which you can put a pin or glasses without opening the flap. Some shirts do without the chest pocket. The shirt pocket was only enforced after the vest was abandoned as an everyday garment.
Research: epaulettes:
Uniform shirts often have epaulettes with rank insignia attached. They have also found their way into civilian fashion as a fashionable detail.
The next step was to come up with a concept Idea for my shirt:
Concept:
I was inspired by the very classic model of the mens shirt, partly because I grew up with my father wearing it to work. However especially because this classic version of the shirt is so well known to so many, I thought it would be interesting to alter the state of the shirt in a way that many body types could be able to wear it. I did this by creating panels of string along the shirt so that due to knotting the shirt would not only fit a great variety of body types but would further be customizable to your needs via the knotting, tight or loose. Also I thought it would be interesting to take the mens shirt as a base as it is androgynous which I enjoy and this way it is convenient for both genders to wear it and not as strong at the waist so that both genders as well as a great variety of thin or thick body types can costomize the shirt through the knots.
This was the original inspiration image of my dad

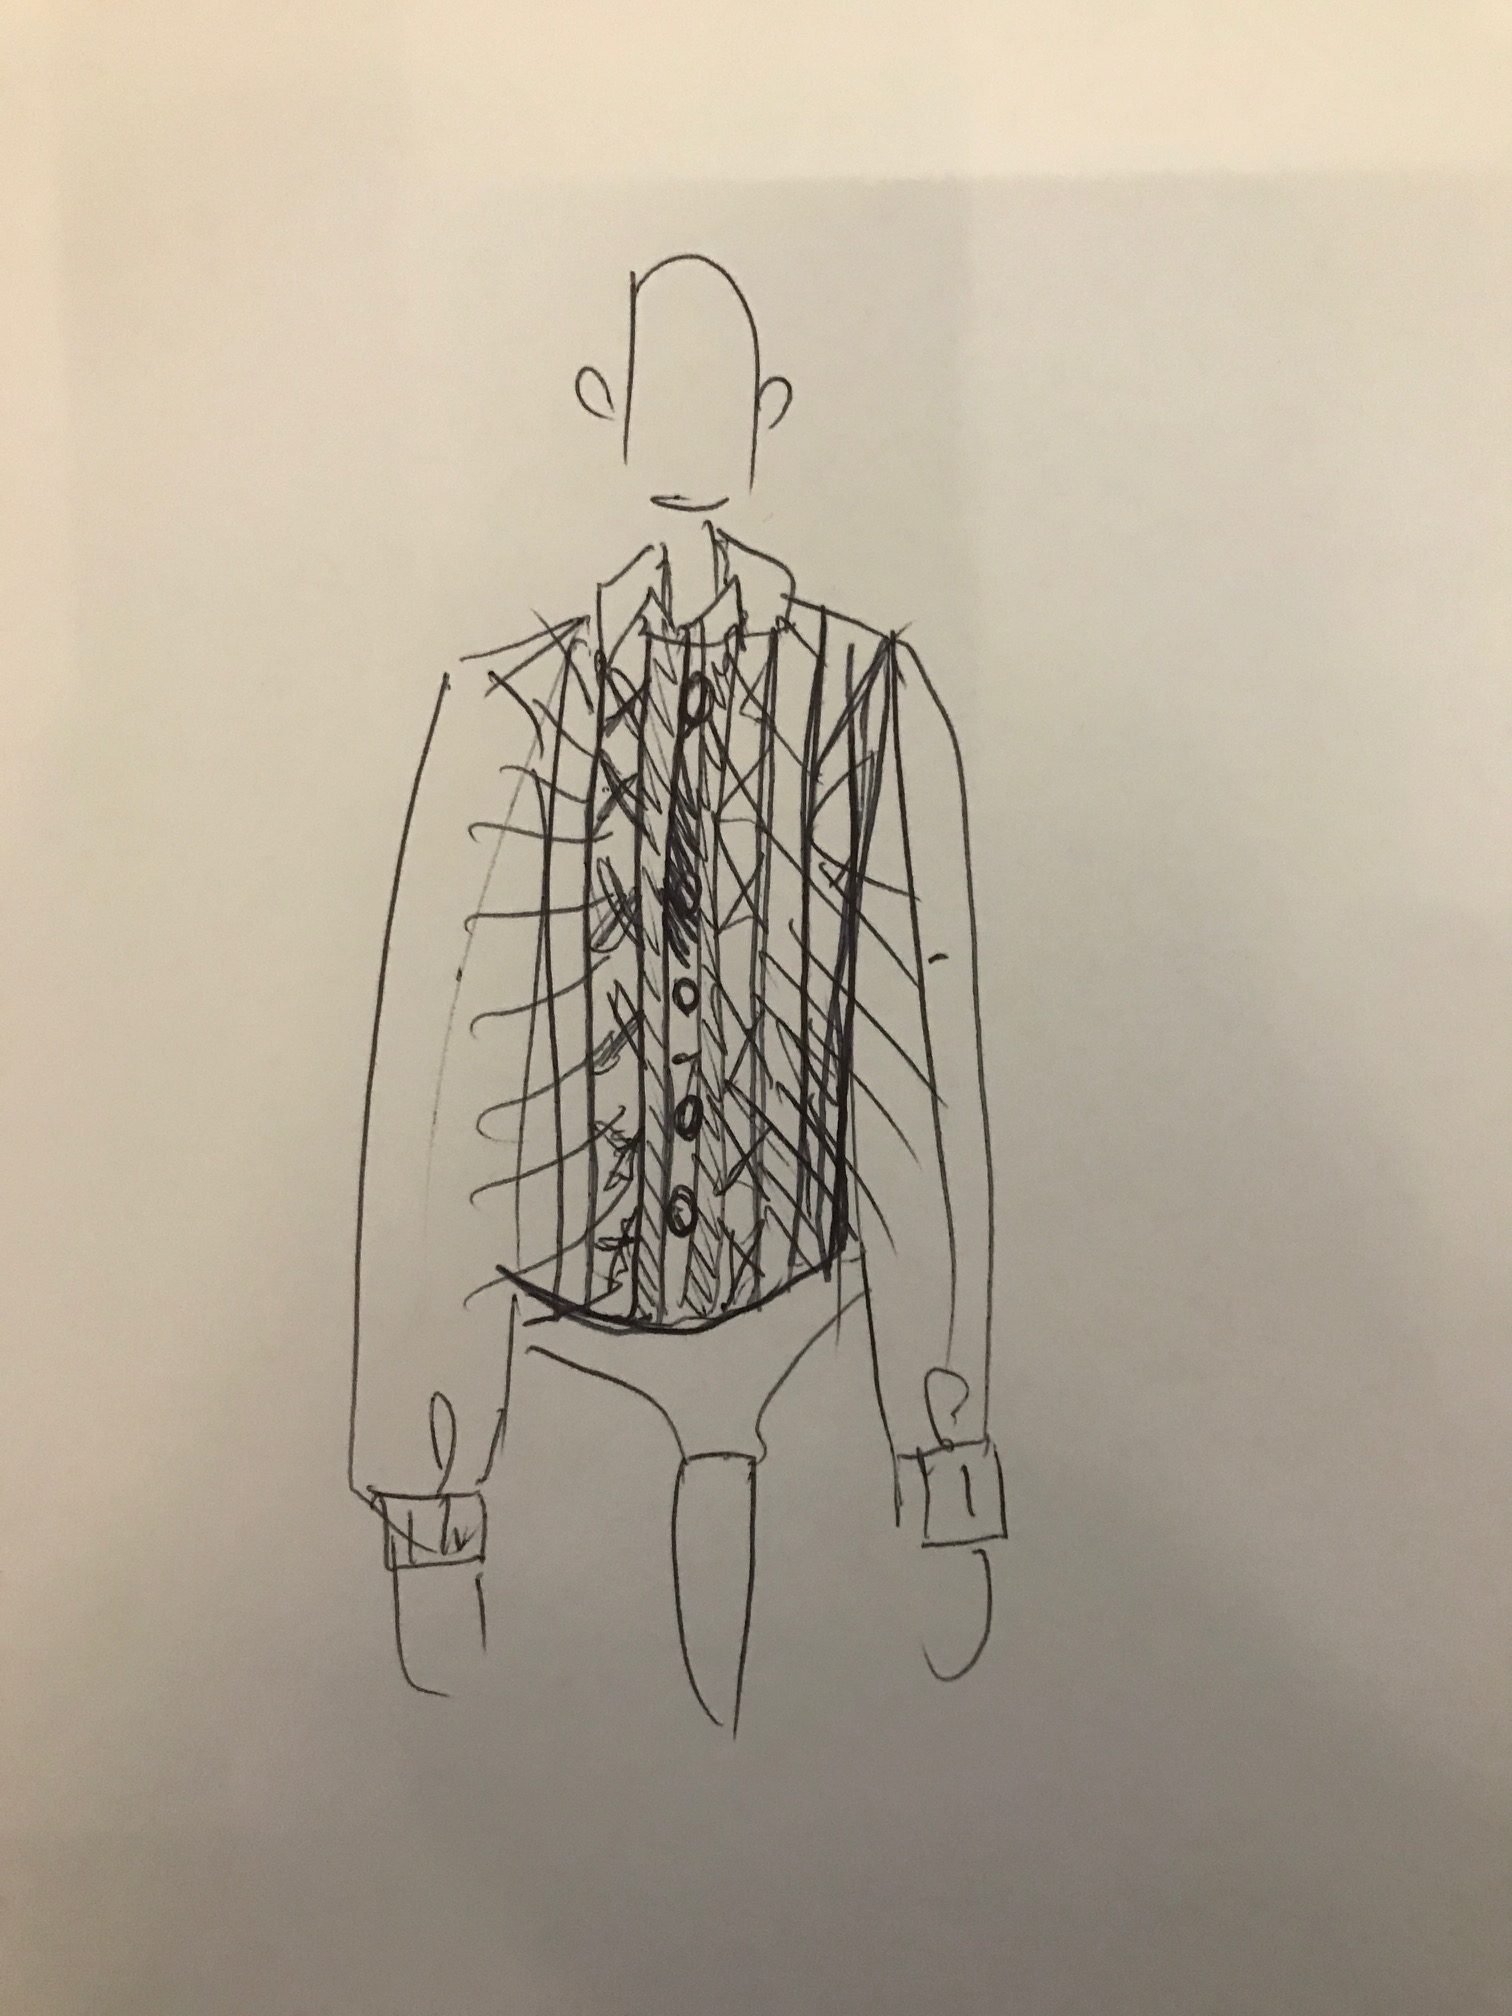
MY designs: (process)
I started refining my design idea and drew out sketches that i felt could be interesting to explore design wise –

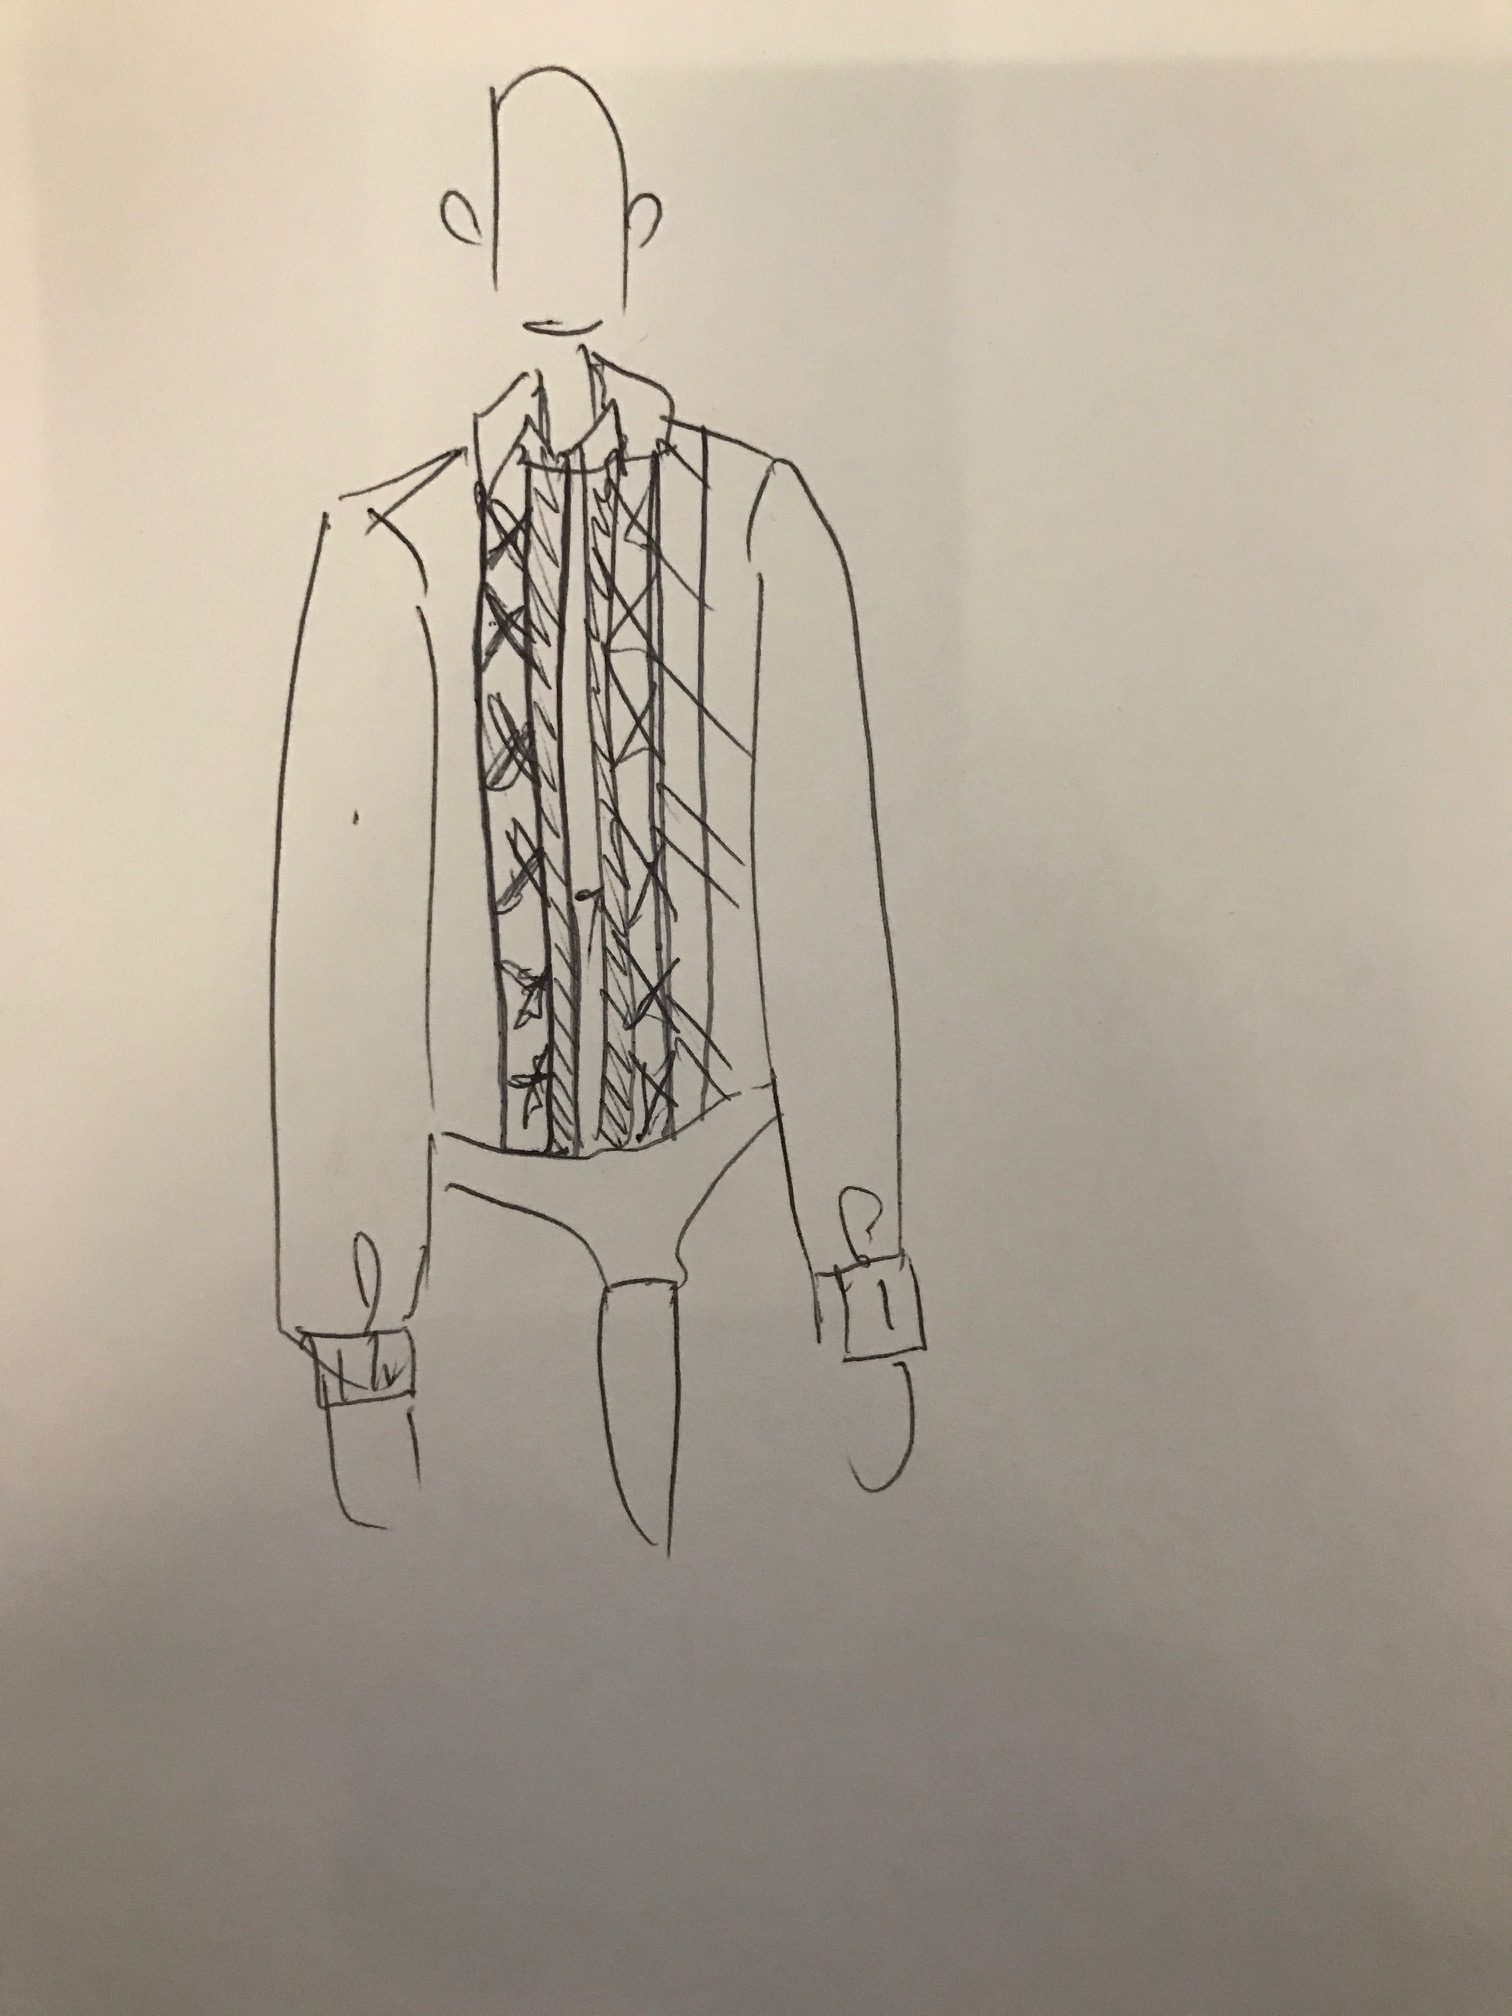


I ended up using this design in which i created panels upon the shirst with pieces of string so that one could costomize the size of the shirt
Prototype:
having crafted my pattern I utilized it to create my first prototype formed out of muselin . The main objective was to try out a way in which I could create the knotts in a visual pleasing yet usable way, so I formed this muselin. Within the prototype, when trying if the knotting technique would work and happily it did, I did not end up being pleases with the outcome visually of the strings comming straight out of the blouse so I created panels instead for the real fabric creation shirt for a cleaner look.


I then started my making process.
Making process:
First step was to cut out the bodice parts back and front of the shirt out of my material. I used soft white 100% thin cotton material as a fabric (classic shirt material used for tailoring often used for mens shirt )

I then assembled the bodice and executed this by sewing it together as well as started to cut the remaining items out my such as cuffs, sleeves, collar, panels, etc. and also started the process of assembling these so that I could continue to assemble the full shirt successfully.
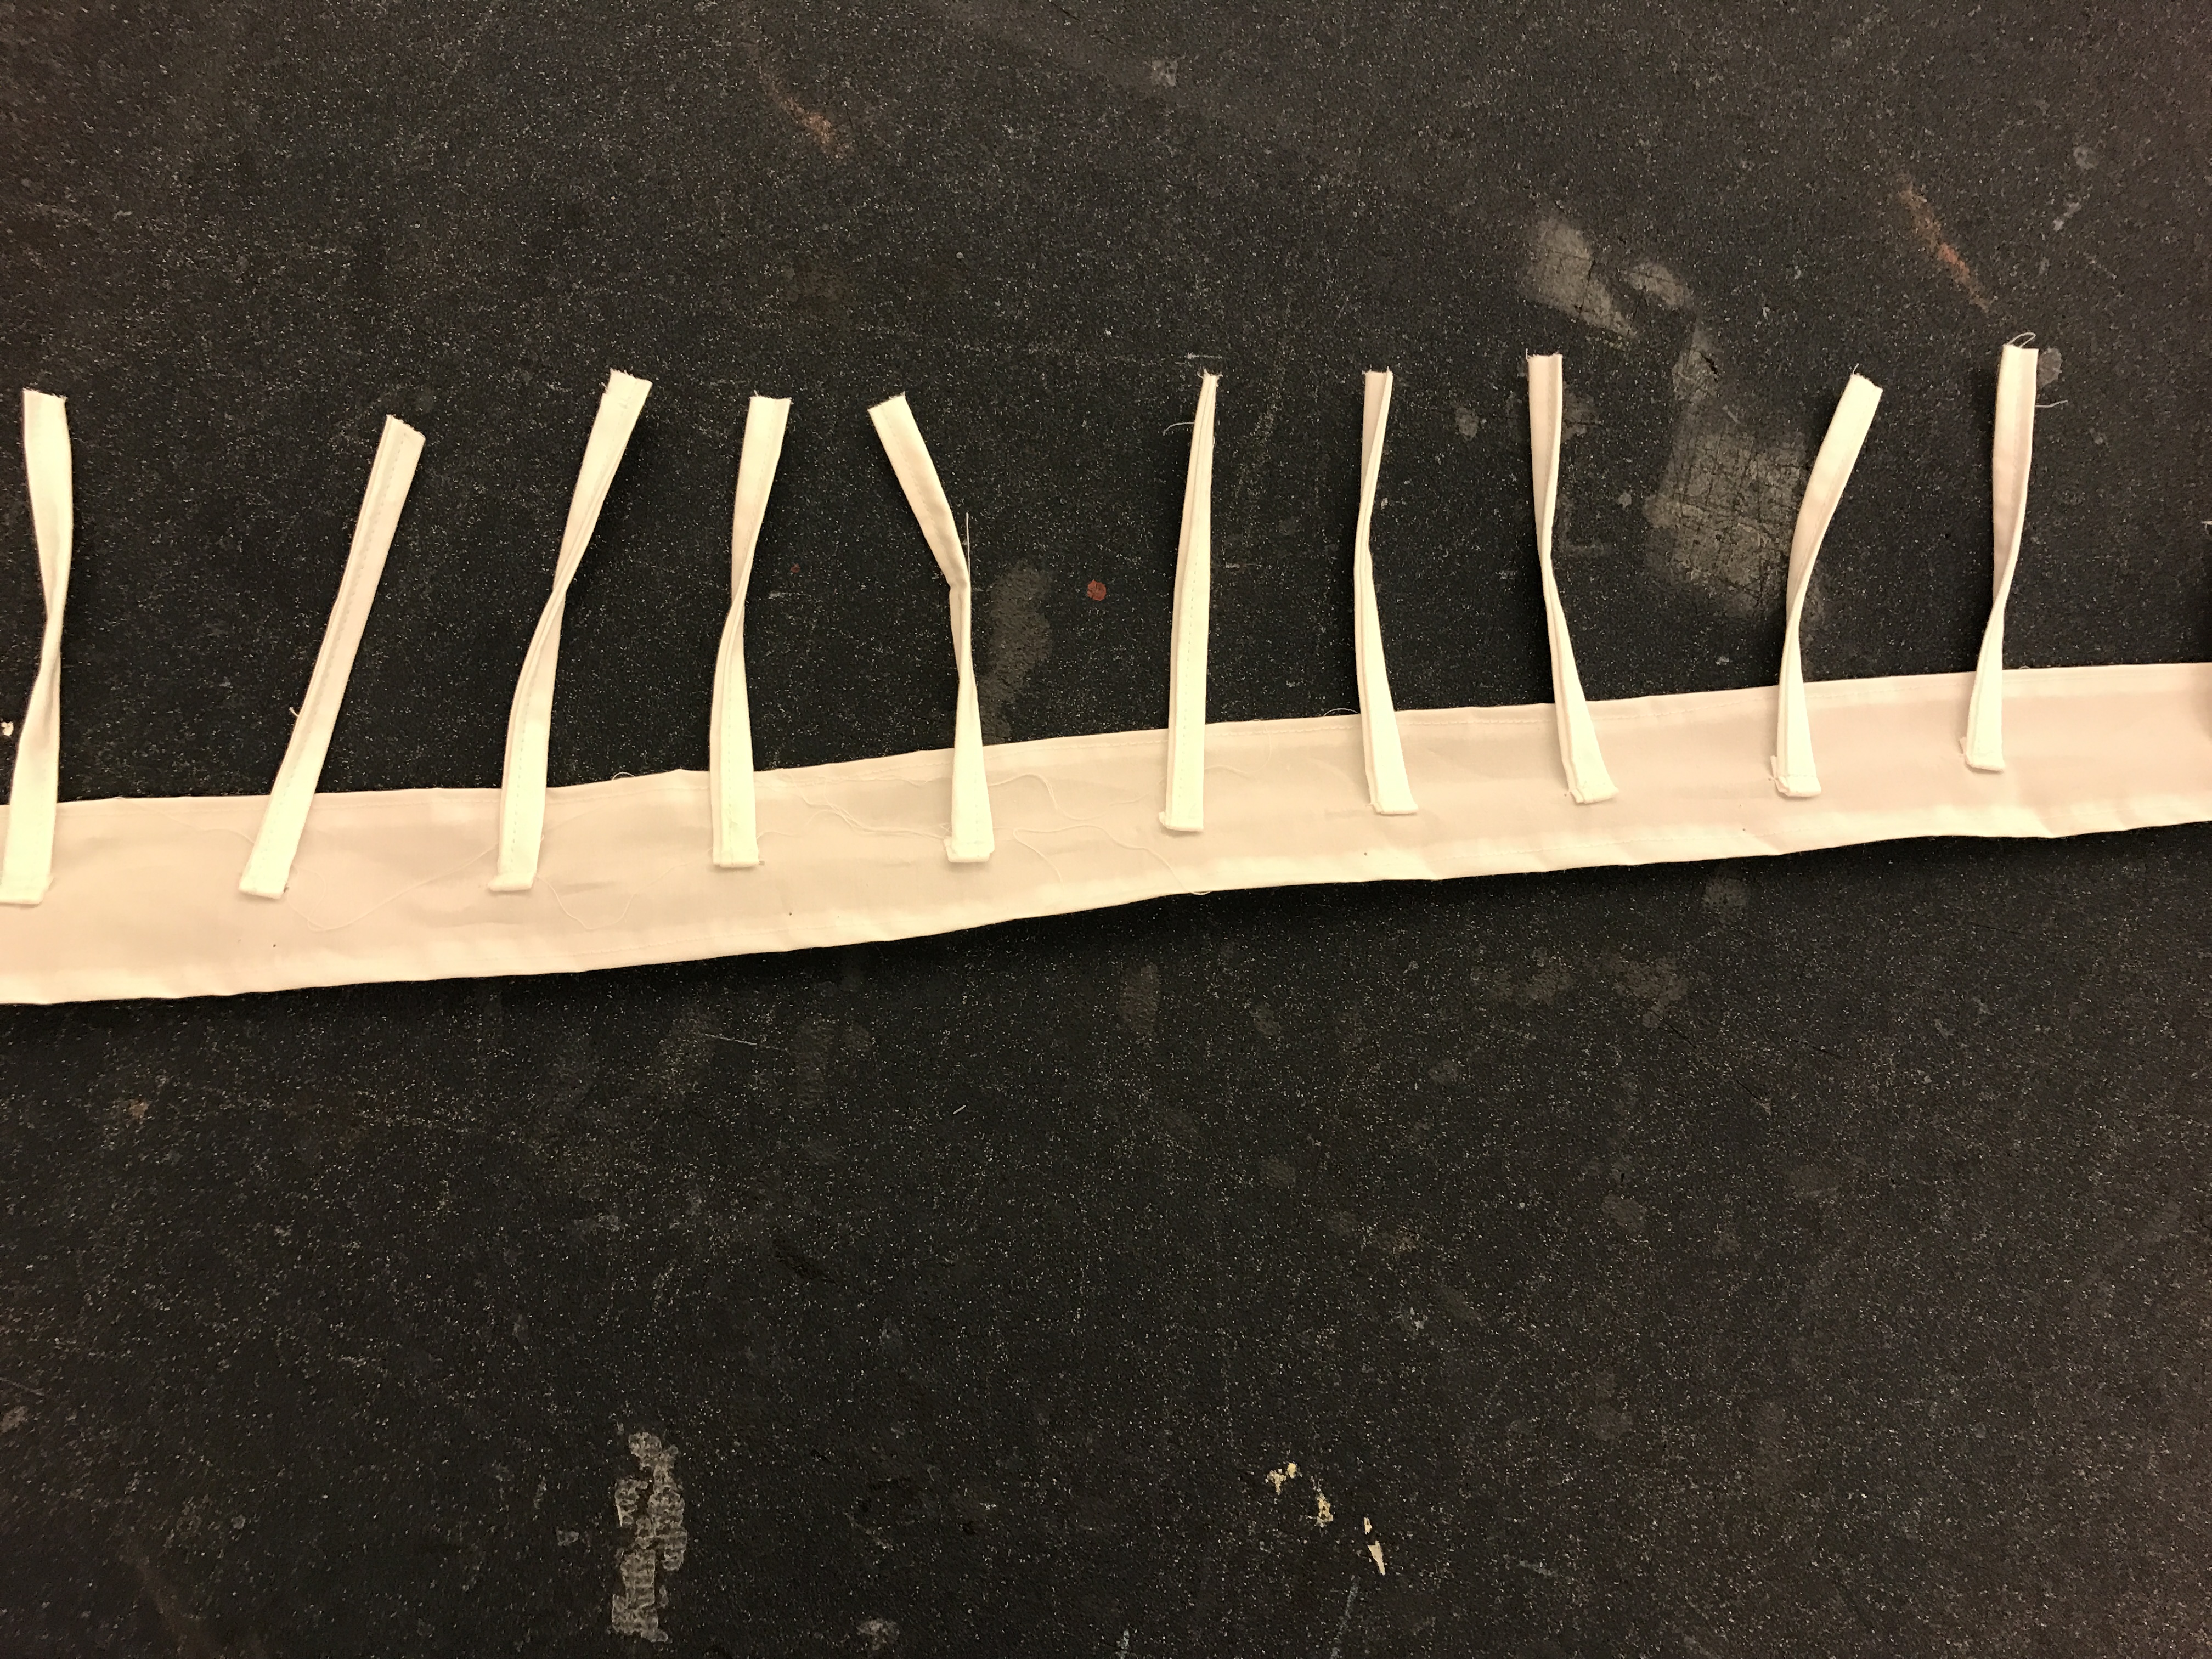
I then started fashioning the panels of my knotting. In order to do so, to create a visually pleasing outcome, I cut long thin tubes which I then turned inside out. Next I would stitch along their side to create a clean finished look. This is how I made the “string” knotting parts. I then started to create the collar, by cutting it out and then assembled the pieces, also ironing in a softer iron on interfacinf inside, so tht the collar would be supported. I especially made aure that the corners of the collar were as pointed as possible as I wanted the shirt to look clean and the pointed detail went well with the pointed strings for a harmonious overall appearance of the shirt. I then placed the collar and sewed it into place. I then places the string panels onto a separate panel, sewing each on separate as I did in the prototype then placing it onto the shirt for greater texture and a more clean finished look. I continued this process until the entire shirt was “knottable”. Makimg sure all panels were clean finished. Once I had done that I set in the sleeve with the cuff.


Next I added button holes in the front panel and on the cuff, and lso hand stitched on the buttons to close the shirt. I chose to use small buttons so they would not distract drom the strinks amd knots of the overall design so it looks minimalist but still visually interesting and would work visually successfully.

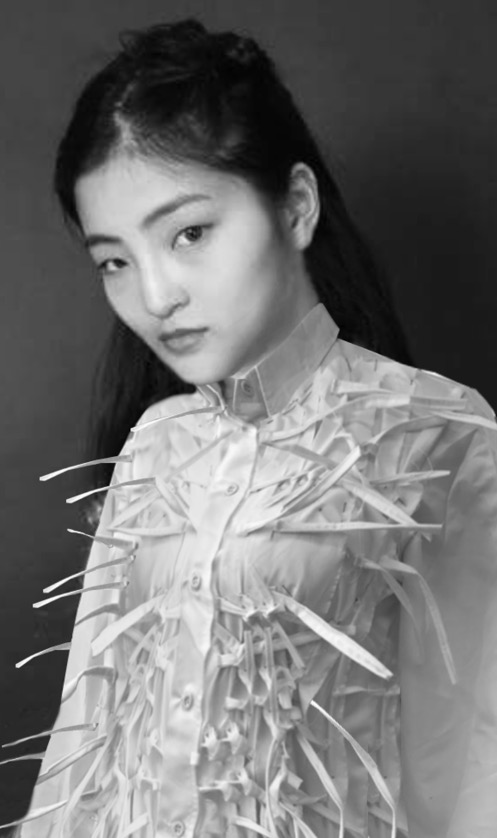
Finished shirt:
The finished shirt was ended up looking fabulous and I was very pleased as it truly knotted well costumized around the body shapes. I actually liked it so much that I ended up creating a phototahoot with my friend to capture the shirt on her .
Finished fotoshoot with shirt